
On this page
Your Class 10 science book asks you to watch yeast reproduce, and it takes one afternoon. The method is Activity 7.1 in NCERT's Chapter 7, How do Organisms Reproduce?. Here is how to set it up, what a bud looks like, and what to do when your slide shows nothing.
What do you need to observe budding in yeast?
Dry baker's yeast granules (a pinch is enough)
Sugar, clean water, a measuring cylinder and a test tube
Cotton for a plug
A glass slide, a coverslip and a dropper
A compound microscope with a high-power objective
The yeast in a kitchen packet is Saccharomyces cerevisiae: the US National Library of Medicine's MeSH entry for Saccharomyces cerevisiae describes it as the species "known as baker's or brewer's yeast".
How do you prepare the yeast culture and the slide?
These steps follow NCERT Activity 7.1.
Dissolve about 10 g of sugar in 100 mL of water.
Pour 20 mL of this solution into a test tube and add a pinch of yeast granules.
Put a cotton plug in the mouth of the tube and keep it in a warm place.
After 1 or 2 hours, put a small drop of the culture on a slide.
Cover the drop with a coverslip and observe it under the microscope.
Lower the coverslip at an angle from one edge so it pushes air out instead of trapping it. Find the edge of the drop at low power, centre it, then switch to high power.
What does a yeast bud look like under the microscope?
Expect small cells. A typical diploid Saccharomyces cerevisiae cell is an ellipsoid about 5 × 6 µm, according to BioNumbers, which cites Mortimer's 1958 measurements and notes that sizes vary with strain and growth phase. That is why you need the high-power objective.
Look at each group of cells and sort it:
One oval cell on its own: a cell that has not budded yet, or one that has just let go of its bud.
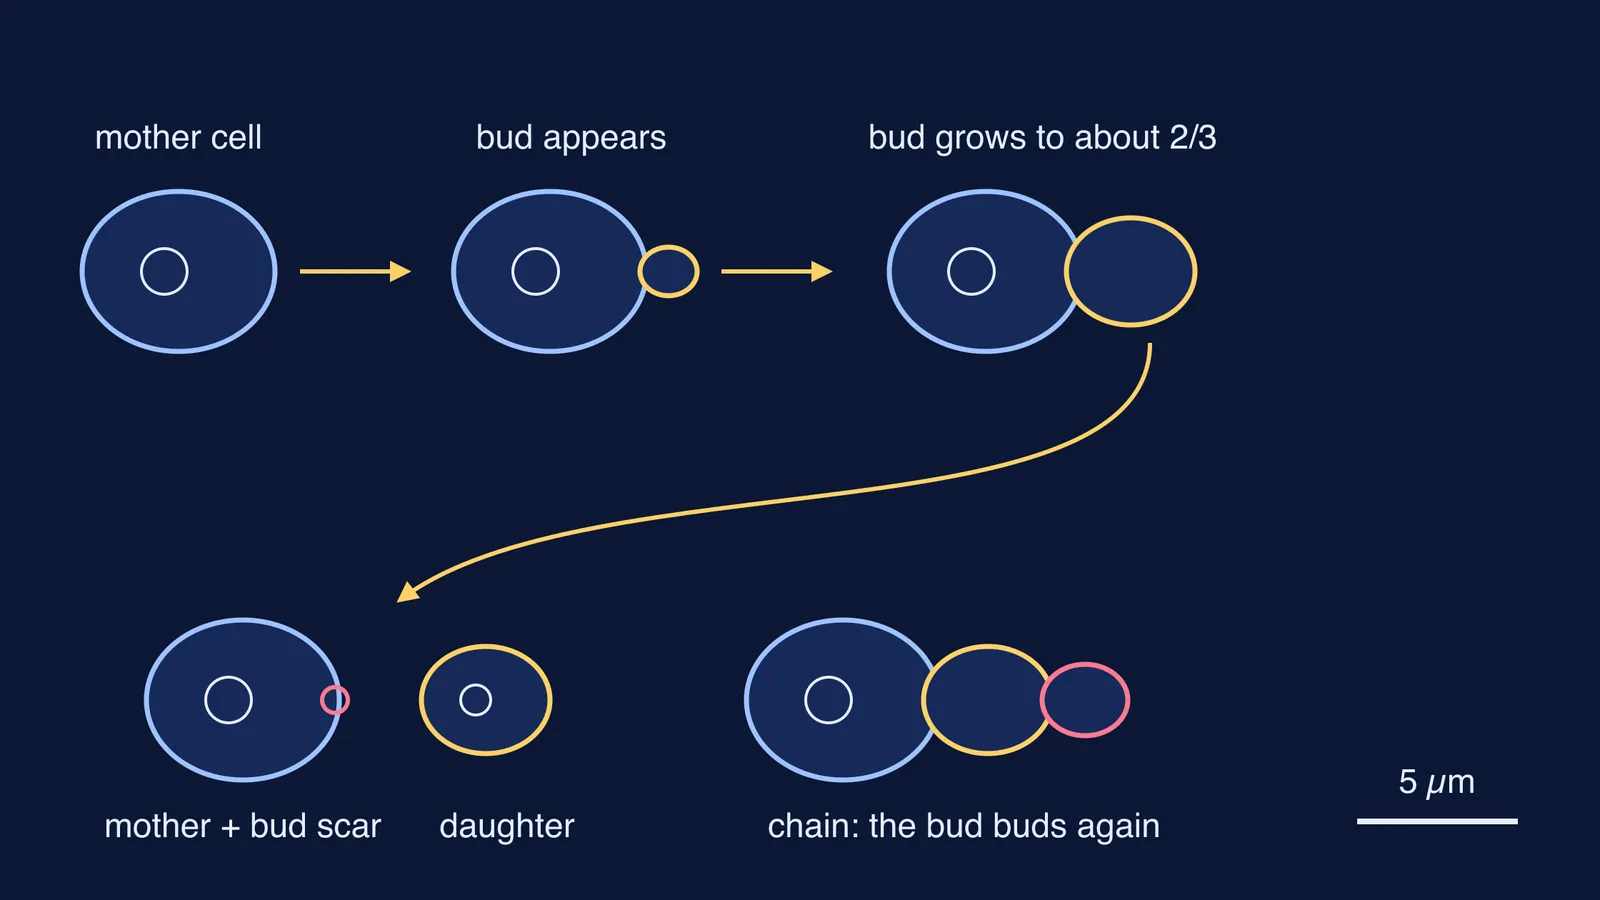
A small bump on one side of a cell: a new bud. NCERT describes yeast as putting out "small buds that separate and grow further".
A large cell with a smaller one attached: a bud close to leaving.
Three or more cells in a short row or cluster: a chain, most likely a bud that began a bud of its own before separating.
The pairs look lopsided for a reason. Budding in S. cerevisiae is asymmetrical, and the bud grows to approximately two-thirds of the mother cell's size before separating, as the University of Kent's notes on yeast cell division explain. The same notes say separation leaves a bud scar on the mother's wall; the scars in their example were photographed with a scanning electron microscope, not a light microscope.
Long, thin cells joined end to end are something else. Gimeno and colleagues (Cell, 1992)90079-R) found that diploid S. cerevisiae strains starved of nitrogen become long and thin and form pseudohyphae. If your chain is made of round or oval cells, you are looking at ordinary budding.
Why can't I see any buds on my slide?
Check these first:
Nothing in view: you are probably focused outside the drop. Go back to low power and find its edge.
Very few cells: yeast settles. Flick the test tube gently before you take the drop.
Cells but no buds: the culture may be too young or too cold. Give it the full time NCERT's Activity 7.1 gives, 1 or 2 hours, somewhere warm.
Cells piled on top of each other: the drop is too thick. Dilute it with a drop of the sugar solution.
Cells too faint to see: close the microscope's diaphragm a little for more contrast, or add a stain; our guide to which stain goes with which biology slide covers the common ones.
How do you write up the yeast budding practical?
A worked record entry you can adapt:
Aim: To observe budding in yeast.
Procedure: The five steps above, in your own words.
Observation: Oval yeast cells were seen. Several carried a smaller bud on one side, and a few groups of three cells were joined in a short chain.
Diagram: A free cell, a mother cell with a smaller bud, and a chain, labelled mother cell, bud and daughter cell.
Result: Yeast reproduces asexually by budding.
Precautions: See how to write precautions and sources of error in practicals.
To compare budding with fission and sexual reproduction, keep sexual and asexual reproduction side by side next to your record. If the line between budding, fission and fragmentation is still fuzzy, the Fermi Concept Library gives every concept in biology its own lesson and its place in the map. For practice questions, the Fermi Problem Library has worked problems with a step-by-step solver that explains the reasoning rather than printing an answer.
Set up the tube before lunch and you can be drawing buds by the afternoon.