
On this page
Writing β = λD/d from memory is the easy part. The harder part is saying, before looking, what happens to the pattern when the slits move closer together. A double slit simulation is the quickest way to close that gap, but only if you predict first and measure second.
What is the fringe width formula in Young's double slit experiment?
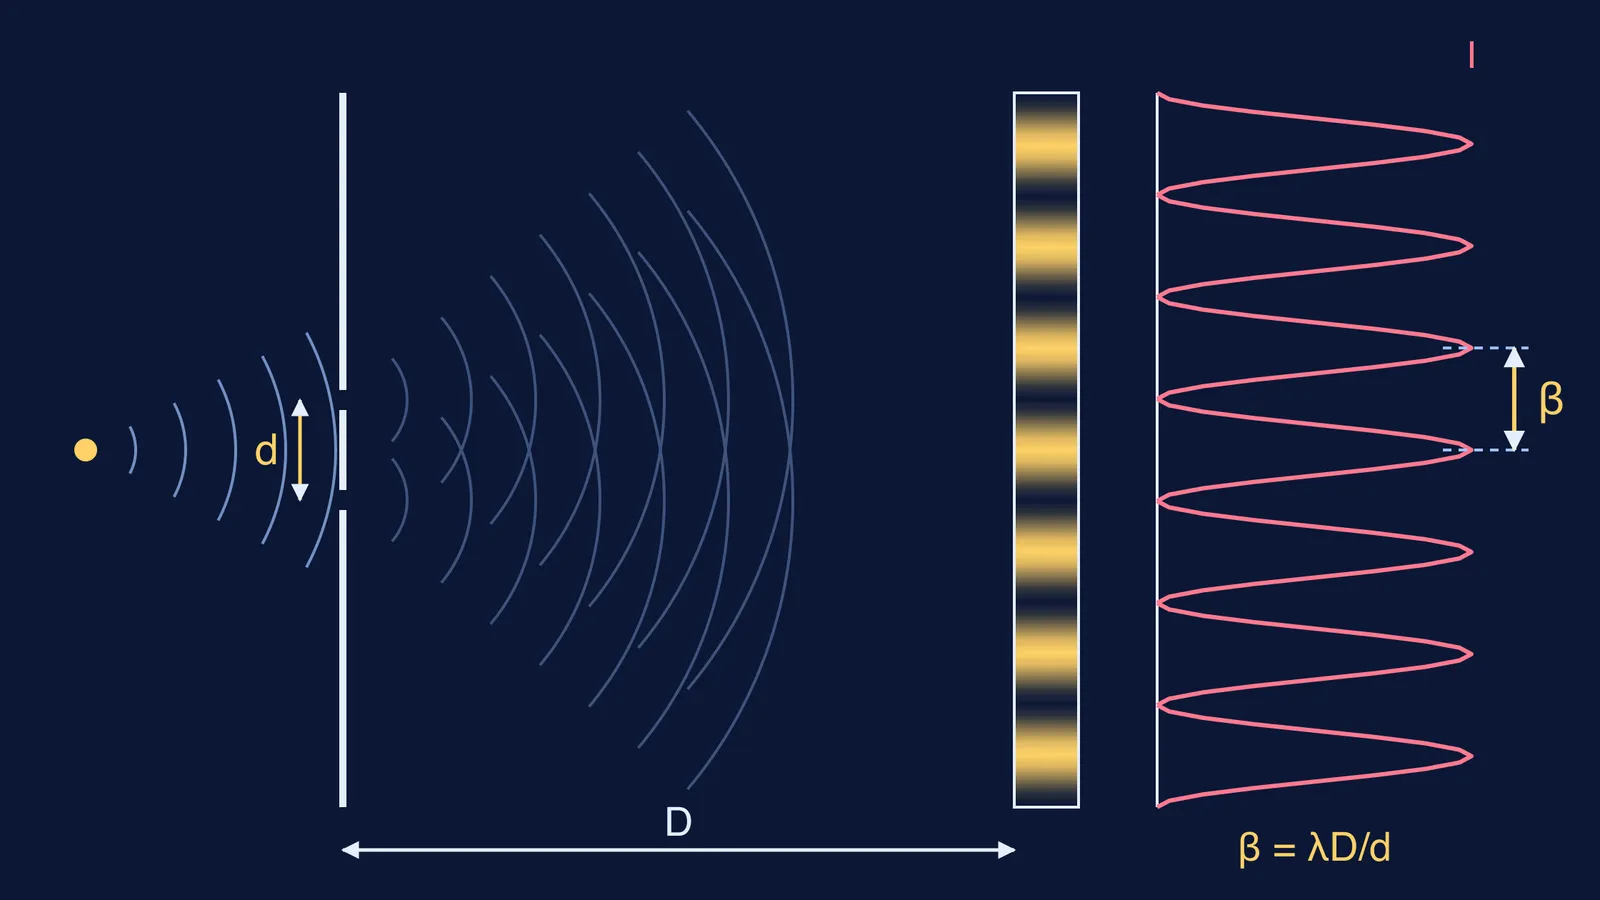
In NCERT's Class 12 Wave Optics chapter, bright fringes appear at x = nλD/d (equation 10.13), where d is the distance between the slits, D is the distance from the slits to the screen and λ is the wavelength. Subtract the position of one bright fringe from the next and you get the fringe width: β = λD/d. The same chapter notes that bright and dark fringes are equally spaced, so one β describes the whole central pattern.
The formula assumes, as the chapter states, that the distances to the screen are much greater than d. HyperPhysics adds that the small-angle approximation is usually accurate enough for laboratory work.
NCERT's own computer-generated pattern (Figure 10.13) uses d = 0.025 mm, D = 5 cm and λ = 5 × 10⁻⁵ cm, and the fringe width comes out at about 1 mm. Check your units on it: (5 × 10⁻⁷ m × 0.05 m) ÷ (2.5 × 10⁻⁵ m) = 1 × 10⁻³ m, or 1 mm.
How do slit gap, screen distance and wavelength change the fringes?
Read the formula as three predictions you can test:
Wavelength λ: β is proportional to λ. Longer wavelength, wider fringes. The NCERT chapter gives yellow light as about 0.6 μm, so red light spreads more and blue light less.
Screen distance D: β is proportional to D. Move the screen twice as far and the fringes double in width.
Slit separation d: β is inversely proportional to d. Bring the slits closer and the fringes spread out.
Notice what is missing: the width of each slit. That controls how bright the pattern is and how many fringes you see, through single-slit diffraction, which you can explore in our single slit diffraction simulation guide.
A worked example you can run in any simulation
Set a baseline: λ = 600 nm, D = 1.0 m, d = 0.30 mm. Convert to metres first, then β = (600 × 10⁻⁹ × 1.0) ÷ (0.30 × 10⁻³) = 2.0 × 10⁻³ m, or 2.0 mm. Write each prediction down before you touch the slider; the HyperPhysics double-slit calculator gives a second check.
Baseline as above. Predict 2.0 mm.
Double the screen distance to D = 2.0 m. Predict 4.0 mm.
Back to D = 1.0 m, double the gap to d = 0.60 mm. Predict 1.0 mm.
Back to d = 0.30 mm, switch to blue light, λ = 450 nm. Predict 1.5 mm.
Combined: λ = 450 nm, D = 2.0 m, d = 0.15 mm. Predict 6.0 mm.
Step 5 is the real test. If you can get 6.0 mm in your head (blue light shrinks β by a quarter, then doubling D and halving d each double it), the ratios have stuck.
How do you measure fringe width accurately on a simulated screen?
Find the centre of the central bright fringe and use it as your zero.
Count ten bright fringes along the screen and note the position of the tenth one.
Divide that distance by 10. Measuring many fringes and dividing spreads out your reading error.
Work out the gap: (measured − predicted) ÷ predicted × 100.
Record λ, D, d, predicted β, measured β and the gap in one line per run.
If the simulation has a ruler or detector tool, use it. If it only shows an intensity graph, measure from peak to peak.
What if your measurement does not match the prediction?
Work through these in order:
Units. Millimetres for d and metres for D is an easy slip to make. A thousand-fold error is a units error, not a physics one.
Counting. Ten fringes means ten gaps, starting from zero. If you count eleven bright bands, divide by ten, the number of gaps between them.
Geometry. If D is not much larger than d, or you are measuring far from the centre, the small-angle formula starts to drift.
Medium. If the simulation lets you fill the space with water, the wavelength inside changes, and so does β, as our post on fringe width in water works through.
A surprising result is worth chasing. The Fermi Simulation Lab has interactive simulations for ideas that are easier to see than to read, and Fermi's AI tutor can run the simulation with you and check your understanding as it goes, so you can ask why the fringes moved instead of just noting that they did.
Once the predictions feel automatic, try them on paper with these Young's double slit practice problems.