
On this page
In June 1859, Pieter Rijke, a physics professor at Leiden University, published a short note in the Philosophical Magazine on a new way to make the air in an open tube vibrate. He heated a wire gauze inside a tube red-hot, took the flame away and heard a loud, steady note: no reed, no speaker, just heat and moving air.
What did Pieter Rijke discover in 1859?
According to the Rijke tube overview on Wikipedia, his glass tube was about 0.8 m long and 3.5 cm wide, with the gauze about 20 cm from one end. The sound lasted until the gauze cooled, about 10 seconds.
A 2022 review of the Rijke tube on arXiv records that the sound was absent when the tube was laid horizontally or when the gauze sat in the upper half. He concluded that the upward flow of air from natural convection was needed. The full explanation came from Lord Rayleigh, in an 1878 paper in Nature.
Why does a Rijke tube make sound when heated?
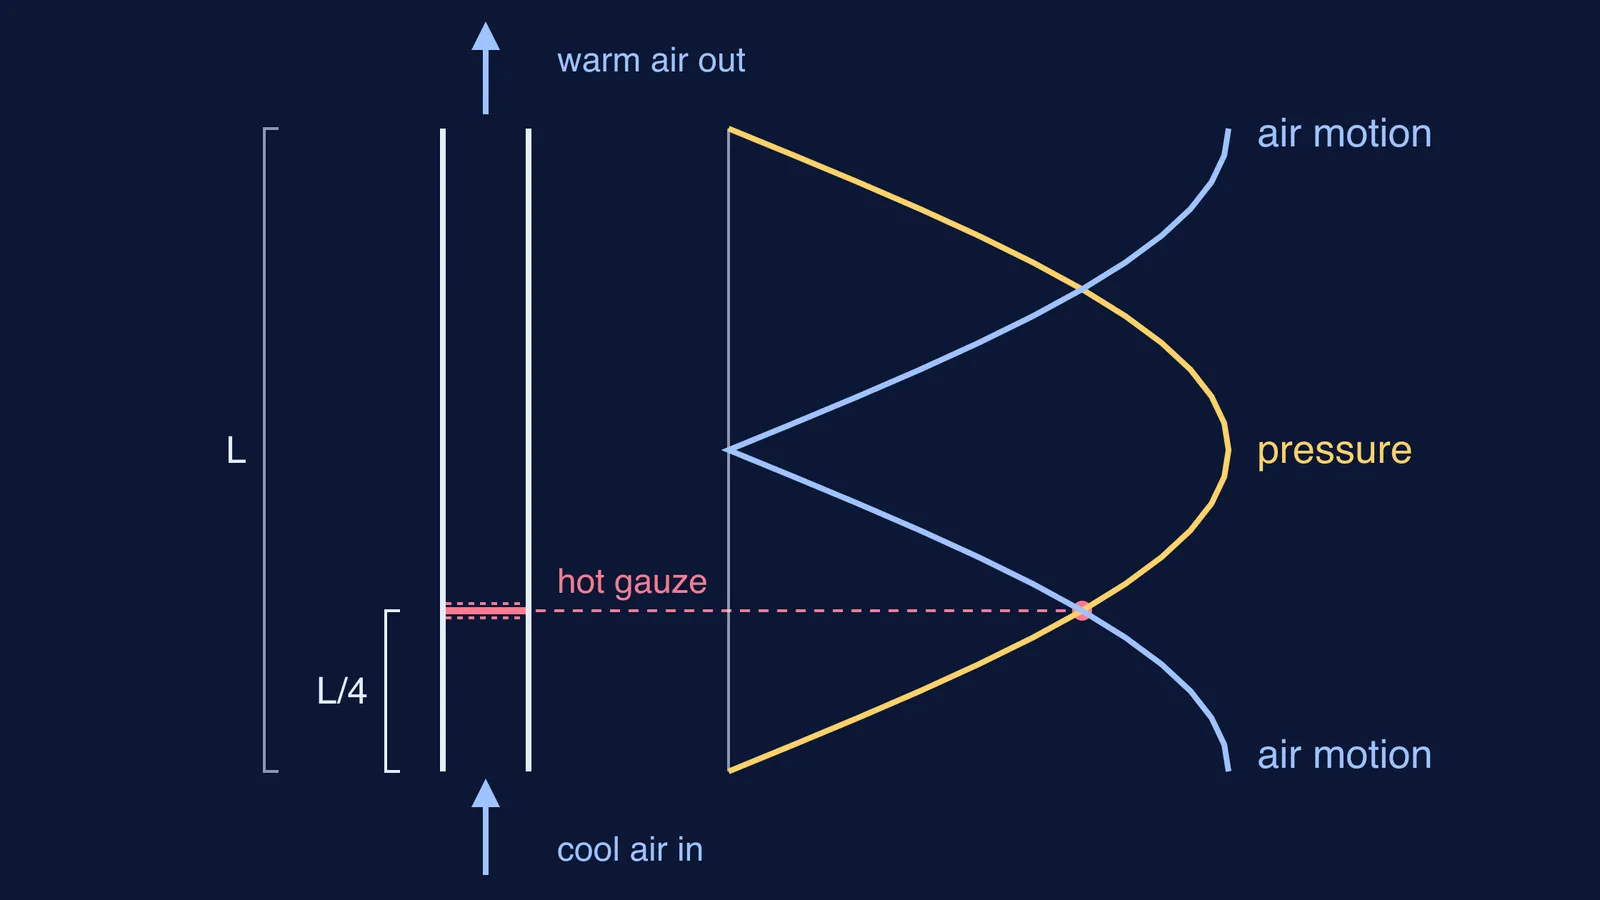
A tube open at both ends has its own note: its lowest standing wave has a wavelength about twice the tube's length (Rijke tube overview). In that wave the air moves most at the two open ends, while the pressure swings most in the middle. The question is what keeps feeding it.
The air at the gauze drifts steadily upwards, because warm air rises, and on top of that drift it moves up and down with the sound wave. Rayleigh's rule, as the arXiv review states it: adding heat at the point of highest compression, or removing it at the point of greatest expansion, promotes the sound.
In the lower half of the tube, the timing works out like this:
When the wave moves air upwards, towards the middle of the tube, the pressure at the gauze is rising. Fresh cool air from below reaches the hot wires, takes in heat and expands, adding to that rise.
When the wave moves air back down, the air passing the gauze is already hot, so little heat changes hands.
Each cycle the gauze gives the wave a small push in step with it, like pushing a swing at the right moment. When the pushes outweigh the losses, the note grows loud.
Why must the gauze sit a quarter of the way up?
Heat transfer is strongest where the air moves most, near the ends; the pressure effect is strongest in the middle. The Rijke tube overview says placing the gauze midway between the two, a quarter of the way up from the bottom, comes close to the best spot. There, both the air movement and the pressure swing are sin 45 degrees, about 0.71 of their largest values.
In the upper half the timing flips: cool air reaches the gauze just before the pressure minimum, so the heat works against the wave. On its side, the tube has no convection current carrying cool air in. The UCLA physics demonstration notes describe exactly this: tip the tube horizontal and the roar stops.
How do you work out the note a Rijke tube plays?
Since the wavelength is about 2L, the frequency is roughly f = v / 2L.
Take L = 0.8 m, like Rijke's: wavelength about 1.6 m.
The speed of sound in dry air at 20 degrees Celsius is about 344 m/s (HyperPhysics).
So f is about 344 / 1.6, roughly 215 Hz.
Treat this as an estimate: sound travels faster in warmer air (HyperPhysics), so the hot air above the gauze nudges the note up. The larger metal tubes in the UCLA demonstration roar at about 100 Hz: longer tube, lower note. Revise nodes with standing waves in strings and pipes, or see August Kundt's tube and the speed of sound.
Where does this matter beyond the classroom?
The same heat-sound coupling can shake real machines: the arXiv review notes that the Rijke tube is studied to understand thermoacoustic instabilities in gas turbines and rocket engines.
How can a teacher run a Rijke tube demo safely?
With a flame and red-hot metal, this is a teacher-led demo, not a student practical. The UCLA procedure: heat the gauze red-hot with a Meker burner, hold the tube vertically over it, then lift it away and listen. First, check:
Use a metal tube, or borosilicate glass if students need to see the gauze. The Rijke tube overview calls metal the safer choice.
Fix the gauze firmly at the quarter point so it cannot slip out when hot.
Clear the bench of paper and solvents; keep a fire blanket or extinguisher within reach.
Wear goggles and heat-resistant gloves; hold the tube with a clamp or tongs.
Keep students back, and never point the top of the tube at anyone.
Let everything cool fully on a heat-proof mat before anyone touches it.
If standing waves in pipes are hard to picture, the Fermi Simulation Lab has interactive simulations for ideas that are easier to see than to read.