
On this page
You close the screw gauge before a practical, and the circular scale zero is a few divisions off the reference line. Is the error positive or negative, and does the correction go up or down? Get either wrong and every reading shifts by the same amount.
What is zero error in a screw gauge?
NCERT's Class 11 Physics Laboratory Manual (Experiment 2) defines it simply: when the end of the screw and the stud touch, the linear scale and circular scale should both read zero, and if they do not, the gauge has a zero error.
The size of the error is counted in circular scale divisions and multiplied by the least count. The same manual gives least count = pitch ÷ number of circular scale divisions, so a gauge with a 1 mm pitch and 100 divisions has a least count of 0.01 mm, and so does one with a 0.5 mm pitch and 50 divisions.
If the readings themselves feel shaky, start with reading a vernier calliper and screw gauge, with zero error, then come back for the sign question.
Is the circular scale zero above or below the reference line?
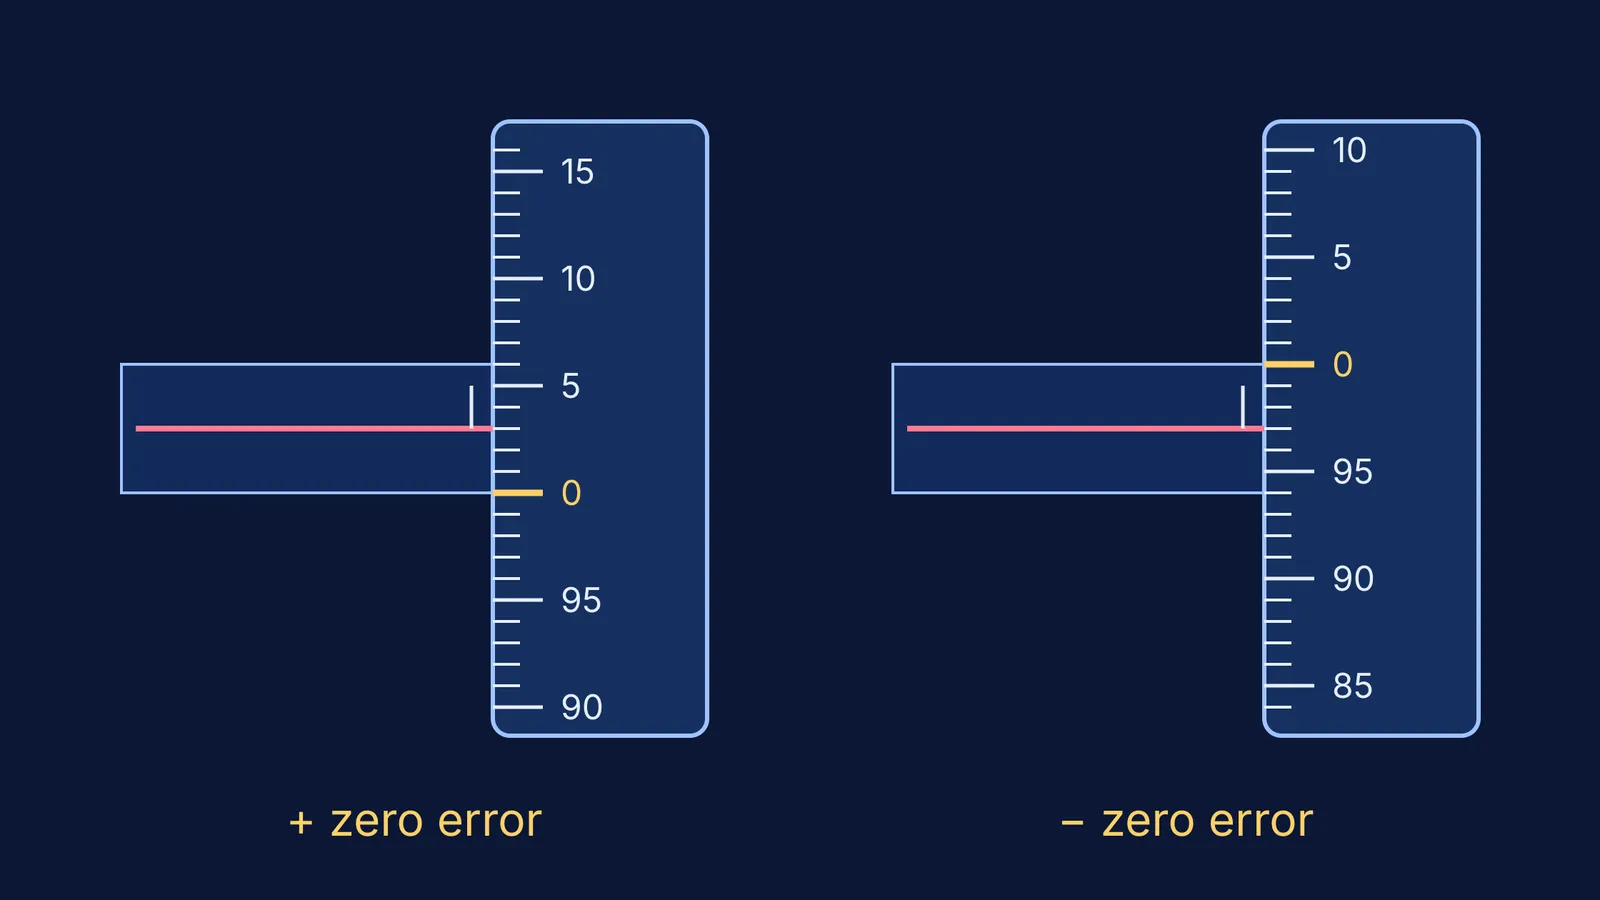
In NCERT's figure of a gauge with no zero error (Fig. E2.3), the circular scale numbers rise as you look upward past the reference line: 5 sits above the line, 0 on it, and 95 below. With that layout, the picture tells you the sign:
Zero below the line: the line meets a small positive division, say 3. The screw stopped short of zero, so the gauge reads more than it should. That is a positive zero error: +3 × 0.01 mm = +0.03 mm.
Zero above the line: the line meets a division near the top of the scale, say 97. Do not write 97. The screw has gone 3 divisions past zero, so the gauge reads less than it should. That is a negative zero error: −(100 − 97) × 0.01 mm = −0.03 mm.
NCERT states the rule in words: when the circular scale reading across the linear scale is more than zero, the gauge has a positive zero error, and when it is less than zero, a negative one (NCERT Lab Manual, Experiment 2).
Do you add or subtract the zero error?
You do not need two rules. NCERT's procedure says to subtract the zero error, with its proper sign, from the mean reading to get the corrected value (NCERT Lab Manual, Experiment 2). Write it once:
Corrected reading = observed reading − (zero error, with sign)
Positive zero error (zero below the line): you end up subtracting it.
Negative zero error (zero above the line): minus a negative is plus, so you end up adding its size.
Worked example: same reading, two gauges
Two students each measure a wire and both record a linear scale reading of 0.5 mm and a circular scale reading of 42, on gauges with a least count of 0.01 mm. Observed reading = 0.5 + 42 × 0.01 = 0.92 mm.
Student A's gauge, when closed, shows the zero 3 divisions below the line. Zero error = +0.03 mm. Corrected = 0.92 − (+0.03) = 0.89 mm.
Student B's gauge shows the zero 3 divisions above the line, so the line reads 97. Zero error = −0.03 mm. Corrected = 0.92 − (−0.03) = 0.95 mm.
Same observed number, a 0.06 mm difference in the answer, all from the sign. If the scale has 50 divisions, count back from 50 instead of 100: a line reading of 48 with the zero above it is −2 divisions.
The Fermi Problem Library has worked problems with a step-by-step solver that explains the reasoning rather than printing an answer, which helps when you want to check each sign as you go.
How do you check zero error before a practical?
Turn the ratchet until the faces touch and it clicks; do not force the head.
Keep your eye level with the reference line, so you are not reading at an angle.
Note whether the circular zero is on, below or above the line.
Count the divisions between zero and the line, and write the zero error with its sign and unit in your record, for example e = −0.03 mm.
Take your readings at several places on the wire, find the mean, then apply corrected = mean − (e).
Ask yourself one sanity question: a positive error should make your answer smaller, a negative one larger.
For more practice, see vernier calliper readings with a simulation, or read who invented the micrometer screw gauge.