
On this page
A convex mirror spreads out the light it reflects, so its image is virtual and sits behind the glass, where no screen or needle can reach it. We explain why in why a convex mirror always forms a virtual, diminished image. The fix in the Class 12 lab is to borrow a real image from a convex lens.
CBSE's Physics curriculum for 2025-26 lists "To find the focal length of a convex mirror, using a convex lens" as Experiment 2 in Section B of the Class 12 practicals. The same document gives the practical exam 30 marks, with two experiments, one from each section, worth 7 marks each.
Why does light retrace its path at the centre of curvature?
A ray aimed at the centre of curvature C travels along a radius, so it hits the mirror along the normal and comes straight back. OpenStax University Physics states the rule directly: a ray travelling along a line through the centre of curvature of a spherical mirror is reflected back along the same line.
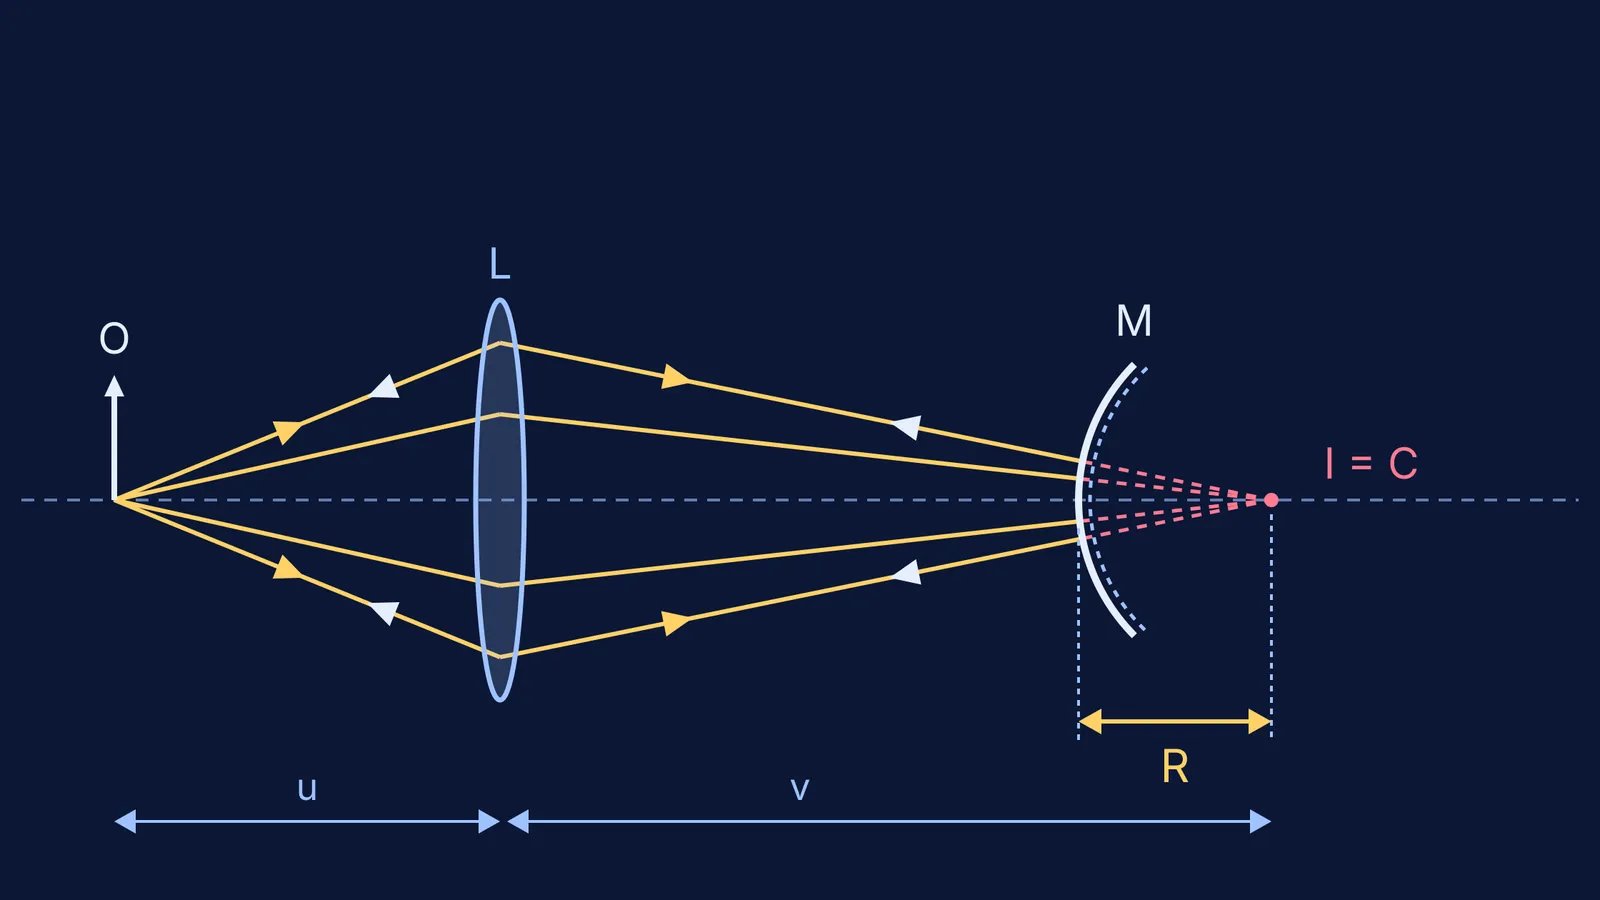
For a convex mirror, C lies behind the reflecting surface, out of a needle's reach, but a lens can make light head towards it:
The convex lens L makes light from the object needle O converge to a real image I.
You place the convex mirror M between the lens and I, so the rays hit it before they meet.
You slide M along the bench. When I falls exactly at the mirror's centre of curvature, every ray strikes M normally and retraces its path to O.
You see an inverted image of O sitting tip to tip with O, with no parallax.
You remove the mirror without moving O or L, and locate I with a second needle. The distance from the mirror's pole to I is R.
The same OpenStax chapter derives f = R/2 for a concave mirror and notes that it also holds for convex mirrors, so one more line gives you f. For where that half comes from, read why focal length is half the radius of curvature.
How do you set up the experiment on an optical bench?
Mount O, L and M so their tips and centres lie on one horizontal line.
Find the rough focal length of the lens first, by focusing a distant window or tree on a screen.
Put O between f and 2f of the lens, so the real image forms beyond 2f. The lens-to-image distance must be longer than R.
Look along the axis from behind O. Slide M until the inverted image of O stays tip to tip with O as you move your eye sideways.
Note the position of M. Remove only M, then move the image needle to the point of no parallax with the image of O. Note that position.
Repeat for two or three object distances and take the mean of R.
Worked example: what do real readings look like?
Suppose your lens has a focal length of 20 cm and your bench readings are:
Object needle O: 20.0 cm
Lens L: 50.0 cm
Convex mirror M, at no parallax: 95.0 cm
Image needle I, after removing M: 110.0 cm
Then R = 110.0 - 95.0 = 15.0 cm, and f = R/2 = 7.5 cm.
You can check the lens part with the thin lens formula. An object distance of 30 cm and a focal length of 20 cm give 1/v = 1/20 - 1/30 = 1/60, so the image forms 60 cm beyond the lens, at 50 + 60 = 110 cm. That matches the image needle, and the diagram at the top is drawn to these numbers. If your image needle sits several centimetres from the prediction, check the lens's focal length and the bench's index correction before you trust R.
What goes wrong, and what do examiners ask?
No retracing position anywhere. The lens image is too close. Move O nearer the lens's focal point so I moves further out.
Disturbing O or L while removing M. If either moves, the image point changes and R is meaningless.
Prepare short answers to these viva questions:
Why can you not find the focal length of a convex mirror directly?
Why does light retrace its path when the image falls at C?
Why is the object usually placed between f and 2f of the lens?
How else could you measure R? A spherometer works on the mirror's surface; see how to use a spherometer to find radius of curvature.
If a numerical on this setup stalls you, the Fermi Problem Library has worked problems with a step-by-step solver that explains the reasoning rather than printing an answer. For the ray-optics ideas underneath, the Fermi Concept Library gives each concept its own lesson and its place in the map.