
On this page
Two fingers on a lever can stop a bike in a few metres, using levers, friction and torque.
How do bicycle brakes work?
On a rim brake, braking force is applied by friction pads to the rim of the rotating wheel, moved by a lever on the handlebar (Wikipedia: Bicycle brake). Your squeeze passes through two levers in a row.
The hand lever: your fingers push far from the pivot and the cable is fixed close to it, so a small squeeze becomes a bigger cable pull.
The brake arms: they pivot and press a pad onto each side of the rim.
Each lever trades distance for force: the cable moves less than your fingers but pulls harder.
Kinetic friction at the rim then gives a torque against the wheel's spin. Rim brakes perform relatively poorly on wet rims, the same page notes, so allow more room in the monsoon. For the torque sums, see our post on braking torque on a wheel from brake pads.
Why does the front brake do most of the stopping?
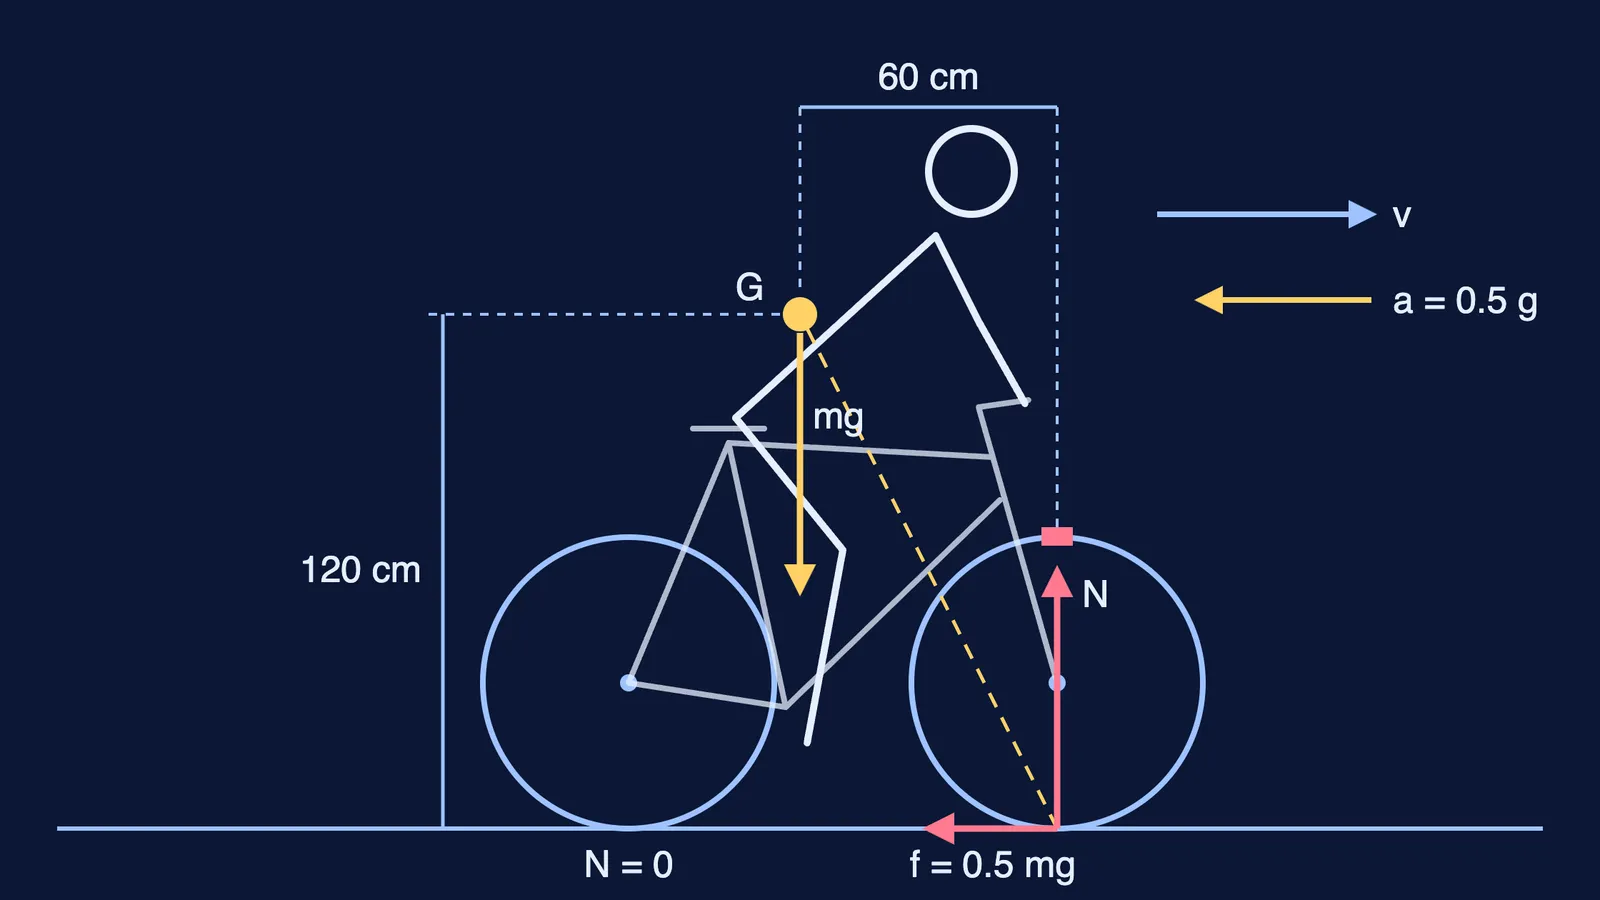
When you brake, the road pushes backwards on the tyres, well below the centre of mass. That tips the bike forward, moving weight off the rear wheel: as braking increases, the rear wheel's normal force falls, and at maximum braking it reaches zero (Wikipedia: Bicycle and motorcycle dynamics). A tyre's grip is at most the friction coefficient times its normal force, so the loaded front wheel does nearly all the stopping while the unloaded rear skids easily.
The combined centre of mass of a typical upright bicycle and rider sits about 60 cm behind the front tyre's contact point and 120 cm above the road, allowing a maximum deceleration of about 0.5 g before the bike pitches over. With the rear brake alone, an upright bicycle manages only about 0.25 g at best (bicycle dynamics).
The bicycle mechanic Sheldon Brown put it simply: "The front brake by itself will stop a standard bicycle twice as fast as a rear brake by itself" (Braking and Turning Your Bicycle).
Where does 0.5 come from? Take moments about the front contact point as the rear wheel goes light. The braking force ma acts at height h = 1.2 m and the weight mg acts b = 0.6 m behind, so mah = mgb and a = g × b/h = 0.5 g.
How far does a bicycle take to stop? A worked example
Use the 0.5 g and 0.25 g limits from the dynamics page at 18 km/h, which is 5 m/s. From v² = 2as:
Front brake at the limit, a ≈ 4.9 m/s²: s ≈ 2.6 m, in about 1.0 s.
Rear brake only, at its best, a ≈ 2.45 m/s²: s ≈ 5.1 m, in about 2.0 s.
Mass cancels here, as our post on whether a heavier vehicle takes longer to stop explains.
Now work back to the pads, assuming rider and bike 80 kg, tyre radius 0.34 m, braking surface at radius 0.31 m. The road must push back with 80 × 4.9 ≈ 390 N. Torques about the axle balance, so rim friction is 390 × 0.34/0.31 ≈ 430 N. With a pad friction coefficient of 0.5 (real values vary, and some coefficients exceed 1), each of the two pads must press with about 430 N: a firm 100 N squeeze multiplied about four times by the levers.
If taking moments is where you get stuck, Fermi's AI tutor can draw the figure with you and check your understanding as you go.
How does the chain drive turn your push into speed?
Modern bicycle chains have a 1/2 inch (12.7 mm) pitch (Wikipedia: Bicycle chain), and a sprocket with N teeth has radius r = p / (2 sin(180°/N)). Take a 44-tooth chainring (r ≈ 89 mm), a 16-tooth sprocket (r ≈ 32.5 mm), a 170 mm crank and a 300 N push, all assumed values.
Pedal torque: 300 × 0.17 = 51 N m.
Chain tension: 51/0.089 ≈ 573 N.
Rear wheel torque: 573 × 0.0325 ≈ 18.6 N m.
Push on the road: 18.6/0.34 ≈ 55 N, with the wheel turning 44/16 = 2.75 times per pedal turn.
The gear trades force for speed, and little is lost. In 1999 Johns Hopkins lab tests the chain drive was 98.6% efficient in the best test and 81% in the worst, and with a new chain in clean lab conditions, lubrication made essentially no difference (ScienceDaily).
For ideas like torque that are easier to see than read, try the interactive simulations in the Fermi Simulation Lab.
How should you use both brakes?
Make the front brake your main brake, and squeeze it progressively rather than grabbing it.
Under hard braking, shift your weight back and down to allow larger decelerations (dynamics page).
Start braking earlier when rims are wet, and replace pads as they wear (Bicycle brake).
Next time you stop at a signal, feel the rear go light: that is the pitch-over rule.