
On this page
A herbarium sheet can lose marks for small, avoidable things: a leaf that turned brown and mouldy, a specimen folded over itself, or a label that just says "Hibiscus". Follow four stages in order (collect, press and dry, mount, label) and start ten days before your deadline, because drying is the slow part.
What is a herbarium sheet?
A herbarium sheet is a dried, pressed plant fixed to stiff paper, with a label recording what the plant is and where and when it was collected. A herbarium is a reference library of these sheets; the label turns a dried leaf into a scientific record. To see how herbaria fit alongside botanical gardens, museums and zoos, read our guide to taxonomical aids and how they help classification.
How do you collect a plant specimen?
Only take a plant you are allowed to take, such as one from your own garden or from a place where you have permission. The Field Museum's plant-pressing guide says the more complete the specimen, the better, from the top of the flower or leaves to the root, if possible. For a shrub such as hibiscus, a twig with several leaves and a flower works. The University of Reading Herbarium asks collectors to consider plant conservation before collecting, so never pick a rare plant or strip a wild patch.
Before you go home, note the place (locality, town, district, state), the date, the habitat ("garden hedge, full sun") and anything drying will destroy, such as flower colour or smell.
How do you press and dry a plant for a herbarium?
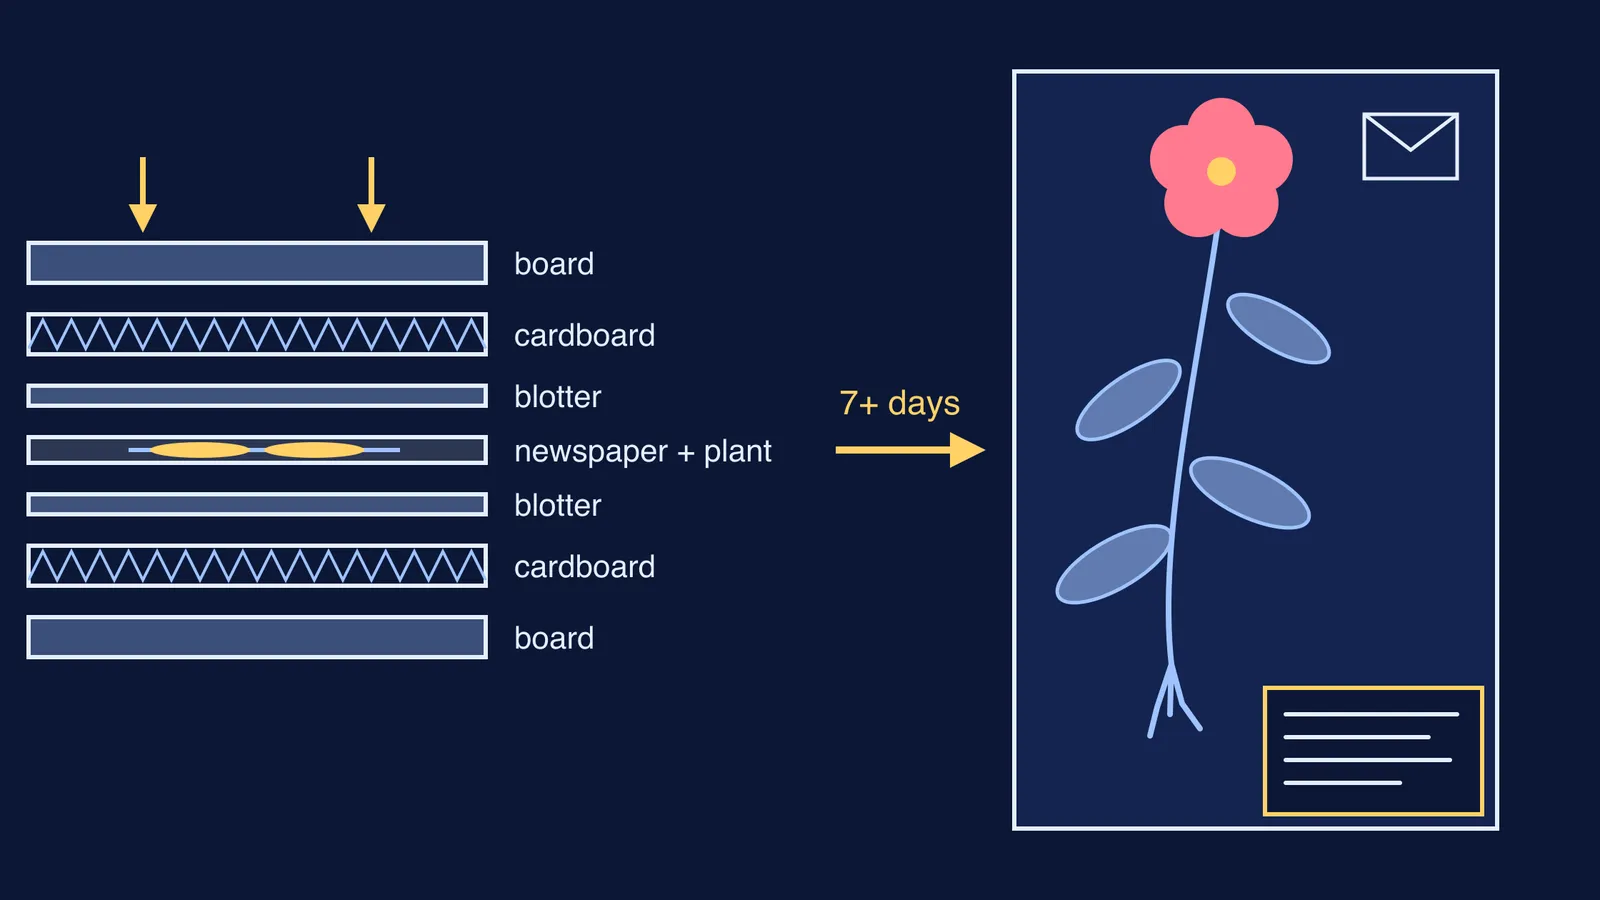
Lay the plant flat inside a folded sheet of newspaper. Spread the leaves so they do not overlap, and turn one leaf over so its underside shows.
Build the stack from the bottom up: a board, cardboard, blotting paper, the newspaper with the plant, more blotting paper, then cardboard, the layering the Field Museum describes.
Put a second board on top and weigh it down with heavy books.
Open the press after a few hours to straighten folded leaves before they turn brittle; the University of Reading Herbarium recommends this check.
Change the drying papers every day, leaving the plant in its newspaper fold. Reading advises daily changes if you have no drying cabinet, because quick drying prevents mould.
Wait. According to the Field Museum, drying takes at least a week, and longer for a larger plant.
How do you mount the specimen on the herbarium sheet?
Use thick white card or chart paper. Herbaria mount specimens on a standard sheet; at the University of Reading Herbarium it is 41.9 x 26.7 cm (16½ x 10½ in). If your teacher gives a size, use theirs.
Arrange the plant so it fills the sheet but leaves the bottom right corner clear for the label.
Fix it with small dabs of white PVA glue at points along the stem, which Reading calls a "glue staple".
Hold a thick stem down with a thin strip of paper glued across it.
Put large seeds or loose flower parts in a small paper envelope glued to the sheet, as Reading suggests.
What should a herbarium sheet label include?
The label goes in the bottom right corner, as Reading's guide specifies. The University of Arizona Herbarium's label guidance lists the scientific name, one primary collector, a collection number, a single collection date and a clear locality, with habitat and a description of the plant (such as flower colour) as optional extras. If you only know the genus or family, Arizona says that is acceptable. Write the scientific name by the rules of binomial nomenclature: genus with a capital letter, species in small letters, underlined when handwritten.
Here is a worked example for a hibiscus twig. GBIF lists the accepted name as Hibiscus rosa-sinensis L., family Malvaceae. Place, date and collector are samples.
Scientific name: Hibiscus rosa-sinensis L.
Family: Malvaceae
Common name: hibiscus
Place: home garden, Jayanagar, Bengaluru, Karnataka
Habitat: garden hedge in full sun
Date of collection: 12 August 2026
Notes: shrub; flowers red, five petals
Collector: your name, class and section
Collection number: 03
The family line is often the hardest to fill in, because it means placing your plant in the taxonomic hierarchy from kingdom to species. If that order still feels fuzzy, the Fermi Concept Library covers every concept in biology, each with its own lesson and its place in the map.
A ten-day plan for your herbarium project
Day 1: collect, write field notes, press, and straighten the leaves a few hours later.
Days 2 to 8: change the drying papers once a day.
Day 9: test for dryness; if a leaf is still limp or feels cold, give it two more days.
Day 10: mount the plant, glue the label in the bottom right corner, check the spelling of the name and family.
Start today with the field notes: they are the one part of the sheet you cannot redo later.