
On this page
In a Class 9 or Class 10 biology practical, one clumsy drop of the coverslip traps air, and the cells you stained so carefully disappear under a black ring. The fix is a small habit with your hands, plus knowing what a bubble looks like so you don't draw one as a cell.
Why do air bubbles form under a coverslip?
If you drop a coverslip flat, it lands on the liquid everywhere at once and seals pockets of air underneath. Microscopy writer Oliver Kim explains in How to prevent air bubbles in wet mounts that lowering the coverslip at an angle lets the air escape on one side. When one edge goes down first, the liquid runs along under the glass and pushes the air out ahead of it.
The same article gives a second cause: if the specimen is not fully under the liquid, the dry patches hold air. Its advice is to add another drop on top of the specimen before you lower the coverslip.
How do you place a coverslip without air bubbles, step by step?
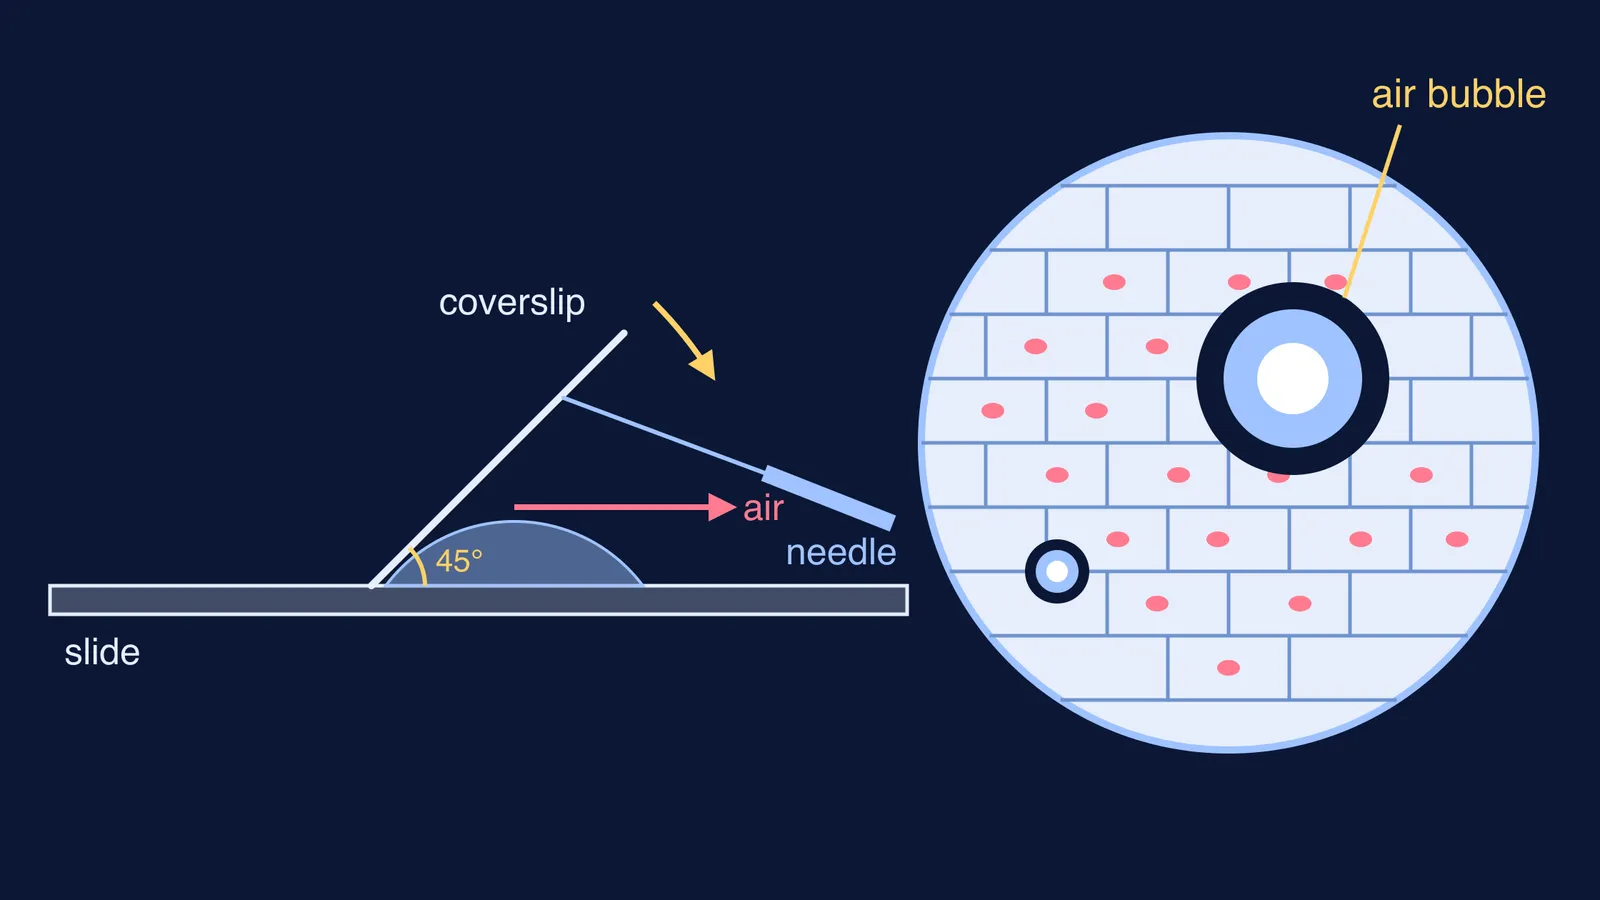
The CBSE onion peel and cheek cell practical, as set out in this Class 9 slide preparation guide, uses a needle to lower the coverslip at a 45-degree angle so air can escape. Here is that method broken into hand movements:
Put the stained peel in the centre of a clean slide and add a drop of glycerine. Check that the whole peel is wet, with no dry corners sticking up.
Hold the coverslip by its edges so you don't leave fingerprints on the glass.
Rest one edge of the coverslip on the slide just beside the drop, tilted at about 45 degrees.
Slide the tip of a needle under the raised edge, then let go of the coverslip with your fingers.
Lower the needle slowly. Watch the liquid creep along the underside of the glass as it comes down.
Pull the needle out sideways only when the coverslip is almost flat.
How do you remove extra stain or glycerine?
After the coverslip is down, liquid often seeps out at the edges. The same practical guide lists removing extra stain and glycerine with blotting paper as a step, and over-staining as a precaution to avoid. Touch a strip of blotting paper to the edge of the coverslip, not on top of it, and let it soak the liquid up. Don't press down on the glass, because pressing can squash the cells or push the coverslip out of place.
What do air bubbles look like under a microscope?
Air has a different refractive index from water, so a bubble seems to have a thick dark border, and its curved shape focuses light so that the centre looks bright, according to Oliver Kim's guide to wet mounts. That gives you a quick test:
Air bubble: round, with a thick dark rim, a bright centre, no cell wall and no nucleus.
Onion peel cell: a brick-like shape with thin walls, and a stained nucleus inside.
Very large bubble: may fill most of the field. The same site notes in What are the effects of air bubbles under the cover glass? that bubbles that are too large may not be recognised as bubbles at all.
The dark rim is refraction at work, the same light-bending you study in physics when a ray crosses from one medium to another. If that part feels shaky, the Fermi Concept Library has its own lesson for each concept in physics, chemistry and biology, refraction included.
Can you fix a slide that already has bubbles?
Sometimes. If a large bubble reaches the edge of the coverslip, the wet-mount article suggests adding more water from the side of the coverslip. A small bubble at the corner, away from your cells, can usually be left alone; move the slide so your field of view avoids it.
If bubbles sit on top of the cells you need, start over. A virtual microscopy lab built on OpenLabyrinth gives the same advice: prepare a new slide and add the coverslip very slowly and carefully.
If the examiner asks about precautions, you could say: "I lowered the coverslip at an angle with a needle so air could escape, and I removed the extra glycerine with blotting paper so the slide stayed clean."
Where does this fit in your practical prep?
The coverslip step sits in the middle of every temporary mount. For the full onion and cheek cell method, see how to prepare onion peel and cheek cell slides; for the Class 10 version, see how to prepare a temporary mount of a leaf peel for stomata. Once the slide is clear, the biology record rules for drawing what you see cover the diagram.
Practise the angle with plain water on a spare slide twice before the exam day, and the real one will feel routine.