
On this page
If you spend an hour looking through a microscope and then sketch a beautifully shaded, 3D masterpiece of a cell for your biology record, you will probably lose marks.
Unlike an art class, a biological drawing is a strict scientific record. The goal is clarity, accuracy and following a set of international conventions. Whether you are in school making a practical file or sitting a board exam, examiners are looking for specific habits.
Here is what you need to know to get your biological drawings right every time.
Why is shading banned in biology?
The most common mistake students make is trying to make their drawings look realistic by adding shadows, shading or cross-hatching.
According to the official OCR Biological Drawing Skills Handbook, shading is strictly prohibited because it obscures scientific details. A biological drawing is not a photograph; it is a map of structures. Shading can easily be confused with actual biological features, such as pigments or dense organelles.
The OCR guide states that you must not use any form of shading, not even stippling or cross-hatching. If you feel you are bad at drawing diagrams, this is actually an advantage: science prefers a simple, flat outline over an artistic interpretation.
How large should the drawing be?
Your drawing needs to be large enough to clearly show all the necessary details without crowding.
The OCR guidelines state that a drawing should occupy at least half of the available space on the page. If you draw it too small, the lines for different structures will merge, and you will not have room to show the true proportions.
Proportion is critical. If a vacuole takes up 80% of a plant cell in your microscope's field of view, it must take up exactly that much space in your drawing. Do not draw a generic "textbook" diagram from memory; draw exactly what you see.
What are the rules for drawing lines?
Examiners look closely at the quality of your lines. They must be single, clear and continuous.
Avoid using short, overlapping strokes to build up a shape (often called "hairy" or sketchy lines). Instead, press firmly and move your hand steadily. If a line is meant to enclose a shape, such as a cell membrane, the end of the line must meet the beginning perfectly, without leaving a gap or overlapping into a cross.
If you make a mistake, do not draw over it. Erase the entire section cleanly and try again.
When you are tackling the full syllabus in the Fermi Concept Library, you will see that every diagram follows this principle of clean, unambiguous outlines.
How do you label a microscope drawing?
Labels are just as important as the drawing itself. A perfect drawing will still lose marks if the labels are messy. Follow these strict formatting rules:
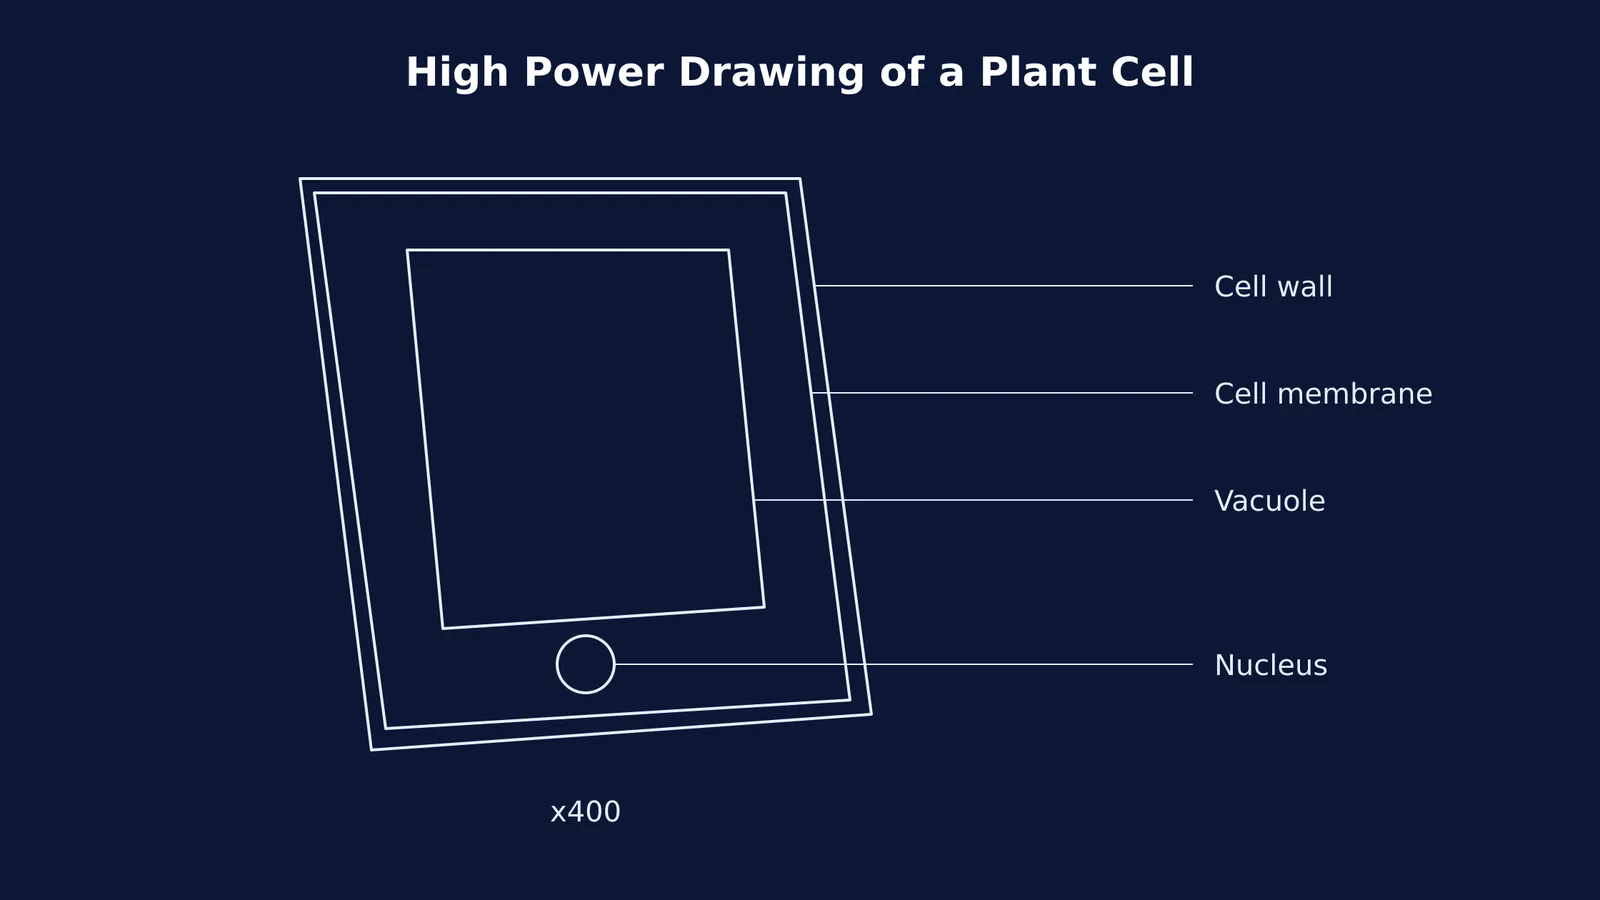
Use a ruler: Every label line must be drawn with a straight edge. Freehand lines are not allowed.
No arrowheads: The line should end exactly touching the structure you are identifying. Do not add an arrow at the tip.
Keep them separate: Label lines must never cross each other.
Align left or right: Ideally, all label lines should be left or right justified, stopping at an invisible vertical margin on either side of the drawing.
Horizontal text: Write all your text horizontally, even if the label line itself is drawn at an angle.
Learning how to draw scientific illustrations is largely about mastering this clean, clinical presentation.
Don't forget the title and magnification
Every biological drawing must have a descriptive title and state the magnification.
The title should tell the reader exactly what they are looking at, for example, "Transverse section of a dicotyledonous stem". If you know the scientific name of the specimen, use binomial nomenclature (*Genus species*) and underline it if you are writing by hand.
Finally, record the magnification. This can either be the total magnification of the microscope (e.g., "x400") or the drawing magnification, which is calculated by dividing the size of your drawing by the actual size of the specimen. Without this context, your accurate, well-labelled drawing is just a shape on a page.
Low power plan versus high power drawings
In your biology record, you will usually be asked to draw one of two types of diagrams: a low power plan or a high power detailed drawing.
A low power plan diagram shows the overall distribution of tissues, such as the layers in a leaf cross-section. When drawing at low power, you must not draw individual cells. Instead, you only draw the boundary lines that separate different types of tissues.
A high power drawing is used to show the detailed structure of the cells themselves. Here, you should draw a few representative cells (usually two or three) and include the internal organelles you can clearly see. Never draw a huge grid of dozens of tiny cells; pick a few and draw them large and accurately.
A 6-point exam checklist for biological drawings
Before you hand in your practical file or finish your exam question, run through this quick checklist:
Is the drawing done entirely in sharp HB pencil?
Are all lines continuous, with no overlapping corners or gaps?
Is the drawing completely free of shading or artistic sketching?
Does it take up at least half the available space on the page?
Are all labels properly justified to the sides, connected with straight ruler lines that do not cross?
Is there a clear title and a statement of magnification?
If you can tick all six boxes, your biological drawing is scientifically accurate and ready to score full marks.