

On this page
In biology laboratory practicals, students often fear losing marks because they cannot sketch like an artist. Yet in scientific illustration, fine-art flourishes like shading, cross-hatching, and feathering are penalized. Biological drawing is an empirical record of physical anatomy observed under a lens. Once you master the standard conventions expected by examiners and researchers, producing an accurate diagram is a systematic craft that anyone can learn.
Why is biological drawing different from artistic sketching?
Artistic drawing conveys emotion and light through shading. Scientific illustration, by contrast, records anatomical data and spatial relationships. In *Science*, Shaaron Ainsworth, Vaughan Prain, and Russell Tytler showed that drawing to learn in science builds reasoning skills by prompting students to select, organise, and externalise visual evidence rather than memorising textbook figures.
In *CBE—Life Sciences Education*, Kim Quillin and Stephen Thomas observed that students often feel art anxiety, assuming drawing requires artistic talent. Their research on drawing as a science process skill demonstrated that sketching clarifies mental models and sharpens observation without fine-arts training. A biological drawing succeeds when proportions are true and boundaries unambiguous.
If you struggle to picture three-dimensional structures before drawing a two-dimensional section, interactive tools help. The Fermi Simulation Lab provides interactive simulations for ideas that are easier to see than to read, helping you explore biological structures dynamically.
What are the strict labelling conventions in biology?
Examiners evaluate labelling as strictly as line work. The OCR Biology Drawing Skills Handbook establishes essential conventions for communicating unambiguous scientific data:
Use a sharp HB pencil; never use pens or coloured pencils.
Draw single, continuous lines without sketchy or feathered marks.
Do not add shading or cross-hatching; indicate wall thickness with double outlines.
Draw label lines with a ruler so they are straight, parallel, and never cross.
Terminate label lines cleanly on target structures without arrowheads, which denote physiological flow.
Write label text horizontally outside the drawing, aligned in a neat column.
How do low-power tissue plans differ from high-power cellular drawings?
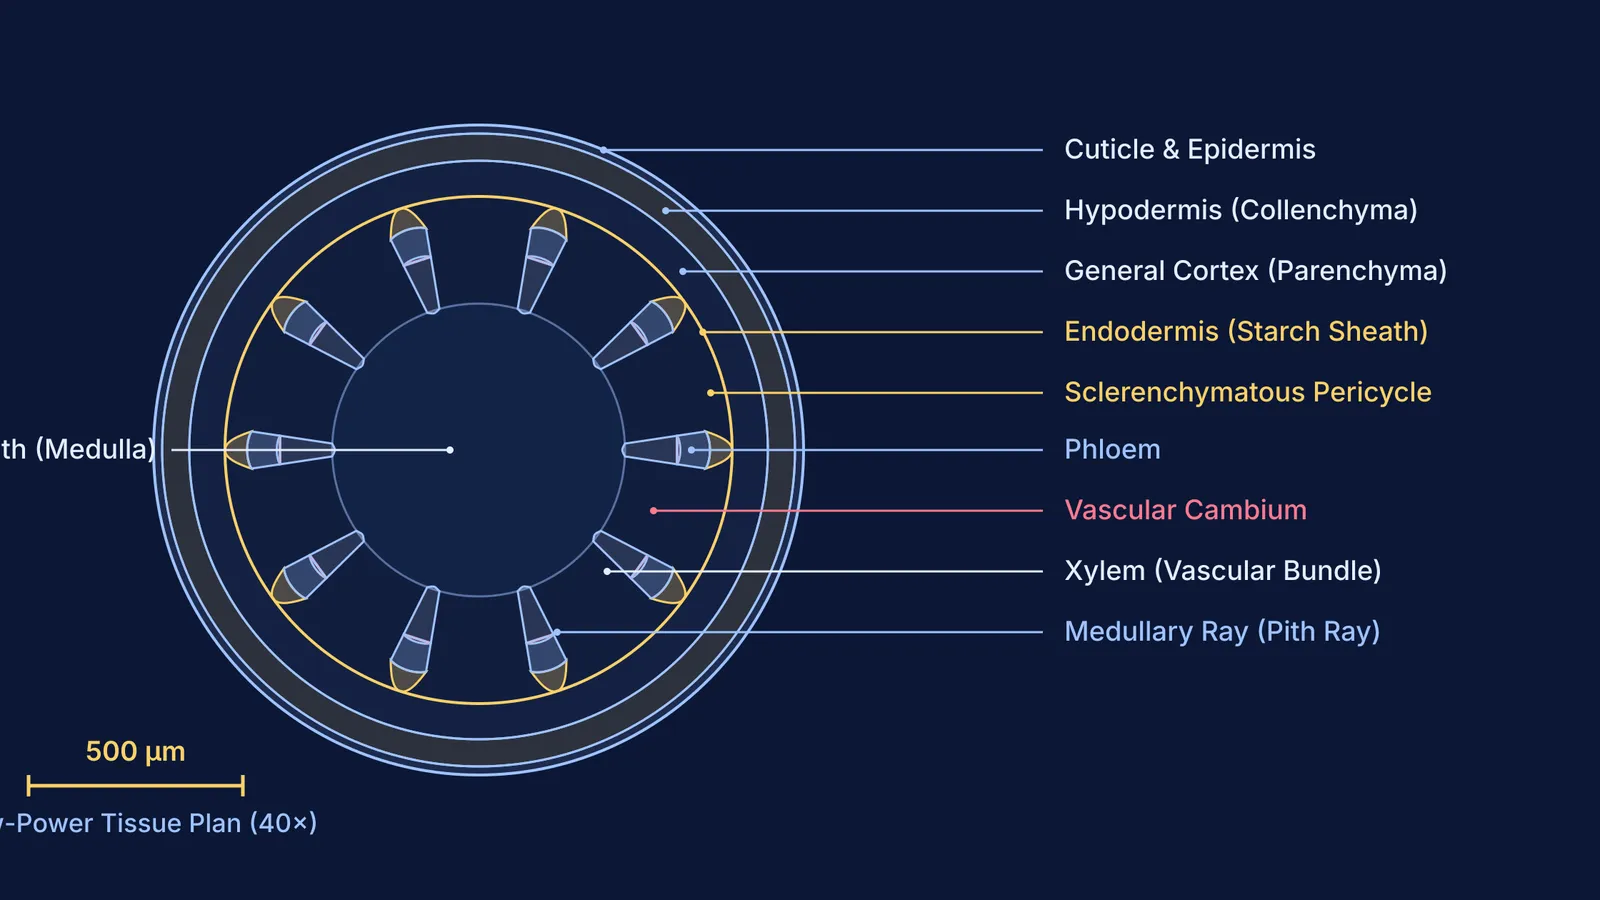
Confusing a low-power tissue plan with a cellular detail drawing is a common error. The OCR Biology Drawing Skills Handbook defines a low-power tissue plan as an outline map showing tissue distributions and proportions without individual cells. When drawing a transverse section of a dicot stem under 40× magnification, outline only the continuous boundaries enclosing the epidermis, cortex, endodermis, vascular bundles, and pith. Adding cells misrepresents scale and loses marks.
High-power cellular drawings focus on four to six adjacent cells under 100× or 400× magnification, recording exact features: double outlines for primary cell wall thickness, middle lamellae where cells touch, and genuine inclusions like nuclei only if visible.
Drawing magnification equals measured drawing size divided by actual specimen size (OCR Biology Drawing Skills Handbook). Always record your calculated magnification (such as Mag. ×250) or draw a calibrated scale bar.
How should you practise drawing from real microscope specimens?
Textbooks show idealized diagrams, but real slide specimens are irregular. Scoring well requires recording what you actually observe rather than reproducing a memorized figure. When preparing temporary mounts—such as studying mitosis in our onion root tip mitosis practical guide or pollen tubes in our pollen germination slide guide—follow this sequence:
Scan at low power (10× objective) for a flat, well-stained field free of air bubbles.
Estimate relative tissue proportions across the organ radius before drawing.
Lightly map outer boundaries, filling at least 50% to 75% of the page as recommended in the OCR Biology Drawing Skills Handbook.
Verify tissue boundaries under high power (40× objective) before drawing firm outline strokes.
In examinations governed by the CBSE practical examination guidelines, practical assessments allocate 30 marks, with slide preparation and specimen spotting contributing 12 marks evaluated on observation and labelling. Similar standards apply across curricula, as detailed in our guide to the ISC Class 12 biology paper structure.
When reviewing anatomical morphology and tissue classifications, the Fermi Concept Library covers every concept in physics, chemistry, biology, mathematics and computing, each with its own lesson and its place in the map. Furthermore, Fermi's AI tutor can work out what you already know, build a plan for your study session, and teach through it—drawing figures on a board, explaining each anatomical feature, and checking your understanding as you go.
What is the five-point checklist for exam-ready biological drawings?
Before submitting your laboratory sheet, verify your diagram against these five criteria:
Proportion: Did you capture true specimen dimensions, such as the cortex-to-vascular ratio, rather than an idealized circle?
Line integrity: Are all outlines single, continuous, and closed, with no sketchy or overlapping strokes?
Zero shading: Did you eliminate pencil shading and smudging, using double lines to show thickness?
Ruled labelling: Are all label lines straight, strictly horizontal, without arrowheads, and aligned in a neat column?
Metadata: Did you include a descriptive title, underlined binomial names, and a magnification scale?


