

On this page
Imagine a completely dark room with a tiny hole in one wall, letting in light from outside. On the opposite wall, a moving, full-colour image of the outside world appears—except it is entirely upside down. This is the camera obscura effect. While we often associate cameras with modern lenses and electronics, the basic principle was documented over two millennia ago. The Chinese philosopher Mozi, who lived during the Warring States period (c. 470–391 BCE), and his followers left us early known descriptions of this phenomenon.
What is a pinhole camera?
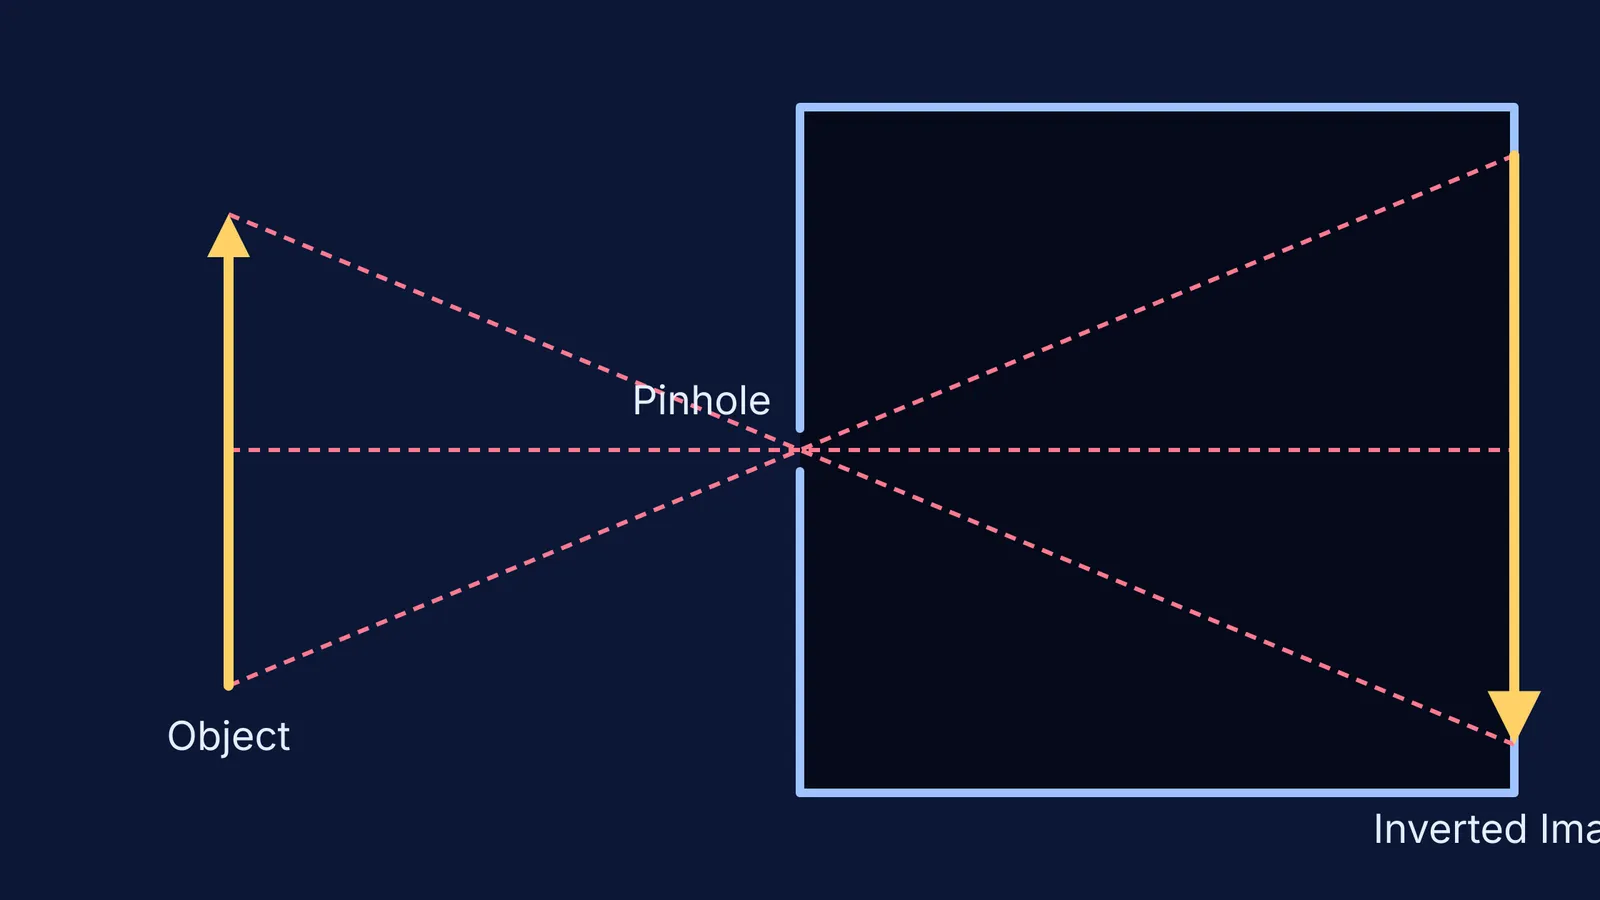
A pinhole camera is a simple camera without a lens but with a tiny aperture. Light from a scene passes through the aperture and projects an inverted image on the opposite side of the box.
Because there is no lens to focus the light, the image relies entirely on the geometry of the rays travelling through the small opening. The size of the projected image depends purely on the distance between the object and the pinhole, as well as the distance between the pinhole and the projection screen. If you move the screen further away from the aperture, the image grows larger but dimmer, as the same amount of light is spread over a wider area.
The ancient Mohist writings described this setup as a "collecting-point" or "treasure house". The text accurately noted that the image formed inside this darkened space is both upside down and left-right reversed. By documenting this, the Mohists provided early evidence that light travels in straight lines.
Why does the image turn upside down?
The inversion of the image happens because of the rectilinear propagation of light, meaning light travels in straight lines.
When light from an illuminated object reaches the small aperture, the hole acts as a narrow pivot point for the light rays. A ray of light originating from the top of a tree must travel in a straight line downwards through the hole, eventually hitting the bottom of the back wall. Conversely, a ray originating from the bottom of the tree travels upwards through the hole to hit the top of the wall.
Because the hole is so small, these light rays cross over each other without mixing. This crossing of paths effectively flips the entire scene, creating an inverted projection. If the hole were larger, light from the top of the tree would hit multiple points on the back wall, blurring the image. The tiny pinhole restricts the light so that only a single ray from each part of the object reaches the corresponding point on the screen.
If you struggle to visualise how light rays cross or how optics formulas work, the Fermi Simulation Lab provides interactive simulations for the ideas that are easier to see than to read. You can adjust the size of the aperture or the distance to the screen and immediately see how the sharpness and size of the image changes.
How did Mozi study optics?
Mozi was a carpenter and extremely skilled in creating devices. While many ancient thinkers debated abstract concepts, the Mohists carefully observed the physical world to understand its underlying mechanics.
Their observations on optics went well beyond just the pinhole camera. They also rigorously studied the formation of shadows, the behaviour of light across different surfaces, and the reflection of light in flat, concave, and convex mirrors.
The Mohists valued practical observation, asserting that knowledge must be grounded in applying one's senses to the physical world. They used the straight path of light as a conceptual tool to test the truth or falsehood of statements. Their systematic approach to empirical evidence was far ahead of its time.
If you are exploring the geometry of light and mirrors in your own studies, our guide on concave mirror images for all six object positions, Class 10 is a great next step.
Try it yourself: How to make a simple pinhole camera?
You can easily recreate the camera obscura effect using household items to see the inverted image for yourself. Building this simple device is an excellent way to understand ray optics in a hands-on way.
Here is a straightforward plan to build your own pinhole camera:
Prepare a box: Take an empty cylindrical can or cardboard box and paint the interior black to suppress internal stray light reflections. Wait for the paint to dry completely.
Make the pinhole: Cut a small, square window in one end of the box. Tape a piece of aluminium foil tightly over this window, and use a sewing needle to prick a tiny, neat hole in the centre of the foil. A cleaner hole will produce a sharper image.
Add the screen: Cut a larger viewing window on the opposite end of the box and cover it tightly with translucent baking paper or tracing paper. This acts as your projection screen.
Test the camera: Take your box into a dark room and point the pinhole end towards a brightly lit window, a television screen, or a strong lamp.
Observe: Look directly at the translucent screen from the outside. You will see a dim, full-colour, upside-down projection of your chosen light source.
When you encounter complex questions on how the object distance relates to the image size, Fermi's AI tutor works out what you already know, builds a plan for the session, and teaches through it. For a closer look at the mathematics of light, you can also review how to trace refraction through a glass sphere or read about common ray optics sign conventions.


