
On this page
"Light, shadows and reflections" was a Class 6 chapter in the older NCERT science book. The ideas have not changed, but where they sit has. Here they are, with three experiments that need only a torch, household objects and two cardboard boxes.
Is light, shadows and reflections still in Class 6?
In the current books, mostly no. The contents page of the Class 6 science textbook Curiosity (Reprint 2026-27) lists twelve chapters, from "The Wonderful World of Science" to "Beyond Earth", and none of them is about light.
The topic is now Chapter 11, "Light: Shadows and Reflections", in the Class 7 Curiosity textbook. That chapter points back to the Class 6 chapter "Materials Around Us", where students first sort materials into transparent, translucent and opaque.
Ask your teacher which book your class follows, or see our guide on how to check which NCERT syllabus version applies to you. The experiments work for either.
What are transparent, translucent and opaque objects?
NCERT's chapter gives three definitions you can quote in an exam (Curiosity, Class 7, Chapter 11):
Transparent: light passes almost completely through the material, as through clear glass.
Translucent: light passes partially through the material, as through tracing paper.
Opaque: light does not pass through the material at all, as with cardboard.
Experiment 1: predict, then test. In a dark room, shine a torch on a wall. Before holding each object in the beam, write down whether light will pass fully, partly or not at all, then test it: a steel tumbler, a clear plastic bottle, butter paper, a notebook page, a folded dupatta. The predictions you get wrong teach you the most.
How are shadows formed?
Because light travels in a straight line, an opaque object placed in its path blocks it, and the dark patch where light does not reach is the shadow (NCERT). To see one you need three things: a source of light, an opaque object and a screen, which can be any wall, floor or ground.
The same chapter notes that opaque objects make darker shadows, translucent objects make lighter ones, and even some transparent objects cast faint shadows. Changing the colour of an opaque object does not change the colour of its shadow.
Experiment 2: the shadow table. Keep the torch and wall fixed, hold a small object between them, and change one thing at a time: move it closer to the torch, then to the wall; tilt it; swap a red object for a blue one of the same shape. Shape, size and sharpness change with position; colour never does.
An eclipse is the same idea on the largest scale; see what makes a ring of fire eclipse and eclipse superstitions versus science.
How do you make a pinhole camera at home?
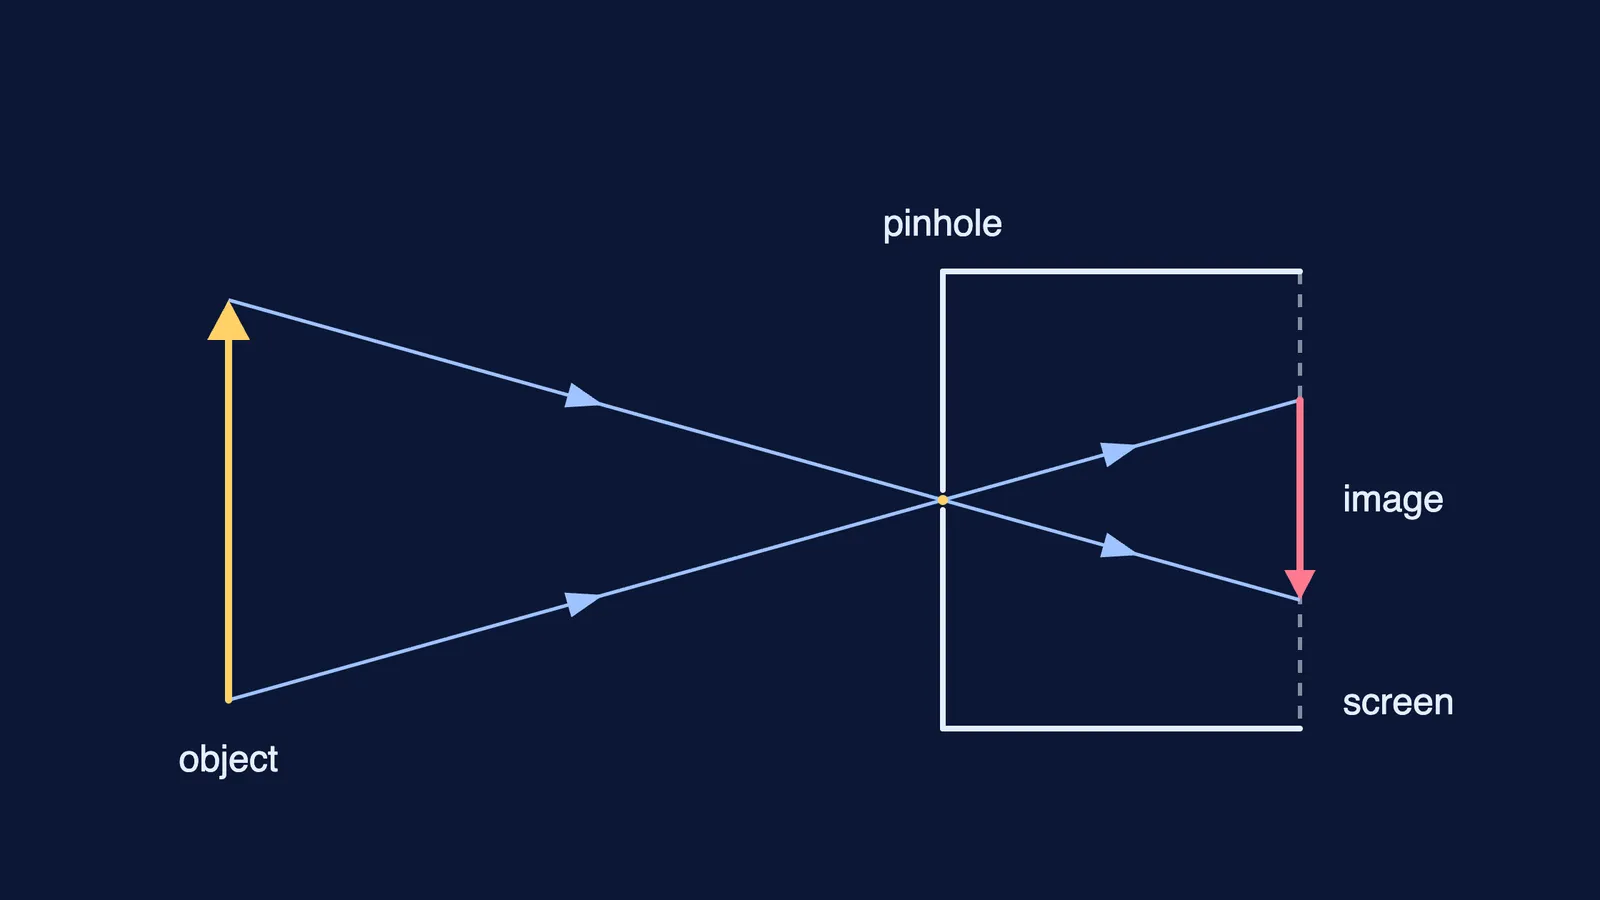
A pinhole camera is a device in which light from an object passes through a tiny hole and forms an image on a screen (NCERT, section 11.7). The textbook's sliding version needs two boxes, one able to slide inside the other:
Cut open one side of each box.
On the face opposite the open side of the larger box, make a small hole in the middle.
On the face opposite the open side of the smaller box, cut a square of about 5-6 cm and cover it with tracing paper. This is your screen.
Slide the smaller box into the larger one, screen side first.
Cover your head and the camera with a dark cloth, point the pinhole at a tree or building in bright sunlight, and slide the inner box until an image appears on the tracing paper.
The picture is upside down, because rays from the top of the tree pass through the hole and land at the bottom of the screen. Never look straight at the Sun while you aim. If you also try the textbook's simpler candle version indoors, do it only with an adult, as the textbook advises.
Worked example: how big will the image be? The crossing rays make two similar triangles, so image height divided by object height equals the pinhole-to-screen distance divided by the object-to-pinhole distance. A 6 m tree 30 m away, with the screen 15 cm behind the pinhole, gives 6 × 0.15 ÷ 30 = 0.03 m, an image 3 cm tall. Slide the screen back to 20 cm and the image grows to 4 cm, but looks dimmer, because the same light is spread over a bigger patch.
If the crossing rays are hard to picture, the Fermi Simulation Lab has interactive simulations for ideas that are easier to see than to read.
How is a mirror image different from a pinhole image?
A mirror changes the direction of the light that falls on it, and this is called reflection of light (NCERT). A plane mirror's image is the same size as the object, erect, cannot be caught on a screen, and is laterally inverted: your left hand appears as the right. That is why AMBULANCE is written in mirror writing on ambulances: drivers ahead read it the right way round in their rear-view mirrors.
The chapter's own contrast is worth memorising: a pinhole camera gives an upside-down image, while a plane mirror swaps left and right but keeps the image upright.
If you get stuck on why the image flips, Fermi's AI tutor can draw the figure and check your understanding as it goes.