

On this page
A common way to crack a slide is to drive the objective lens into the glass at high power, where there is almost no room to spare. The routine below works on most school compound microscopes, from a Class 9 onion peel to a Class 12 practical slide.
Why should you always start on low power?
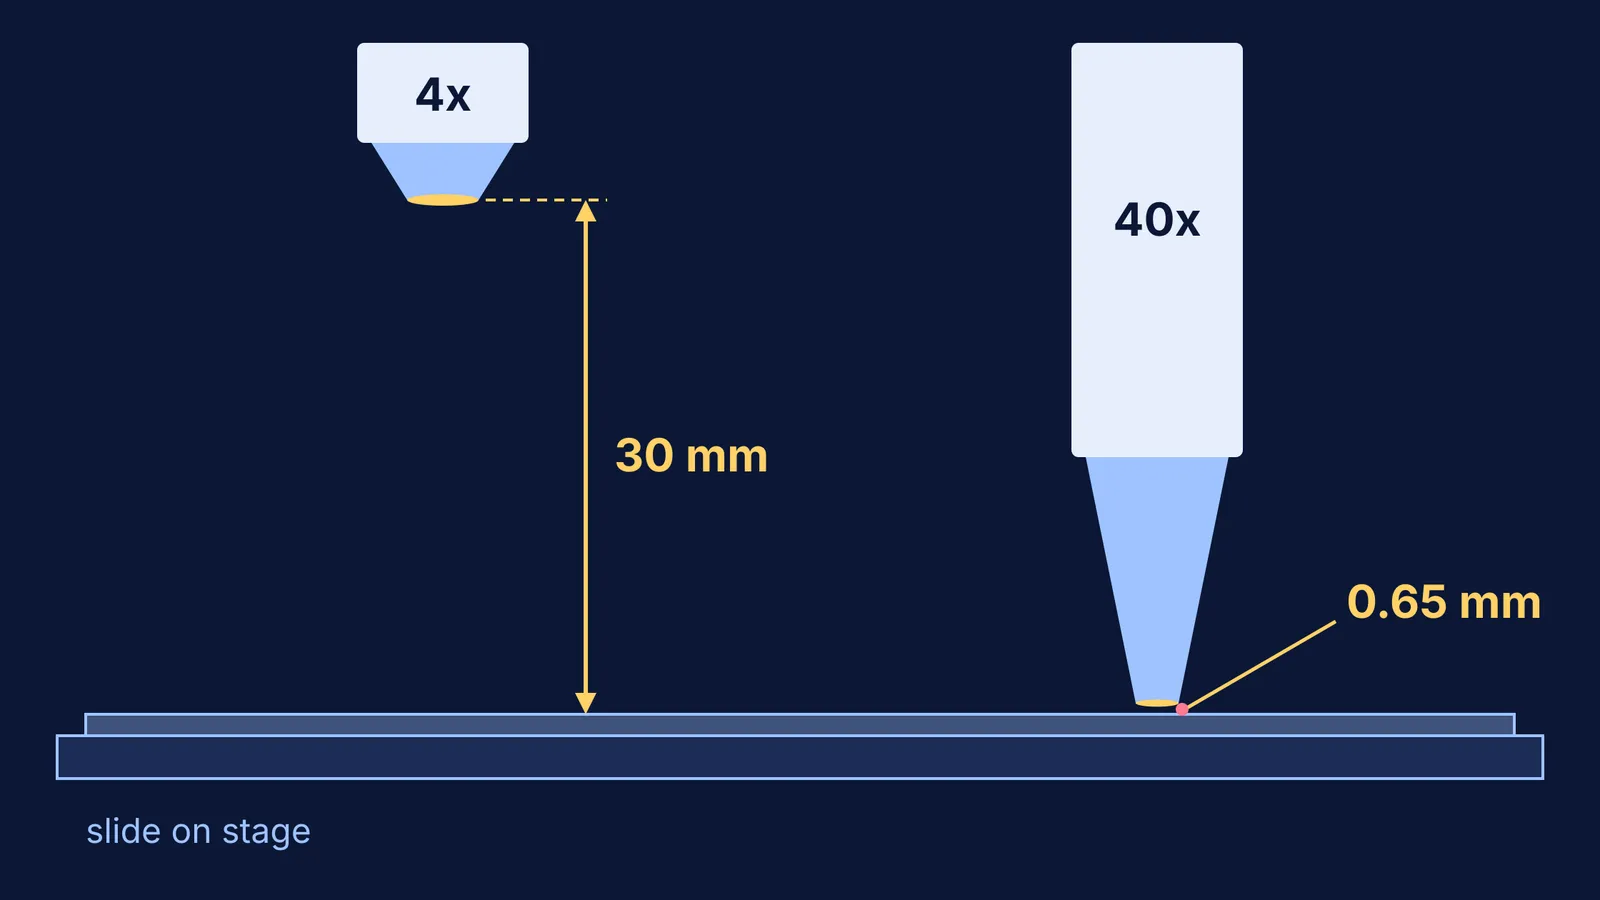
Working distance is the gap between the front of the objective lens and the top of the coverslip, as defined in Nikon's microscopy glossary. Nikon lists a working distance of 30 mm for its CFI Achro 4X objective and 0.65 mm for its CFI Achro 40X objective. That is about 46 times less room at 40x.
Total magnification is the eyepiece number multiplied by the objective number, so a 10x eyepiece with a 40x objective gives 400x, as the University of Vermont microscope guide explains. The University of Wisconsin botany lab manual says the 4x objective "allows for a larger field of view and has a longer working distance", and that field diameter is inversely related to magnification. Going from 40x to 400x total magnification (the 4x to the 40x objective) shrinks the width you see to about a tenth.
How do you focus a compound microscope step by step?
These steps follow the Vermont guide, a Kingsborough Community College lab lesson and the Wisconsin manual.
Carry the microscope with two hands, one on the arm and one under the base.
Clip the slide to the stage, coverslip up, with the specimen over the hole where the light comes through.
Turn the nosepiece until the 4x objective clicks into place.
Looking from the side, not through the eyepiece, use the coarse knob to bring lens and slide close together.
Now look through the eyepiece and turn the coarse knob the other way, moving lens and slide apart, until the specimen appears.
Sharpen the image with the fine knob.
Centre the part you want. The image is reversed, so the specimen seems to move opposite to your hand.
Swing in the 10x, then the 40x. Lab objectives are usually parfocal, meaning the specimen stays in focus or very close to it when you change objectives, so use only the fine knob from here.
When you finish, turn the 4x back into place before removing the slide.
How should you adjust the light?
Use the lamp dial to set brightness and the iris diaphragm under the stage to control contrast. The Wisconsin manual warns that using the diaphragm for brightness "will decrease the detail to be seen in your subject"; use it to cut glare instead.
Too much light also hides detail. The Vermont guide says excess light lowers contrast and "may actually burn out the image", and that unstained specimens are best seen with low illumination. If a fresh, unstained peel looks like a blank bright circle, dim the lamp and close the diaphragm a little until cell walls appear.
What mistakes crack slides or lose the specimen?
Coarse knob at high power. The Wisconsin manual says the coarse knob is for the low power lens only. A 40x objective can have under a millimetre to spare.
Focusing down while looking through the eyepiece. You cannot see the lens approaching, and the Vermont guide warns that slides and lenses "can be easily broken if brought into contact".
Switching up before centring. A specimen near the edge at 4x falls outside the narrower 40x field. Go back, centre, switch again.
Slide upside down. The specimen then sits under the full thickness of glass and may not come into focus at 40x. Flip the slide.
Wiping lenses with tissue. The Wisconsin manual says to use lens paper, never regular tissue, and never to rub a dry lens.
Reaching for the 100x lens. It is an oil immersion objective, and the Kingsborough lesson says not to use it unless instructed.
What should you check before calling your teacher?
Only a bright circle: go back to 4x, check the specimen is over the hole, and refocus by moving lens and slide apart.
Half the circle is dark: the objective has not clicked fully into place.
A speck that will not go away: turn the eyepiece. If the speck turns too, it is dirt on the eyepiece.
Sharp at 10x, blurry at 40x: use only the fine knob, a little each way, and check the slide is the right way up.
Bright but no detail: lower the lamp, then close the diaphragm a little.
For the lens maths, see our guide to magnifying power of microscopes and telescopes; for specific slides, read about the onion root tip mitosis practical and cell structure and slides in Class 8. If image formation by two lenses still feels shaky, the Fermi Concept Library covers every concept in physics, chemistry, biology, mathematics and computing, each with its own lesson.


