On this page
A periscope is a science project a child can build in an afternoon and use the same evening to peep over a sofa or a crowd of taller cousins. It also sits inside the school syllabus. The NCERT Grade 7 science textbook Curiosity has a Section 11.8.1 near the end of its chapter "Light: Shadows and Reflections" which says we can make a simple periscope "by placing two plane mirrors in a Z-shaped box", and notes that periscopes are used in submarines and tanks.
Here is the build, and then a small experiment: what happens when the mirrors are not at 45°?
What do you need to make a periscope at home?
Two empty 1-litre juice or milk cartons, rinsed and dried
Two small flat mirrors, about 6 cm wide (acrylic craft mirrors are safer than glass)
Scissors, strong tape and a ruler
A 45° set square from a school geometry box
A notebook for predictions
An adult should handle any glass edges. Never point the periscope at the Sun.
How do you build a cardboard periscope step by step?
Cut the top off both cartons so each becomes a tube with one closed end.
Near the closed end of the first carton, cut a window about 5 cm square on one face.
On the two side faces, use the set square to draw a 45° line from the top edge on the window side, sloping down to the back face. The mirror will sit behind the window like a ramp.
Cut a slit along that line, slide the mirror in with its shiny side facing the window and the open end, and tape it.
Repeat on the second carton.
Turn the second carton upside down and tape the two open ends together, so the windows face opposite ways. That gives the Z shape.
Look into the bottom window. You should see whatever the top window faces.
If you see the ceiling or a cardboard wall instead, one mirror is off angle. That is the most useful part of the project.
Why do the mirrors have to be at 45 degrees?
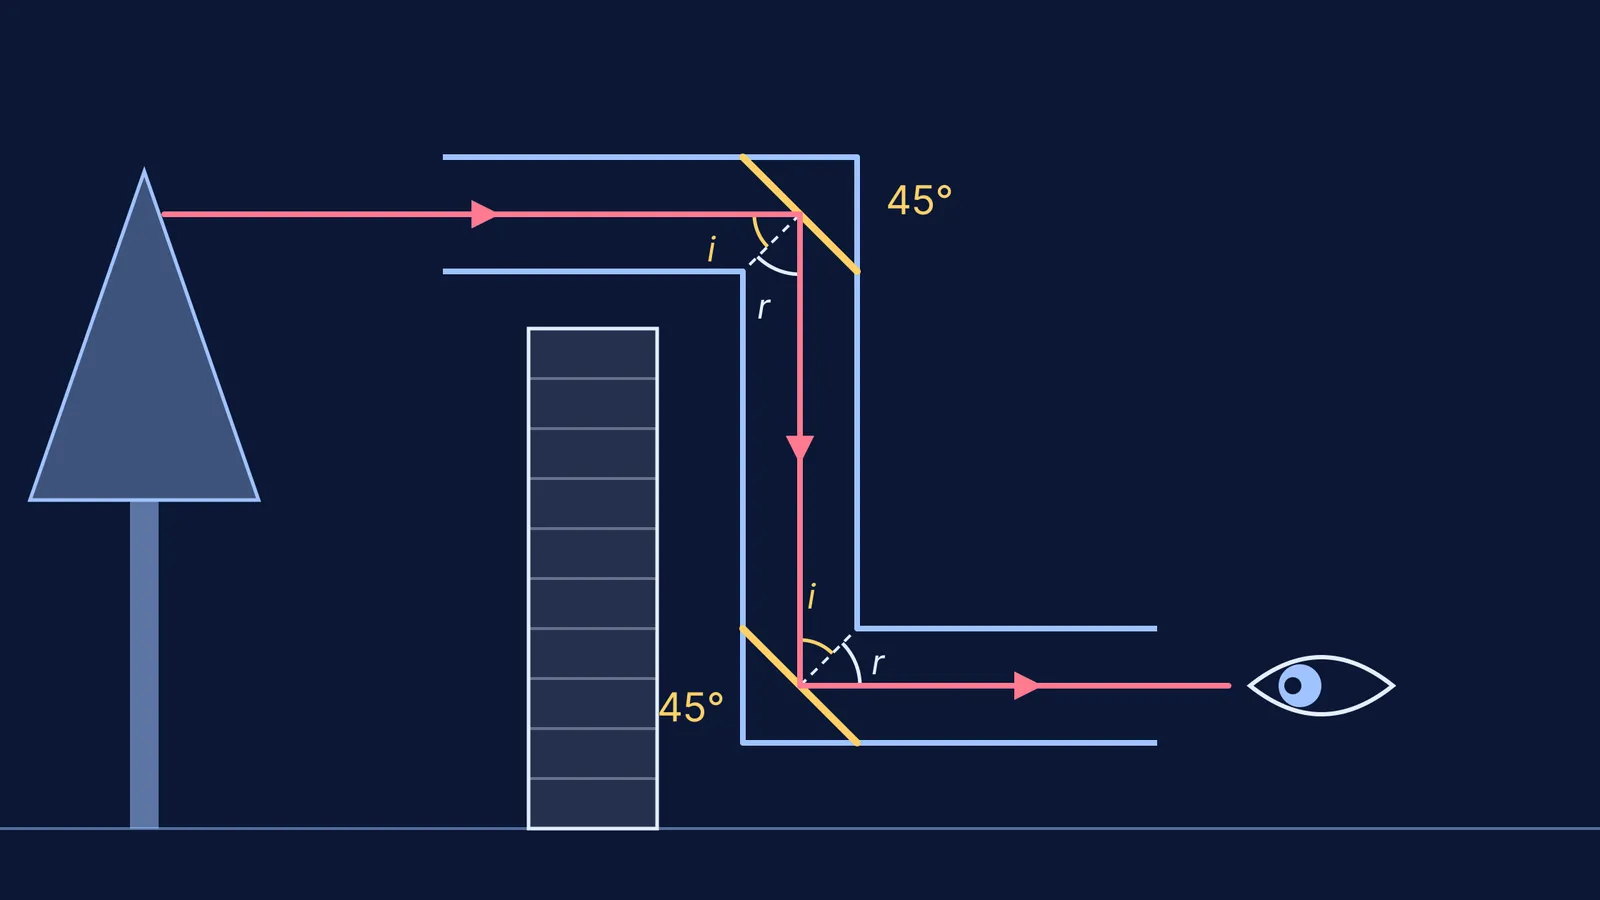
The answer is in the next year's book. Curiosity Grade 8, Chapter 10, "Light: Mirrors and Lenses" states the law of reflection: the angle of incidence equals the angle of reflection, both measured from the normal, a line at right angles to the mirror.
Light arriving horizontally meets a 45° mirror at 45° to the normal, leaves at 45° on the other side, and so turns through 90°, straight down the tube. The bottom mirror is parallel to the top one, so it turns the light 90° again, out towards your eye.
There is a fuller explainer on why a rotating plane mirror turns the reflected ray by 2θ.
What happens if you change the mirror angle?
Work this example together before testing. Say the two mirrors are 40 cm apart along the tube.
Top mirror at 45°: the ray turns exactly 90° and runs down the middle of the tube.
Top mirror at 44°: the mirror is 1° off, so the ray is 2° off vertical. Over 40 cm it drifts sideways by 40 × tan 2°, about 1.4 cm. It still hits the bottom mirror, but what you see shifts slightly up or down.
Top mirror at 40°: the ray is 10° off vertical and drifts 40 × tan 10°, about 7 cm, more than half the tube's width. It hits the cardboard, and your child sees darkness.
Ask your child to write a prediction for each, then loosen the tape and test. Activity 11.5 in the Grade 7 chapter uses the same move: tilt a mirror and watch a spot of light move on a wall.
What to say while testing:
"Before you look, what will you see if this mirror leans a bit more?"
"You saw the ceiling. Which way did the light go after the top mirror?"
"The mirror moved a little. Why did the picture move a lot?"
Then swap roles: your child sets an angle and you predict.
How does a periscope link to the Class 7 and Class 8 light chapters?
The Grade 7 chapter teaches that a plane mirror image is laterally inverted: your left appears as your right. Hold a page of writing in front of the top window. The words read the right way round, because the second mirror undoes the first mirror's flip. Ask your child to explain why.
Question 11 at the end of that chapter asks students to mark where to fix two mirrors in a bent tube to make a periscope. A child who has built one can answer from experience. For the wider topic, see our guide to light in Class 8 science, and for more home projects, our kitchen science experiments.
When later light chapters get harder to picture, the Fermi Simulation Lab has interactive simulations for ideas that are easier to see than to read. Keep the cardboard periscope nearby too: if the screen and the real thing disagree, ask why.