On this page
You can learn charging by induction as a list to memorise, or as four predictions you make before each step. The second way sticks, because every step rests on two facts: electrons in a metal move freely, and like charges repel. Below are the steps for a positive rod and a prediction drill.
What is an electroscope and why do its leaves move?
The NCERT Class 12 Physics textbook describes the gold-leaf electroscope as a vertical metal rod in a box with two thin gold leaves at its lower end; when charge reaches the leaves they diverge, and how far they diverge indicates how much charge there is.
Both leaves carry the same sign of charge, so they push apart. Every prediction below comes down to one question: is there net charge on the leaves right now?
Metals let charge move because they have conduction electrons that move freely, while insulators lack them, as OpenStax University Physics explains. NCERT lists human bodies and the earth as conductors too, which is why touching the knob with a finger earths it.
What happens to the leaves at each step of charging by induction?
Start with a discharged electroscope, leaves hanging together, and a glass rod rubbed with silk, which is positive. Before each step, say your prediction out loud, then check it.
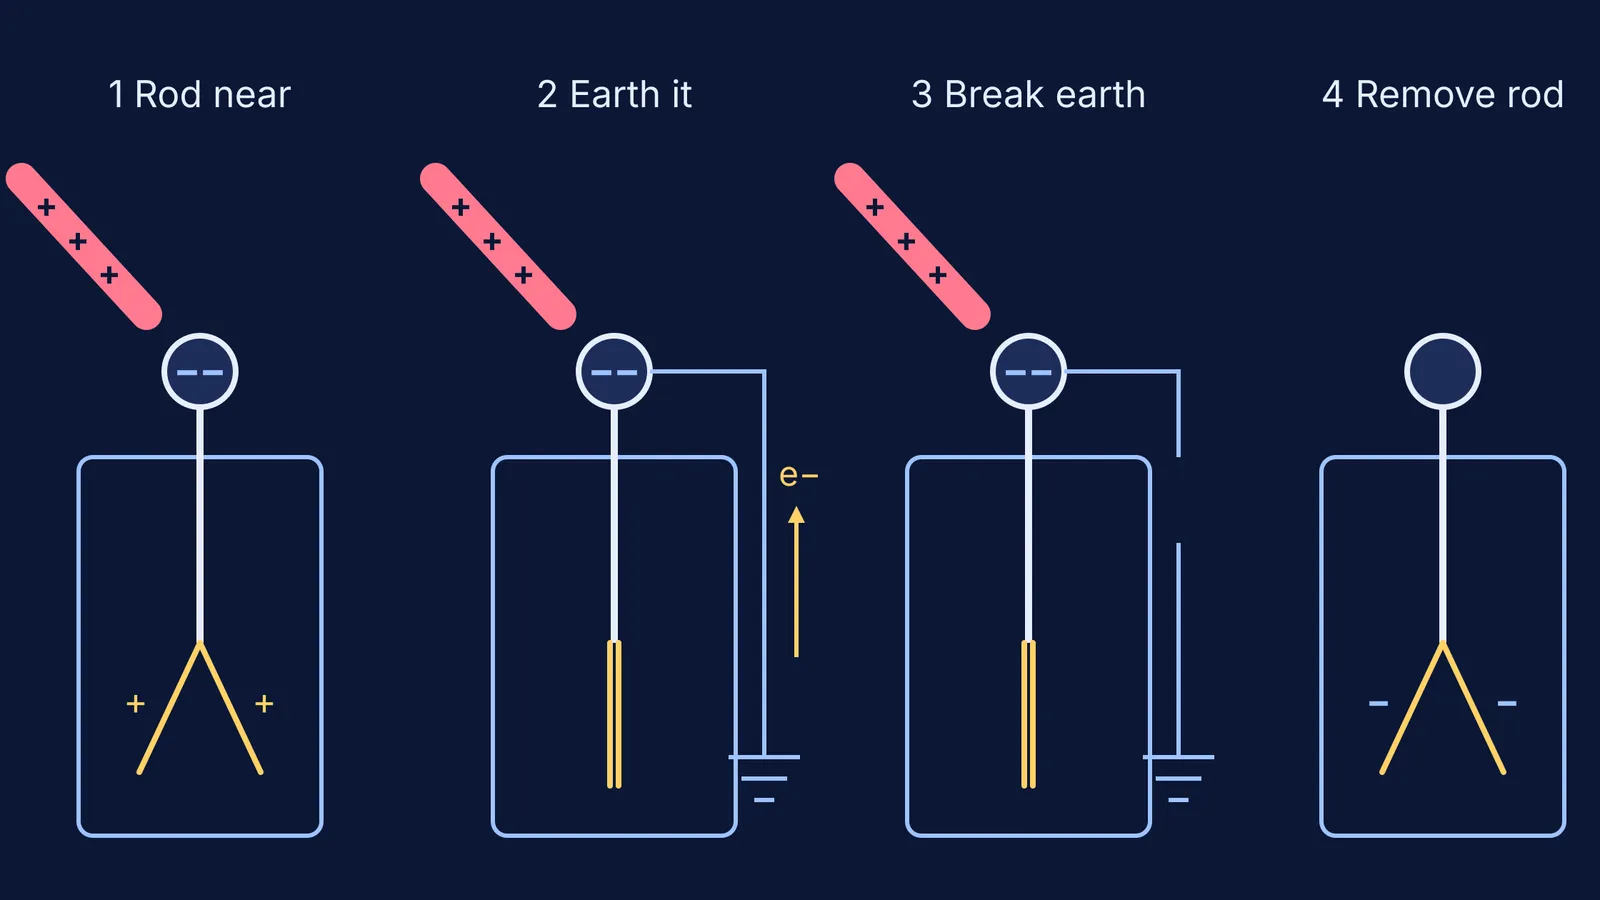
Bring the rod near the knob without touching. Prediction: the leaves spread. Electrons are pulled up to the knob, so the knob turns negative and the leaves are left positive. The account of electrostatic induction on Wikipedia describes exactly this split: the top terminal gains charge opposite to the rod, and the leaves gain charge of the same sign.
Touch the knob with a finger while the rod stays. Prediction: the leaves collapse. Electrons flow up from the earth and cancel the positive charge on the leaves. The knob stays negative because the rod still attracts those electrons. OpenStax calls this grounding: the earth is large enough to supply or accept excess charge easily.
Take your finger away, rod still in place. Prediction: no change, the leaves stay down. The extra electrons are now trapped on the electroscope, but the rod still holds them at the knob, so the leaves have no net charge yet.
Remove the rod. Prediction: the leaves spread again. The trapped electrons now spread over the whole conductor, including the leaves. The electroscope is negative, opposite to the rod.
Purdue University's lecture demonstration notes give the same order: rod near, touch the knob, remove your finger, then remove the rod, leaving a charge opposite to the rod's.
Why must you remove the earth before the rod?
Describing the same method for a metal sphere, OpenStax states that the ground connection is broken before the charged rod is removed, leaving the sphere with an excess charge opposite to that of the rod.
Swap steps 3 and 4 and predict again. If the rod goes first while your finger is still on the knob, nothing holds the extra electrons any more, so they flow back to the earth through you. The electroscope ends neutral and the leaves stay down. Before every move, ask: where are the extra electrons, and what is holding them there?
Two more variations are worth predicting:
Use a negative rod, such as plastic rubbed with fur. Every sign flips: electrons are pushed down to the leaves in step 1, they leave through your finger in step 2, and the electroscope ends positive.
Bring a charged rod near an electroscope that is already charged. The Purdue notes say that a rod of the opposite sign makes the leaf begin to collapse. A rod of the same sign pushes more like charge down and the leaves spread further. This is how an electroscope tests the sign of an unknown charge.
How do you practise this on a virtual electroscope?
A simulation lets you pause between steps and see where the extra charges sit, which a real gold leaf cannot show. For the evidence, see our post on what PhET research says interactive physics simulations are good for. Use this drill:
Write the four steps in a column. Next to each, write spread, collapse or no change, plus one line on why.
Run each step. Check the leaves first, then check where the charges are.
For every wrong prediction, write the sentence that would have got it right, for example: the rod still holds the electrons at the knob, so the leaves have no net charge.
Repeat with a negative rod, then with steps 3 and 4 swapped.
Explain the whole sequence to a friend or parent without notes.
For other ideas that are easier to see than to read, the Fermi Simulation Lab has interactive simulations. If a step still feels wrong, Fermi's AI tutor notices where you are stuck and decides whether to explain, ask or show.
Next, see why charge on a conductor sits on its surface in our guide to conductors, surface charge and shielding, and practise reading electric field lines without common mistakes.