

On this page
When you open up a camera's aperture from f/4 to f/2.8, the image gets brighter and the background melts into a soft blur. But what is happening to the light rays inside the lens to cause this? Instead of memorizing rules of thumb, we can look at the physics of light cones and geometry to understand exactly how aperture size changes what hits the sensor. Whether you are studying optics for an exam or trying to take better portraits, the relationship between the f-number and the focal plane is a perfect example of applied mathematics. It builds on the same optical foundations you use when tracing the image through a lens and mirror set apart or calculating refraction through a glass sphere.
What is the effect of aperture size on image brightness?
Inside the lens, a mechanical diaphragm made of overlapping blades opens and closes to control the light. When you change the f-number on your camera, you are instructing these blades to adjust the physical diameter of the aperture. The brightness of an image depends on the area of this lens opening gathering light. The f-number is defined as the focal length divided by the aperture diameter. Because the area of a circular opening depends on the square of its diameter, the light-gathering area is inversely proportional to the square of the f-number. Moving from f/4 to f/2.8 doubles the aperture area, which doubles the light reaching the sensor and produces a brighter image (Wikipedia).
This inverse-square relationship means that small changes in the f-number create massive differences in how much light a camera collects. A tiny smartphone lens and a massive telescope will produce the exact same image brightness if they are both set to f/2.8, because the ratio of light collected to light spread across the sensor remains identical in both optical systems.
How does aperture size affect background blur?
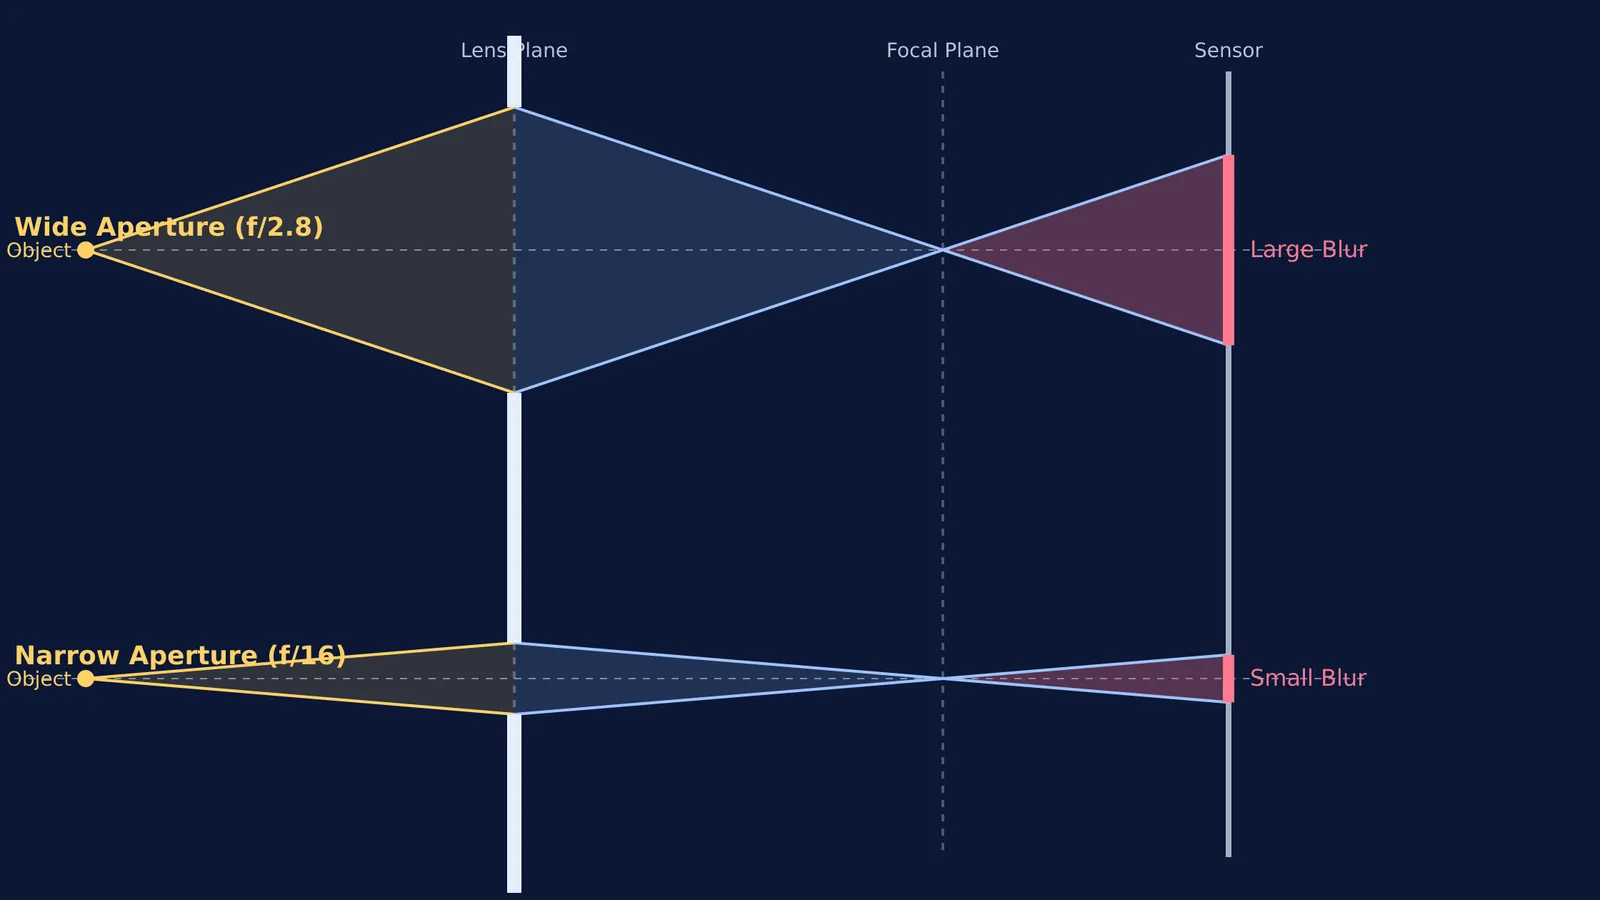
When an object is perfectly in focus, its light rays converge to a single sharp point exactly on the sensor plane. However, for objects that are positioned further away or closer to the camera than the focal distance, the light rays form a converging or diverging cone that intersects the sensor not as a point, but as a circular blur disk. In optical physics, this disk is known as the circle of confusion. For a standard 35mm full-frame sensor, an image only appears sharp to the human eye if this circle of confusion is smaller than 0.03 mm (Wikipedia). Any blur disk smaller than this threshold is perceived as perfectly sharp, creating a continuous depth of field.
A wider aperture (such as f/2.8) creates a very steep, wide cone of light entering the camera from the lens. When the subject is slightly out of focus, that wide cone spreads out rapidly across the sensor plane, creating a large circle of confusion. The result is a highly shallow depth of field, where only a thin slice of the world appears sharp and the background becomes completely blurred.
Conversely, a narrow aperture (such as f/16) restricts the incoming light to a tight, shallow-angled cone. Because the cone is narrow, the blur circle stays tiny even for objects that are positioned very far from the main focal plane. This optical property explains why landscape photographers use high f-numbers to keep both nearby rocks and distant mountains acceptably sharp in the same photograph.
Predicting exposure: a worked example
You can use the standard f-number sequence—f/1.4, f/2, f/2.8, f/4, f/5.6, f/8, f/11, f/16—to plan your camera settings mathematically in the field. Because these numbers increase by a factor of the square root of 2, each step up exactly halves the light-gathering area of the lens.
If you are shooting a portrait at f/5.6 and decide the background is too distracting, you might want to open the aperture to f/2.8 to significantly increase the blur. Here is how you balance the physics to avoid overexposing the sensor:
Count the stops: moving from f/5.6 down to f/4 is one full stop, and moving from f/4 down to f/2.8 is a second full stop.
Calculate the brightness change: opening up the aperture by two full stops increases the incoming light by a factor of four (2 × 2).
Adjust the shutter speed: to prevent the final image from being four times too bright, you must use a shutter speed that is exactly four times faster (for example, moving from 1/100th of a second to 1/400th of a second).
Testing the physics with active learning
Physics principles like light cones and depth of field are much easier to grasp when you can actively manipulate the variables yourself. This approach, widely known as active learning, forces you to build and rigorously test a mental model rather than just passively reading a textbook or watching a lecture. A 2011 study published in *Science* compared traditional physics lectures to active learning methods, finding that students who engaged in guided practice and problem-solving achieved enhanced learning on conceptual tests (Science).
If you are struggling to picture how light cones intersect a sensor at various distances, you can jump into the Fermi Simulation Lab. Interactive simulations for the ideas that are easier to see than to read are excellent for bridging the gap between mathematical theory and physical reality. Instead of just memorizing the inverse-square rule for f-numbers, you can manually drag the aperture wider and instantly watch the optical geometry change, permanently cementing the relationship between the math and the physical result.


