
On this page
In 1610, Galileo Galilei published a small book called *Sidereus Nuncius* (The Starry Messenger) that changed how we see the universe (Project Gutenberg, 2024). Using his newly improved telescope, he looked at the Moon and saw something that contradicted centuries of accepted wisdom: the Moon was not a perfect, smooth sphere.
It had valleys, craters and mountains.
To prove this to a sceptical public, Galileo did more than just draw what he saw. He used the geometry of right triangles to calculate exactly how tall those mountains were. How to visualise hard physics ideas: a chooser by topic can help you set up geometric models like this.
How did Galileo know the Moon had mountains?
Aristotelian philosophy held that all celestial bodies were perfect spheres. Any dark spots on the Moon were thought to be variations in its density, not physical bumps.
When Galileo looked at the Moon during its quarter phase, he focused on the terminator—the line dividing the sunlit half from the dark half. If the Moon were perfectly smooth, this line would be crisp and straight. Instead, Galileo saw a jagged, uneven edge.
More importantly, he noticed bright spots of light appearing in the dark portion of the Moon, just beyond the terminator. He realised these spots were mountain peaks catching the first horizontal rays of "sunrise" while the lower valleys surrounding them remained in shadow.
How did Galileo measure mountains on the Moon?
Galileo knew that the key to measuring the mountains lay in the distance from the terminator to those isolated bright peaks.
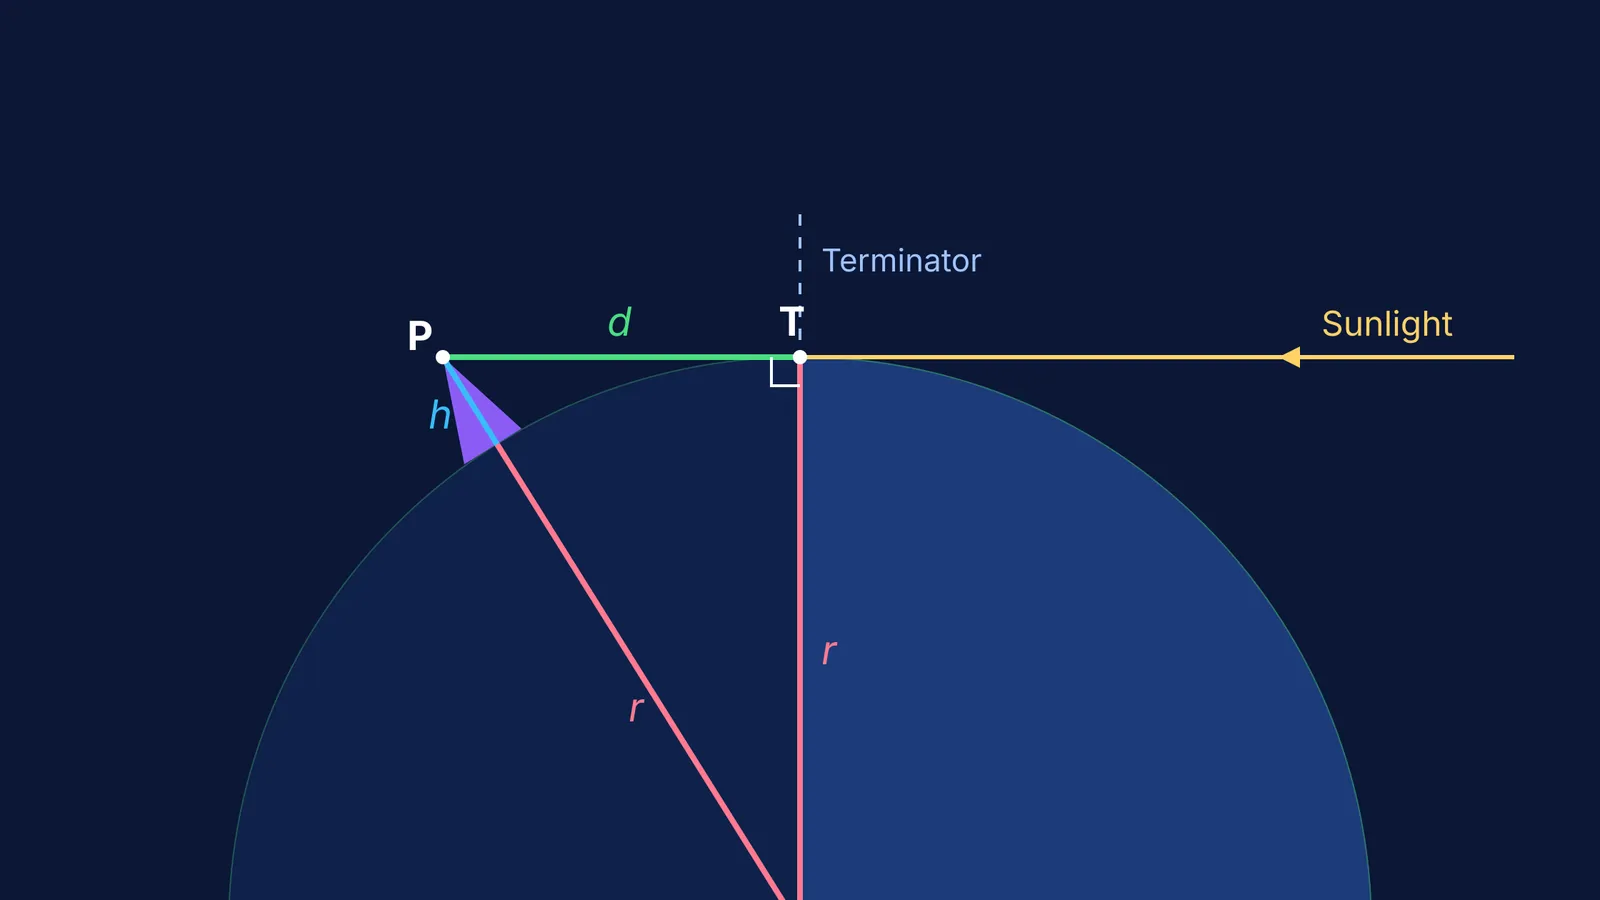
He visualised a right-angled triangle connecting three points:
The centre of the Moon (C).
The terminator (T): The point where the Sun's grazing ray touches the Moon's curved surface.
The mountain peak (P): The bright spot in the dark region.
Because the Sun's ray is tangent to the Moon's surface at the terminator, the line from the Moon's centre to the terminator (the radius, r) meets the ray of sunlight at exactly 90°. The distance from the terminator to the peak along this ray of sunlight is d. The distance from the centre of the Moon to the peak is the radius plus the mountain's height (r + h).
Using the Pythagorean theorem (a² + b² = c²), the relationship is: r² + d² = (r + h)²
How do you calculate the height step by step?
To calculate the height, Galileo needed two numbers: the radius of the Moon (r) and the distance to the peak (d).
He estimated the Moon's diameter to be 2,000 Italian miles, giving a radius (r) of 1,000 miles. By comparing the distance of the bright spots to the size of the whole Moon in his telescope, he found that the peaks were about 1/20th of the Moon's diameter away from the terminator (Project Gutenberg, 2024). Therefore, d = 100 miles.
Here is how he solved it:
Start with the formula: 1000² + 100² = (1000 + h)²
Square the numbers: 1,000,000 + 10,000 = (1000 + h)²
Add them together: 1,010,000 = (1000 + h)²
Take the square root of both sides: √1,010,000 ≈ 1004.98
This means: 1004.98 ≈ 1000 + h
Subtract the radius: h ≈ 4.98 miles
Galileo concluded that the mountains were "more than 4 Italian miles" high (Project Gutenberg, 2024). At the time, this was astonishing—it meant lunar mountains were taller than the highest known mountains on Earth.
If you are practising how to extract numbers from a physics scenario to build a mathematical model, How to solve physics problems step by step, with a worked example provides a reliable framework.
What was the impact of the four-mile mountain?
By backing up his visual observations with hard numbers, Galileo made it impossible to dismiss his findings as mere optical illusions. His simple application of geometry dismantled the idea of a "perfect" heaven and proved that celestial bodies were physical, rocky worlds much like our own.
Visualising how light rays hit a curved surface can be tricky when reading from a textbook. In the Fermi Simulation Lab, you can find interactive simulations for the ideas that are easier to see than to read. And if you get stuck working through the math of a geometric proof, the Fermi Problem Library has worked problems with a step-by-step solver that explains the reasoning rather than printing an answer.