
On this page
More than a century and a half ago, Michael Faraday used a single candle to teach young people how burning works. His lectures still line up, almost activity for activity, with the flame-zones diagram that Indian students learn in Class 8.
What was The Chemical History of a Candle?
According to the Royal Institution's history of its Christmas Lectures, Faraday started the lectures in 1825 “to engage and educate young people about science”. He went on to present 19 series himself, more than anyone else. Two were on the chemical history of a candle, in 1848 and 1860. The lectures were printed as a book in 1861, edited by William Crookes, and the book is still in print.
The full text is free on Project Gutenberg. Its six lectures run from the flame's structure to water, hydrogen, oxygen and carbon dioxide, ending with breathing as a kind of slow burning. Early on, Faraday says, “I claim the privilege of speaking to juveniles as a juvenile myself.” He keeps that promise: the flame experiments below need little more than a candle, a glass tube and a strip of paper.
What did Faraday show about a candle flame?
In the second lecture of the Gutenberg edition, Faraday takes the flame apart one region at a time:
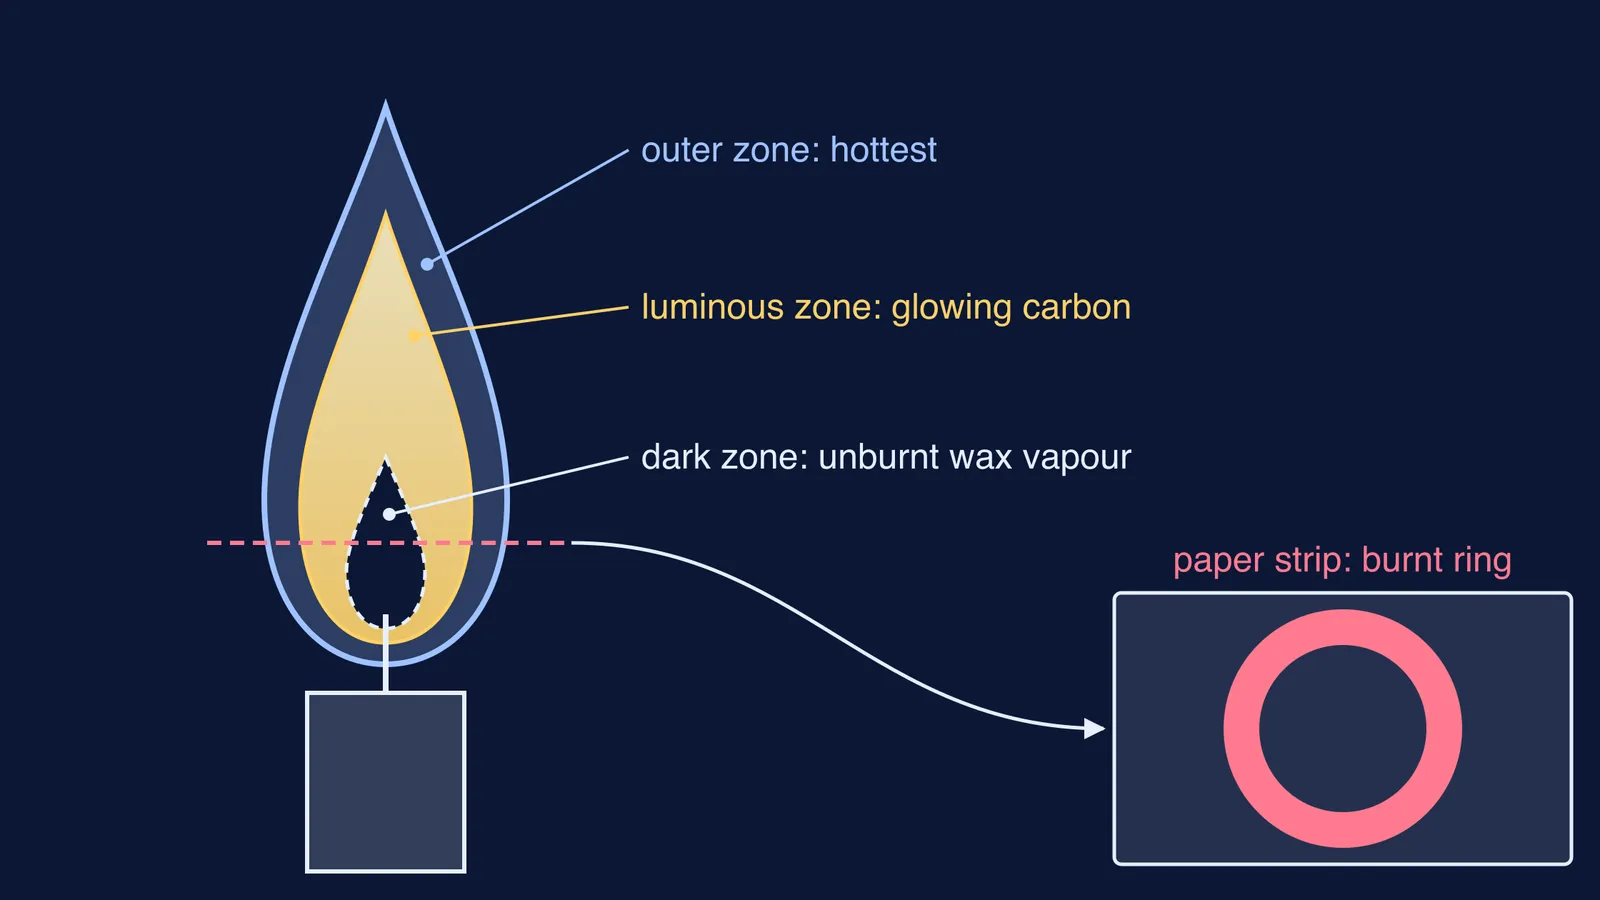
The dark middle is fuel, not fire. He puts a bent glass tube into the dark part of the flame and draws off a vapour. Then he lights that vapour at the far end of the tube: “we can actually lay on a candle!” The vapour is wax, turned to vapour by the flame's own heat.
The bright part is glowing carbon. He moves the tube higher, into the luminous part, and gets “a black vapour” that is “as black as ink”. It does not burn, and it puts a light out. These are carbon particles. Heated until they glow, they are what makes the flame bright: “all bright flames contain these solid particles”.
The heat is in a ring. He holds paper across the flame and finds the heat “in a ring, exactly in the place where I told you the chemical action was”. That is where vapour from the inside meets air from the outside.
The series ends with a wish for his listeners: that “you may, like it, shine as lights to those about you.”
How do Faraday's experiments match the Class 8 flame zones?
NCERT's Class 8 chapter Combustion and Flame (Chapter 4 in the 2024-25 edition of the textbook) shows three zones in Fig. 4.13. The innermost zone holds unburnt wax vapours: it is black and the least hot. The middle zone is where partial combustion happens: it is yellow and moderately hot. The outer zone is where combustion is complete: it is blue and the hottest part of the flame.
The chapter's activities are close cousins of Faraday's:
Activity 4.5 puts one end of a 4-5 cm glass tube into the dark zone and brings a lit matchstick to the other end. This is Faraday's “lay on a candle” trick.
A clean glass plate held in the luminous zone for about 10 seconds picks up “a circular blackish ring” of unburnt carbon. That is Faraday's ink-black vapour caught on glass.
A copper wire held just inside the non-luminous zone for about 30 seconds turns red hot just outside the flame. Like Faraday's paper ring, it shows where the heat is.
NCERT's textbook site now also lists the newer Curiosity science books, so check which book your school uses. The chapter, figure and activity numbers here come from the older Science textbook.
How do you write the flame-zones answer in an exam?
Use a four-part frame: name the zone, say what is burning there, say how hot it is, and give one piece of evidence. Here it is on a question the NCERT chapter itself asks: why do goldsmiths use the outermost zone of a flame to melt gold and silver?
Zone: the outermost, non-luminous (blue) zone.
What happens there: complete combustion, because this is where the fuel vapour meets the air.
Result: it is the hottest part of the flame.
Evidence: a copper wire held there glows red hot just outside the flame, and Faraday's paper scorched in a ring at the same edge.
To revise, run this checklist for each zone and say it aloud without looking:
Inner, dark: unburnt wax vapour, least hot. Evidence: the vapour drawn off through a tube can be lit.
Middle, yellow and luminous: partial combustion, moderately hot. Evidence: soot collects on a glass plate.
Outer, blue and non-luminous: complete combustion, hottest. Evidence: paper chars in a ring and copper wire glows.
If the nested zones are hard to picture, the Fermi Simulation Lab has interactive simulations for ideas that are easier to see than to read. If the trouble is with the words underneath, such as fuel, complete combustion and partial combustion, the Fermi Concept Library gives each concept in chemistry its own lesson.
Then read Lecture II tonight. It is short, and you will never look at a birthday candle the same way again.