

On this page
In physics and geometry, straight lines are simple to measure. You place a ruler along the line, read the number at the end, and you have your distance. But the real world is rarely perfectly straight. Rivers wind, roads bend, and coastlines snake around bays.
When asked how to measure the length of a curved line in Class 6 Science, you will quickly find that a straight scale cannot do the job directly. According to the NCERT Class 6 science textbook (Chapter 10, *Motion and Measurement of Distances*), you must use an intermediate tool that bends to follow the path. The most common and accurate method in a school laboratory involves using a flexible thread.
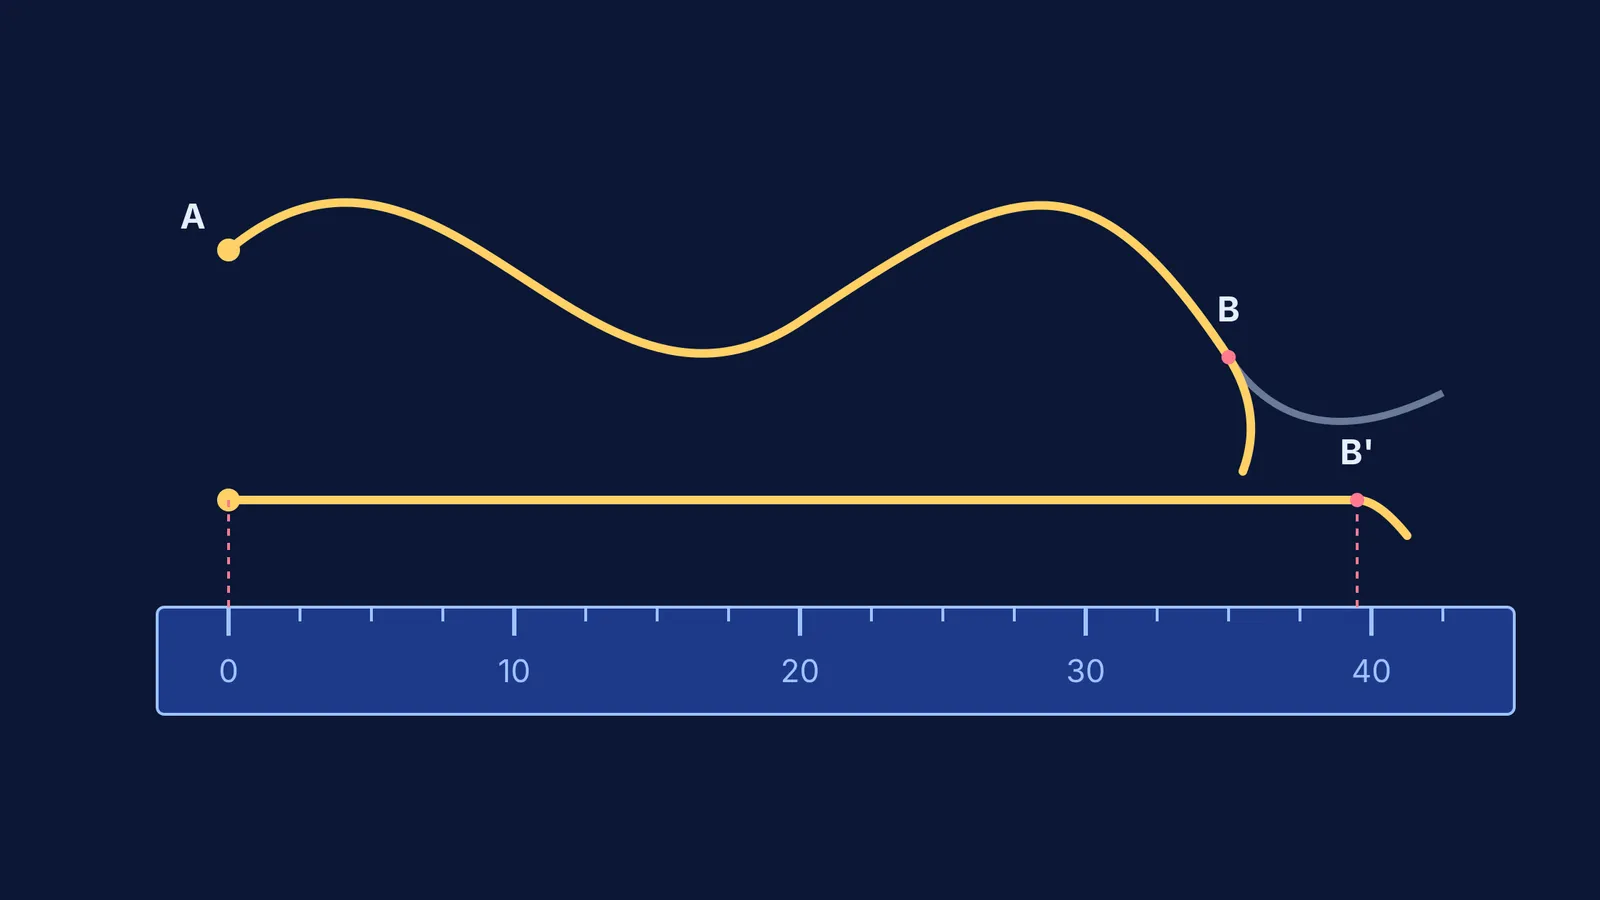
How to measure a curved line with a thread?
To measure a curved line accurately, you need a long piece of thread, a pen or marker, and a standard ruler. The thread must be made of cotton or a similar material that does not stretch. If you use an elastic string, it will elongate when pulled, completely ruining the accuracy of your measurement.
Here is the standard step-by-step method:
Tie a starting knot: Tie a small knot at one end of the thread. This knot will be your starting point, essentially acting as the zero mark.
Place the start: Put the knot precisely at the beginning of the curved line (point A). Hold it firmly in place against the paper with your thumb.
Trace the curve: Use your other hand to lay a small section of the thread exactly along the curve. Press down on the thread where the curve starts to bend, so it does not slip out of place, and then adjust the next small section.
Walk your fingers: Move along the line bit by bit. Always keep the thread taut but not stretched, making sure it perfectly overlaps the drawn curve until you reach the very end (point B).
Mark the endpoint: Once the thread touches the final point of the curve, use a pen to make a clear, visible mark on the thread itself.
Read the total length: Take the thread off the paper and pull it straight alongside a standard metre scale. Place the initial knot exactly at the zero mark on the ruler. The number on the ruler that lines up with your pen mark is the true length of the curved line.
This method works beautifully because the thread stores the shape of the path. Once straightened, the distance along the thread remains exactly the same as the total distance along the curve.
How do you measure a curved line on a map using a divider?
While a thread is perfect for a science practical or measuring a drawing on a desk, geographers and navigators often use a different tool to measure winding rivers or roads on a map. A divider is a drafting instrument with two sharp metal points, similar to a geometry compass but without a pencil attached.
Because you cannot bend a metal ruler or easily stretch a thread across a large, folded map, you use the divider to break the curved line into many tiny, straight steps. This technique is known as the stepping method.
Set the divider gap: Open the points of the divider to a small, known distance against a ruler. For example, set the gap between the two sharp points to exactly 1 cm.
Start stepping: Place one point of the divider at the starting point of the curve on your map.
Walk the path: Pivot the divider on its front leg, swinging the back leg forward to make the next step along the line. Keep stepping and pivoting until you reach the destination.
Count and multiply: Keep a strict count of how many steps you took. If you took 15 steps and your gap was 1 cm, the map distance is 15 cm. If there is a tiny segment left over at the end, measure it separately and add it to the total.
Convert to real distance: Finally, use the map's printed scale to turn those 15 cm into real-world kilometres or miles.
If a map features tightly winding paths, you must use a smaller divider gap (such as 0.5 cm) so the straight points do not cut corners across the curves, which would result in a shorter measurement than the reality. Navigators have used this precise stepping technique for centuries, long before Gerardus Mercator's map transformed ocean travel with straight bearing lines.
Checking your measurements and units
Whether you are tracing a line with a thread or stepping a divider across a map, precision matters at the final reading. When you place your marked thread against a ruler, always ensure your eye is directly above the measurement mark. Viewing the scale from an angle causes a parallax error, making the measurement appear slightly longer or shorter than it truly is.
If you are stuck on a physics problem about distances, displacements, or measurement errors, the Fermi Concept Library holds the core ideas behind units and scaling. And if you are trying to understand why a straight-line measurement does not match a curved trajectory in kinematics, Fermi's AI tutor can walk you through the geometry step by step. It lets you explore the shapes and test the paths yourself until the rules of motion and measurement make complete sense.


