
On this page
A lever is a simple machine that makes work easier by changing the amount or direction of a force. At its most basic, it consists of a rigid bar that rotates around a fixed pivot point, known as the fulcrum (Wikipedia).
Whether you are using scissors to cut paper, swinging a cricket bat, or sweeping the floor with a broom, you are using a lever. To understand how they work, we divide them into three classes based on the arrangement of three key parts: the fulcrum, the load (the resistance you are trying to overcome), and the effort (the force you apply).
What are the three classes of levers?
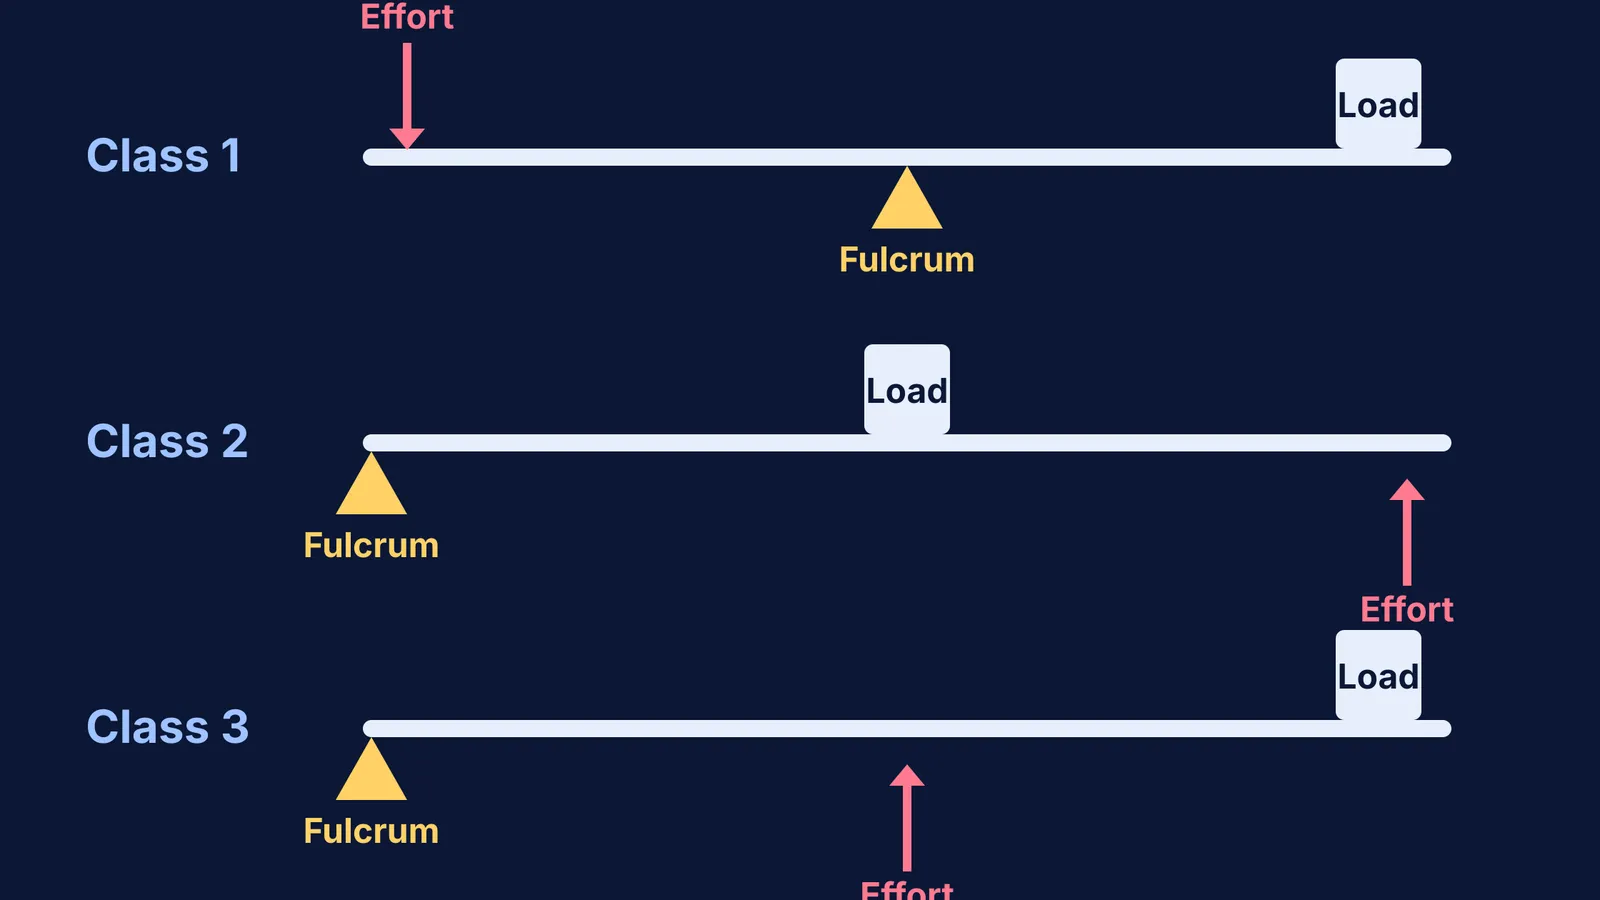
Levers are classified by which component sits in the middle. The easiest way to remember this is the FLE rule:
Fulcrum in the middle (Class 1)
Load in the middle (Class 2)
Effort in the middle (Class 3)
Understanding these arrangements is a core topic in Class 9 physics, where you calculate mechanical advantage. If you are ever stuck on these definitions or calculations, the Fermi Concept Library has a lesson for every concept in physics and shows its place in the map.
What is a first-class lever?
In a first-class lever, the fulcrum is positioned between the effort and the load. This arrangement can change the direction of the force. When you push down on one end, the other end goes up.
Depending on exactly where the fulcrum is placed, a first-class lever can either multiply your force (if the fulcrum is closer to the load) or multiply your speed (if the fulcrum is closer to the effort).
First-class lever examples:
Scissors: Scissors are actually two first-class levers joined together. The central pivot screw is the fulcrum, your fingers apply the effort at the handles, and the paper being cut is the load.
Seesaw: The classic playground example, where the pivot is exactly in the centre.
Crowbar: The tip goes under a heavy object (load), the bend rests on the ground (fulcrum), and you push down heavily on the handle (effort).
The human neck: The joint between your skull and your first vertebra acts as a fulcrum. Your neck muscles provide the effort to hold up the weight of your head.
What is a second-class lever?
In a second-class lever, the load is situated between the fulcrum and the effort (Britannica). Because the effort is always applied further from the fulcrum than the load is, a second-class lever always provides a mechanical advantage greater than 1. This means it multiplies your force. It allows you to lift heavier objects than you could on your own, though you have to move your hands a greater distance to do so.
Second-class lever examples:
Nutcracker: The hinge at the top is the fulcrum. The hard nut placed in the middle is the load, and you squeeze the handles at the bottom to apply effort.
Wheelbarrow: The wheel resting on the ground acts as the fulcrum. The dirt in the bucket is the heavy load, and you lift the long handles at the other end.
Bottle opener: The small tip that hooks under the cap is the fulcrum, the cap itself is the load, and you lift the long handle to pry it off.
Standing on tiptoes: The ball of your foot is the fulcrum, your body weight is the load, and your calf muscles pull up on your heel to provide the effort.
What is a third-class lever?
In a third-class lever, the effort is applied between the fulcrum and the load. Because the effort is closer to the fulcrum than the load is, this type of lever actually requires you to apply *more* force than the weight of the load itself.
However, the trade-off is that it multiplies speed and distance. A small, strong movement by your hand results in a large, fast movement at the load end.
Third-class lever examples:
Tongs: The joined, flexible end is the fulcrum. You squeeze the middle of the arms (effort) to pick up a hot object at the open tips (load).
Tweezers: They work exactly the same way as tongs, converting a strong squeeze in the middle into a precise grip at the tips.
A fishing rod: The bottom of the rod held against your body is the fulcrum. Your other hand pulls up on the middle of the rod (effort) to lift the fish at the far end (load).
The human arm: Your elbow joint is the fulcrum. Your biceps muscle attaches to your forearm just below the elbow to provide the effort, lifting a weight held in your hand.
How do you solve lever problems in exams?
When you encounter a lever problem in a physics paper, do not immediately rush to plug numbers into a mechanical advantage formula. Instead, follow a structured plan. Just like learning the types of motion in Class 6, identifying simple machines becomes much easier once you know what to look for first.
Locate the fulcrum: Finding the stationary pivot point anchors the rest of the problem.
Identify the middle component: Use the FLE rule to name the class of the lever.
Check the distances: Measure the effort arm (the distance from the fulcrum to the effort) and the load arm (the distance from the fulcrum to the load).
Approaching a question systematically is the key to solving physics problems step by step. Once you can confidently label the fulcrum, load and effort, the mathematical formulas will make perfect sense.