

On this page
If you scrape your knee or cut your finger, you will soon see a dark crust form over the injury. This scab is not just dried blood; it is a complex biological bandage created by a cascade of chemical reactions. For students studying Class 11 biology, understanding this process—known as blood coagulation—is a key part of the curriculum.
Here is the step-by-step science of how a cut forms a scab, how the skin heals underneath, and how to memorise the clotting cascade for your exams.
How does the body stop the bleeding?
When a blood vessel is damaged, your body immediately enters the hemostasis phase to prevent blood loss. According to the National Institutes of Health's StatPearls, this initial response happens in seconds to minutes (StatPearls).
First, the blood vessels constrict to slow the flow of blood. Within seconds, tiny cell fragments called platelets rush to the site. They become sticky and clump together at the edges of the cut to form a temporary plug.
To make this platelet plug permanent, the blood triggers an enzyme cascade. If you find it hard to picture how enzymes and cell fragments interact in real time, you can explore the Fermi Simulation Lab.
What is a scab made of?
A scab is a dried-out blood clot composed mainly of trapped red blood cells, platelets, and a protein mesh called fibrin.
As detailed in the Class 11 Biology NCERT textbook, the formation of this mesh relies on a specific sequence of reactions in the blood plasma (NCERT):
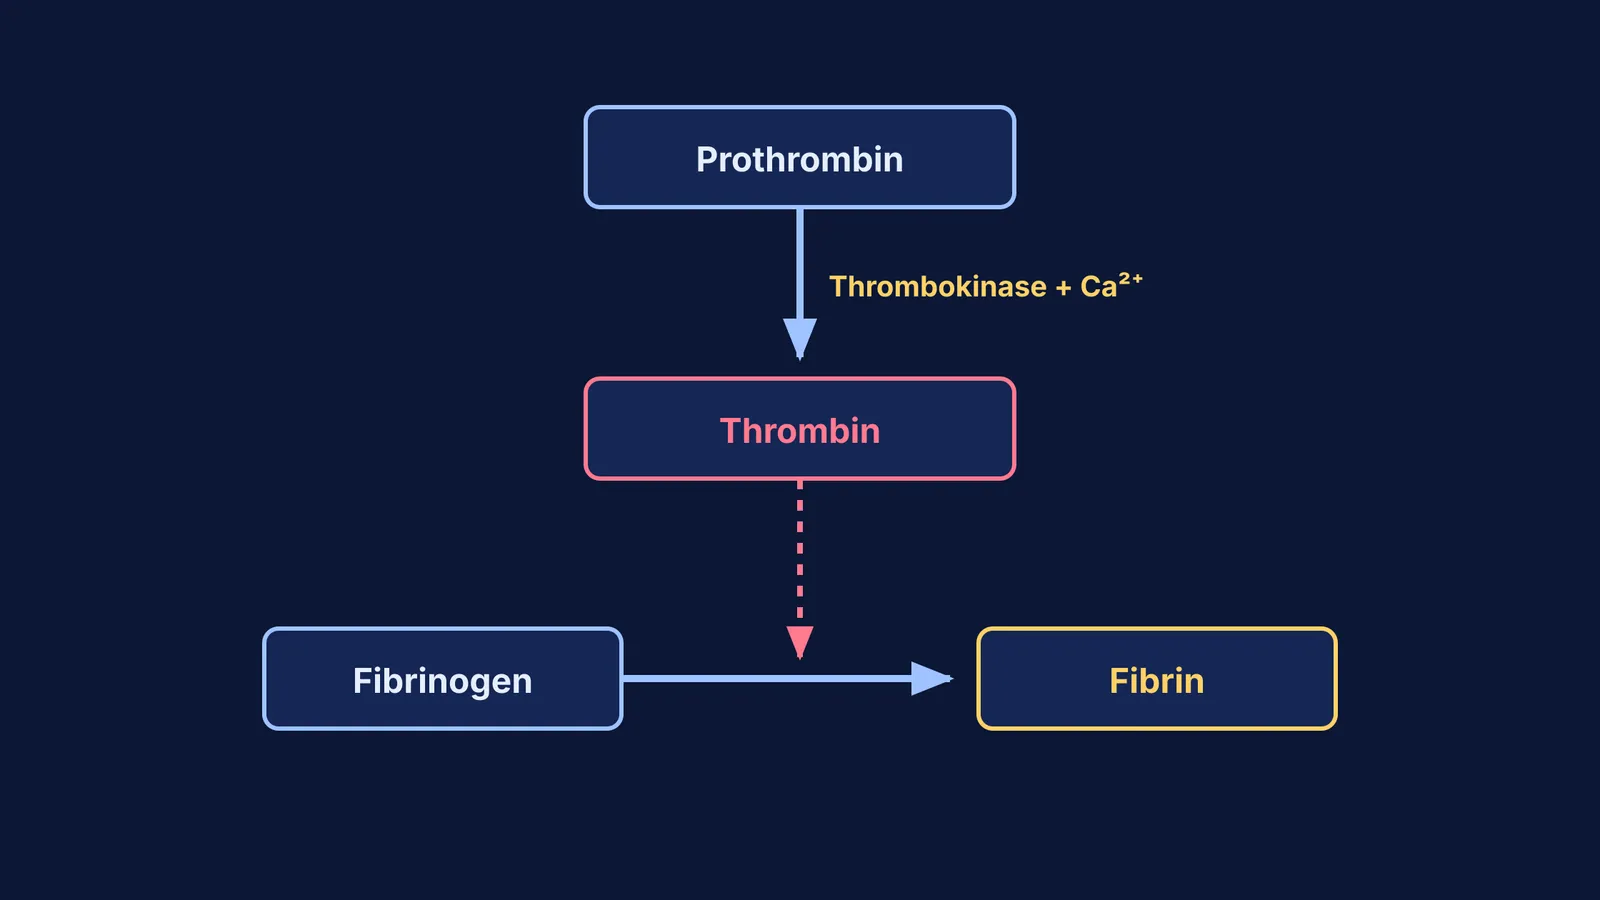
Tissues at the site of the injury and activated platelets release factors that trigger an enzyme complex called thrombokinase.
Thrombokinase converts an inactive plasma protein called prothrombin into an active enzyme called thrombin.
Thrombin then converts soluble fibrinogen into insoluble threads of fibrin.
These fibrin threads weave through the platelet plug, trapping dead and damaged cells to seal the wound. Calcium ions (Ca²⁺) are essential for this cascade to work. As this fibrin-platelet mesh is exposed to air, it dries and hardens into the protective crust we call a scab.
How long does a cut take to heal?
While the scab protects the surface, a highly orchestrated rebuilding process happens underneath. StatPearls outlines three main phases that follow hemostasis (StatPearls):
Inflammation (Days 1 to 5): White blood cells, particularly neutrophils, arrive within the first hour to clear out bacteria and dead cells.
Proliferation (Days 3 to 21): Cells called fibroblasts begin laying down new collagen to rebuild the tissue by days five through seven. At the same time, new skin cells migrate across the wound bed beneath the scab.
Remodeling (21 days to a year): Even after the scab falls off—usually within a week or two—the new tissue continues to mature. The final scar tissue will eventually reach about 80% of the original skin's tensile strength.
If you are studying these biological timelines and getting stuck, Fermi's AI tutor can help. The tutor teaches rather than answers: it notices where you are stuck, decides whether to explain, ask or show, and checks your understanding as it goes.
Why shouldn't you pick a scab?
It is tempting to pick at a drying scab, but doing so actively harms the repair process. The scab is firmly attached to the new, fragile tissue growing underneath.
According to the StatPearls overview of wound healing, the proliferation phase involves building delicate new blood vessels—a process called angiogenesis—to supply oxygen to the new cells (StatPearls). When you tear off a scab prematurely, you rip these microscopic blood vessels and tear away the migrating epithelial skin cells. This forces the body to restart the hemostasis and inflammation phases.
Resetting this biological clock not only extends the time it takes for the cut to heal but also increases the risk of bacterial infection. Prolonged inflammation and repeated damage also lead to an overproduction of collagen, which makes a permanent, visible scar much more likely.
How to memorise the blood clotting cascade?
The blood coagulation pathway is a frequent topic in NEET and board exams. Use this simple checklist to ensure you can recall the exact sequence under pressure:
Identify the trigger: Note that both injured tissues and platelets release clotting factors.
Trace the enzymes: Write down the prothrombin to thrombin conversion, noting that thrombokinase is the catalyst.
Trace the structural protein: Write down the fibrinogen to fibrin conversion, noting that thrombin is the catalyst.
Add the ions: Always write Ca²⁺ above the reaction arrows in your exam answers, as examiners look for this detail.
Define the final product: State clearly that the fibrin network traps formed elements (cells) to create the coagulum (clot).
By breaking the cascade into these five components, you avoid memorising a single long paragraph and instead build a logical framework of how the proteins interact. For more on the components of blood, review our guides to the formed elements of blood and blood clotting for NEET.


