

On this page
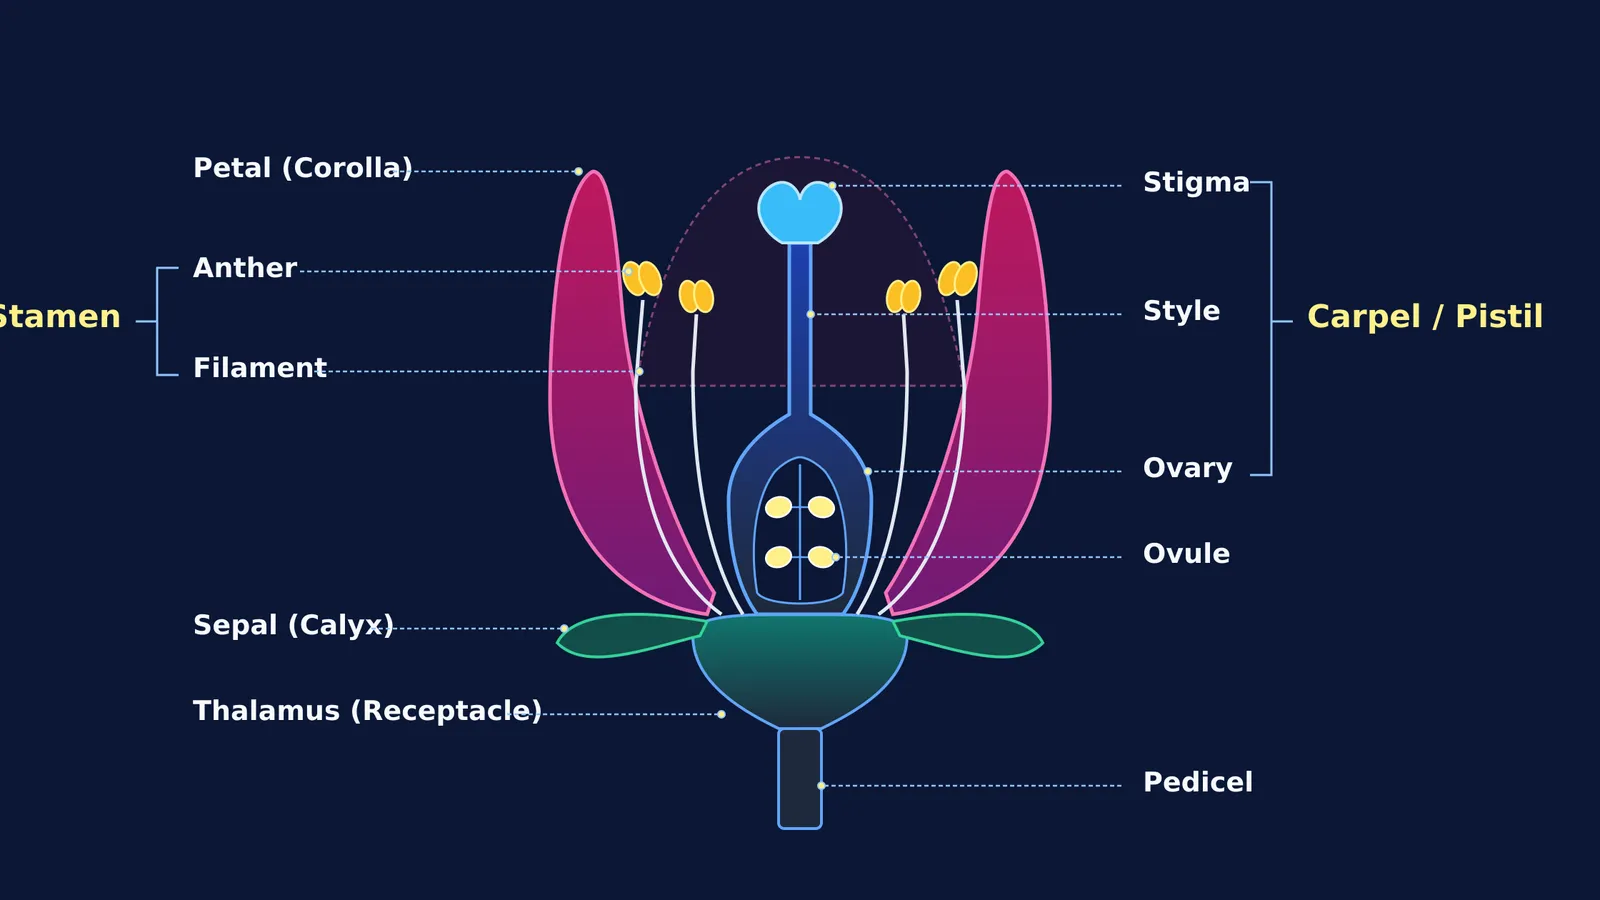
The longitudinal section (L.S.) of a flower is a frequent visual question in secondary biology. A longitudinal cut bisects the flower vertically along its central axis, exposing the internal reproductive chambers hidden inside an intact blossom. Understanding this cross-sectional anatomy is essential for scoring marks in school assessments and for grasping how pollination leads to seed formation in angiosperms.
In CBSE Class 10 Science, the "World of Living" unit accounts for 25 marks of the 80-mark theoretical paper under the CBSE Secondary Curriculum. Questions asking students to draw or label an L.S. diagram of a bisexual flower typically carry 2 to 3 marks, rewarding symmetrical bisection and unambiguous labels according to official CBSE curriculum assessment guidelines. Practising this structure alongside other core CBSE Class 10 science diagrams prevents unnecessary loss of marks on technical drafting errors.
What are the essential parts shown in an L.S. of a flower?
A typical angiosperm flower consists of four concentric whorls arranged on the swollen tip of the flower stalk. In longitudinal section from the outside inward, you must identify:
Thalamus (Receptacle): The swollen, dome-shaped apex of the pedicel supporting all floral organs.
Sepals (Calyx): The outermost green whorl that protects the delicate floral bud before opening.
Petals (Corolla): The brightly coloured second whorl that attracts biotic pollinators. Their overlapping arrangement follows distinct patterns, as explained in aestivation in flowers.
Stamens (Androecium): The male reproductive organs. Each stamen consists of a slender filament and a terminal bilobed anther producing pollen grains.
Pistil or Carpel (Gynoecium): The central female reproductive organ, comprising a sticky terminal stigma, an elongated style, and a swollen basal ovary.
Ovules: The egg-bearing structures inside the ovary. After fertilisation, each ovule becomes a seed while the ovary develops into a fruit, a key process in how organisms reproduce in Class 10.
How should you draw and label the diagram step by step?
Drawing an anatomical diagram under timed exam conditions requires a structured method:
Anchor the base: Draw a vertical cylindrical pedicel expanding into a cup-shaped thalamus.
Outline the pistil: Sketch a flask-shaped carpel standing on the thalamus. Narrow the rounded ovary into a slender style topped with a lobed stigma. Inside the ovary, draw two or four small ovules along the central placenta.
Position the stamens: Draw two stamens on each side of the pistil. Curve their filaments outward so the anthers sit level with the stigma.
Add petals and sepals: Draw broad petals sweeping outward to frame the reproductive organs, followed by pointed sepals curling downward from the thalamus.
Draw clean leader lines: Use a ruler to pull horizontal, parallel guide lines toward the margins, grouping male structures on one side and female structures on the other.
When exploring how floral organs function during fertilisation, the Fermi Concept Library covers every concept in physics, chemistry, biology, mathematics and computing, each with its own lesson and its place in the map. If you get stuck on multi-step reasoning questions, Fermi's AI tutor works out what you already know, builds a plan for the session, and teaches through it—drawing the figure and checking understanding as it goes.
Why does sketch drawing improve biological recall?
Generating visual representations is an active cognitive strategy rather than a decorative task. In their study on visual learning in life sciences, Kim Quillin and Stephen Thomas (2015) demonstrated that student-generated sketches promote model-based reasoning, requiring learners to organise spatial relationships, select key components, and translate abstract verbal definitions into physical structural models.
Similarly, an analysis by Shaaron Ainsworth, Vaughan Prain, and Russell Tytler (2011) in Science established that drawing enhances student engagement, deepens conceptual reasoning, and provides immediate visual feedback. When you draw the path of a pollen tube through the style to the ovary, your brain forms durable associations between anatomical structure and physiological function.
What common labelling mistakes cost marks in board exams?
Examiners evaluate botanical diagrams for anatomical accuracy rather than artistic flair. The most frequent errors include:
Inverted reproductive parts: Swapping labels between the filament and style, or confusing anthers with the stigma.
Detached organs: Drawing stamens or petals floating in midair rather than anchored to the thalamus receptacle.
Missing ovules: Drawing an empty ovary cavity without showing internal ovules attached to the placenta.
Crossing leader lines: Drawing diagonal, intersecting pointers that make it ambiguous which organ is identified.
Unbracketed collective terms: Labelling individual components without grouping anther and filament as "Stamen" or stigma, style, and ovary as "Pistil / Carpel".


