On this page
When children sit down to eat, they know food enters the mouth and exits as waste. Everything that happens between those points remains invisible. School textbooks often introduce digestion with colourful anatomical diagrams, yet young learners frequently imagine the stomach as a hollow holding sack where chewed food simply waits.
Why do children struggle to picture digestion?
Research in science education confirms how persistent these intuitive misunderstandings are. In a study of 45 children aged 4 to 10 published in the *International Journal of Science Education*, Francimar Martins Teixeira (2000) showed that while young students memorise names like stomach and intestine, understanding chemical transformation—how solid food becomes microscopic nutrients—is a primary cognitive hurdle. Most children assume food stays essentially the same substance throughout its transit.
Similarly, an investigation by Yilmaz Cakici (2005) into upper primary pupils aged 10 to 11 found that students frequently view digestion as "melting" or passive dissolution, like sugar dissolving in water. Many participants believed digestion ends entirely in the stomach, treating intestines merely as waste tubes.
Static diagrams cannot show muscular grinding or fluid transfer. Hands-on kitchen science experiments provide physical feedback, turning abstract biological terms into tangible actions children can see and feel.
What household items do you need for the model?
You can demonstrate every major digestive phase using common kitchen supplies. The setup adapts the classroom demonstration created by STEM Learning with Reach Out CPD:
Food: 1 or 2 slices of soft bread or plain crackers.
Saliva: 50 millilitres of tap water.
Stomach acid: 60 millilitres of white vinegar or lemon juice.
Stomach: 1 sealable zip-top freezer bag (1-litre capacity).
Small intestine: 1 leg cut from a nylon stocking or pair of tights (about 30 centimetres long).
Large intestine and rectum: 1 paper cup with a 2-centimetre hole cut in the bottom, plus a second cup as a plunger.
Work area: 1 shallow baking tray to catch liquid.
How do you run the bread-and-bag demonstration step by step?
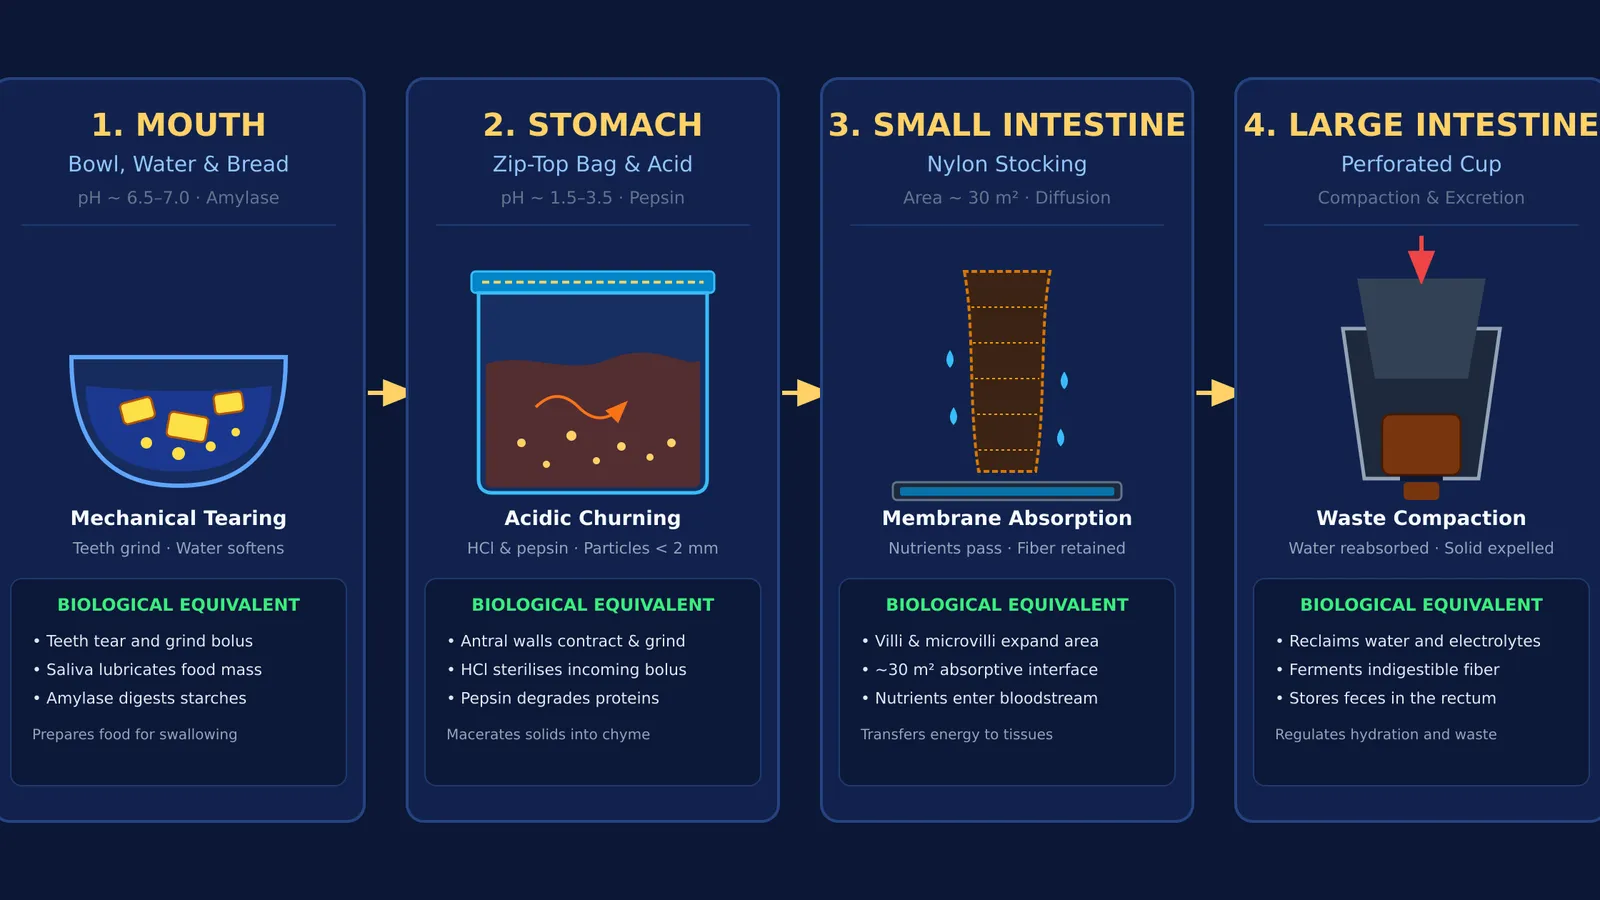
Run the activity across four stations, letting your child handle the tools:
Station 1: Chewing in the mouth. Place bread into a bowl. Have your child tear it into pieces, add the 50 millilitres of water, and mash with a spoon for 30 seconds.
*What to say:* "Teeth carry out mechanical digestion by breaking food into smaller bits to increase surface area. Saliva moistens food and contains enzymes that begin splitting starches into sugars, as outlined in the practical protocol from STEM Learning."
Station 2: Churning in the stomach. Transfer the bread mush into the zip-top bag and add the 60 millilitres of vinegar. Squeeze out excess air, seal tightly, and let your child knead the bag for 2 minutes.
*What to say:* "The stomach is a muscular pouch. Its lining secretes hydrochloric acid, bringing internal pH between 0.8 and 3.5, according to clinical data in StatPearls. This acid kills microbes and activates pepsin to split proteins. Strong contractions grind food until particles are under 2 millimetres, forming a liquid called chyme."
Station 3: Absorption in the small intestine. Snip a 1-centimetre corner off the bag. Squeeze the chyme into the stocking held over the tray, and stroke the fabric downward. Liquid drips immediately into the tray.
*What to say:* "In your body, the small intestine is about 5 metres long. While older books compared its lining to a tennis court, morphometric research by Helander and Fändriks (2014) shows that microvilli expand its surface area to roughly 30 square metres—about half a badminton court. The dripping fluid represents nutrients passing through intestinal walls into the blood."
Station 4: Compacting waste in the colon. Squeeze remaining solid mass into the perforated cup. Push the base of the second cup downward to press solids through the hole.
*What to say:* "Undigested fibre passes into the large intestine, which reclaims extra water and compacts waste for excretion."
What does the kitchen model explain, and where does it stop?
Physical models make complex ideas intuitive, but scientific literacy also requires understanding where simple models stop.
In this demonstration, vinegar provides acidity, but it lacks the pancreatic enzymes and liver bile that break down dietary fats. Furthermore, nylon stockings act as a simple passive filter, whereas intestinal cells rely on active molecular transport pumps, as explained in our Class 7 guide to digestion and life processes. Historically, discovering how muscular motion and chemical secretions work together took decades of clinical inquiry, highlighted by William Beaumont's direct observations of gastric juices inside a living stomach.
When your child finishes the hands-on demonstration and asks how real digestive enzymes dock onto nutrient molecules, the Fermi Simulation Lab provides interactive simulations for ideas that are easier to see than to read. For older students connecting these kitchen models to school curricula, the Fermi Concept Library maps every concept in physics, chemistry, biology, mathematics and computing, each with its own lesson and its place in the map.