On this page
Drawing a ray diagram is a classic way to predict where an image will form. When your lines do not meet where they should, it is tempting to just look at the textbook answer and copy it. You might erase your sketch, trace the exact lines from the book, and assume you have understood the physics. However, the next time you sit down to solve a problem, the same confusion often returns.
Describing your drawing to an AI tutor is a better approach. By explaining the physical setup and the path of each ray in words, you force yourself to actively check the rules. The AI can point out which ray is wrong without handing you the complete drawing, leaving you to correct the diagram yourself. This method transforms a frustrating drawing exercise into an active learning session.
Why do students struggle with ray diagrams?
Students often struggle with optics because they memorise the rules for drawing lines without understanding the physical reality behind them. When a diagram is just a collection of arrows, it is easy to draw a line that disobeys the laws of physics simply to force an intersection.
In one 1987 study published in the *American Journal of Physics*, researchers found that 75% of calculus-based physics students mistakenly believed that covering half a converging lens would make half of the image disappear (Goldberg and McDermott, 1987). Even after completing a university optics course, more than half of the students still held this misconception.
The researchers noted that students frequently treat the "special rays" used in diagrams as the *only* rays that form the image. In reality, an infinite number of light rays travel from every single point on the object, passing through every part of the lens to form the image. The standard rays you draw are simply the easiest ones to trace using basic geometry. When you treat the diagram as a mere drawing exercise rather than a physical model of light, you are much more likely to guess the paths of the lines when you get stuck. You forget that each line represents a real path that light takes through space.
What are the three standard rays?
Whether you are plotting concave mirror images for all six object positions or figuring out why a lens's object and real image are at least 4f apart, you only need to draw two of the three standard rays to locate the image. We choose these three specifically because their reflection or refraction paths are mathematically predictable without needing a protractor.
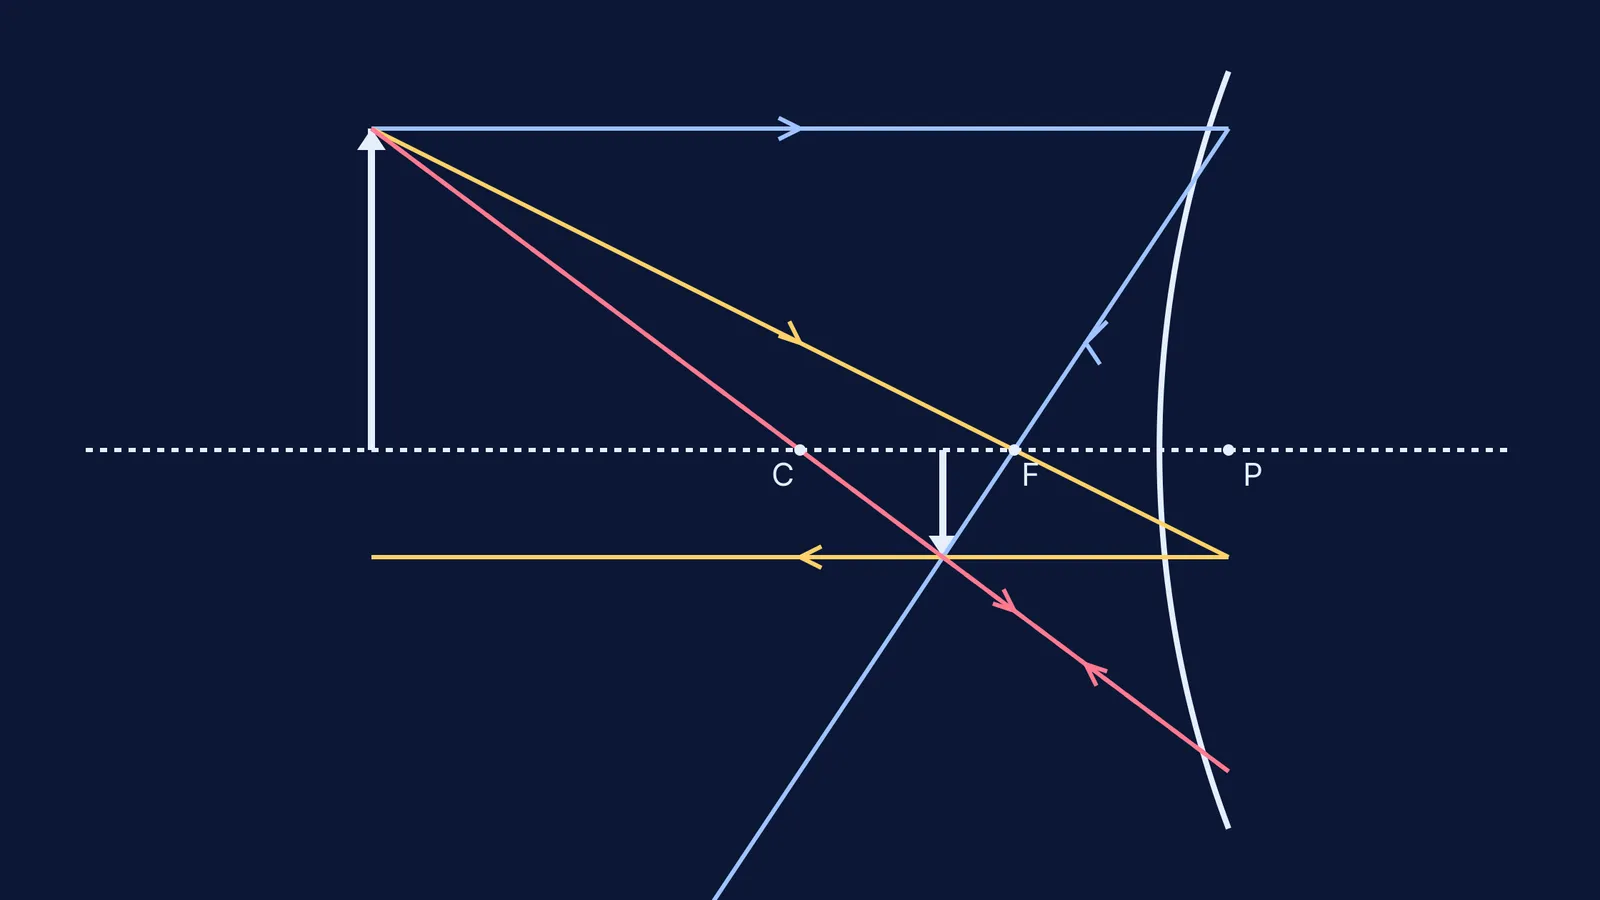
The parallel ray: A ray travelling parallel to the principal axis will reflect (or refract) through the principal focus (F). For a diverging lens or convex mirror, it will appear to diverge from the virtual focus. This ray is useful because it relies on the definition of the focal point itself.
The focal ray: A ray passing through the principal focus will reflect (or refract) parallel to the principal axis. This is the exact reverse of the parallel ray, taking advantage of the principle of reversibility of light.
The central ray: A ray passing through the centre of curvature (C) of a mirror reflects straight back along its own path, because it strikes the surface at a normal angle. For a lens, a ray passing through the optical centre continues straight through without bending.
If your drawn rays do not intersect at a single distinct point, at least one of these rules has been broken. The intersection is not just a mathematical convenience; it is the physical location where the light rays converge to form a sharp image.
How can an AI check my ray diagram description?
When a diagram goes wrong, the fastest way to check it is often the worst way to learn: turning to the back of the book. Alternatively, you might take a photo of your messy sketch and ask an AI, "Is this right?" but this bypasses the critical thinking required to spot your own mistake.
Instead, describe the setup and your logic to Fermi's AI tutor.
To get the most out of the AI check, tell the tutor exactly where the object is located relative to the focus and the centre of curvature. Then, describe the journey of each ray you drew, from the object to the mirror or lens, and where it went after. The tutor holds a line of reasoning across a session, noticing where you are stuck and deciding whether to explain, ask or show. It works out what you know and builds a plan to help you fix your own logic.
A worked example: spotting the mistake
Translating your drawing into a script is highly effective. Here is a specific example of what you might type to the tutor when checking your work:
> "I am drawing a concave mirror with an object placed between C and F. > Ray 1 starts at the top of the object, goes parallel to the axis, and reflects through F. > Ray 2 goes through C and reflects back along the same path. > Ray 3 hits the pole of the mirror and reflects parallel to the principal axis. > My lines are not meeting perfectly. Which of these rays is wrong?"
Because you provided the reasoning rather than just lines on a page, the AI can pinpoint the exact conceptual misconception without spoiling the final picture. In the script above, it will tell you that Ray 3 is incorrect: a ray striking the pole reflects at the same angle it arrived, meaning the angle of incidence equals the angle of reflection. It does not reflect parallel to the axis unless it originated from the focus.
Armed with this specific feedback, you can return to your paper, erase the single wrong line, and redraw the image correctly. This active correction builds the deep conceptual understanding you need for your final exams. You learn not just which line was wrong, but the physical rule that governs its true path.