

On this page
Drawing the ray diagram for a triangular glass prism is a staple of high school physics practicals. However, when it comes time to trace the rays and mark the angle of deviation (δ), small physical slips often turn into massive errors on the graph.
Whether you are performing the Class 10 dispersion practical or plotting the full i-δ curve for Class 12, physical precision is everything.
Here is exactly how to pin the board, trace the rays, and draw the angle of deviation without losing marks.
How to set up the drawing board?
Before you pick up a pencil, your physical setup must be completely rigid. A loose paper will ruin the geometry of your incident and emergent rays.
Fix the paper: Place a clean, white sheet of paper on a soft wooden drawing board. Pin all four corners securely using drawing pins so the paper lies entirely flat without any wrinkles.
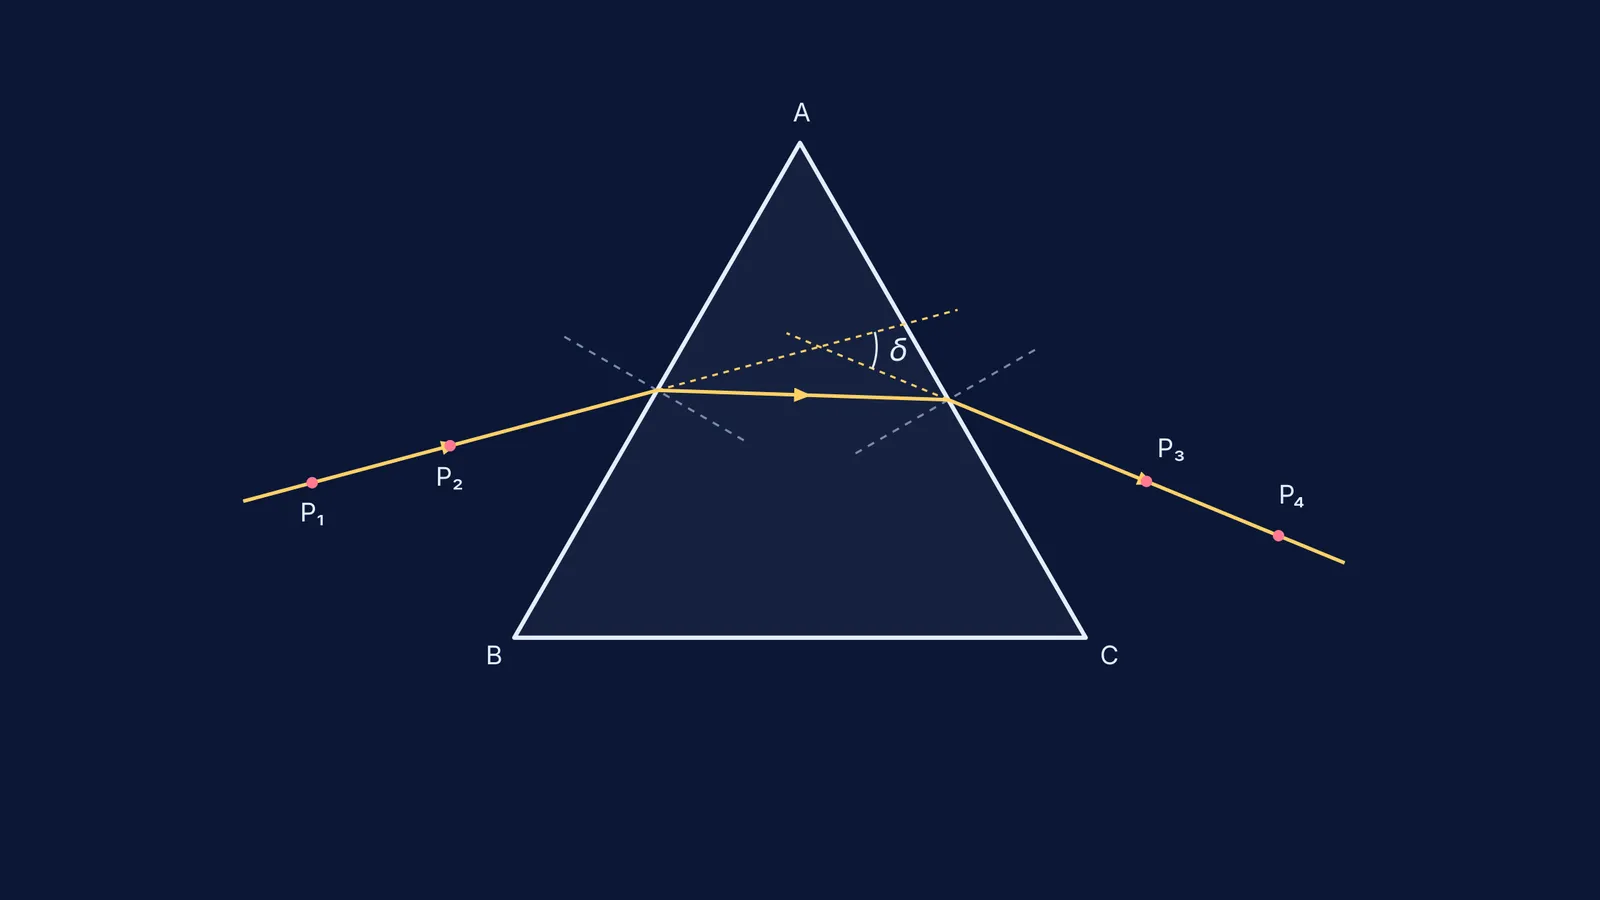
Trace the boundary: Place the triangular glass prism flat on the paper. Use a sharp pencil to trace its boundary (ABC).
Keep it steady: Once you trace the prism, do not move it. If you bump the prism mid-experiment, you must erase your lines and start over, as the angles will no longer align with your original boundary.
How to draw the incident and emergent rays?
The biggest mistake students make happens before they even look through the glass. It comes down to pin placement.
Draw the normal: On the left refracting face (AB), mark a point Q roughly in the middle. Use a protractor to draw a dashed normal line, perfectly perpendicular (90°) to the surface at Q.
Mark the angle of incidence (i): Use your protractor to draw an incident ray making your chosen angle with the normal. Standard lab manuals recommend choosing angles between 35° and 60°.
Place the first two pins (P₁ and P₂): Fix two office pins vertically on this incident ray. Crucially, NCERT guidelines recommend placing them at least 5 cm apart. If the pins are too close, a tiny millimeter error in your line of sight will drastically skew the ray's angle.
Locate the emergent ray: Look through the opposite right face (AC). You will see the refracted images of P₁ and P₂ inside the glass. Fix two new pins (P₃ and P₄) on the paper so they perfectly cover the images of the first two. Again, keep P₃ and P₄ at least 5 cm apart.
What happens inside the glass prism?
When the incident light ray enters the glass at point Q, it moves from a rarer medium (air) to a denser medium (glass). This change in refractive index forces the light to bend towards the normal.
The ray travels through the prism and strikes the second face (AC) at point R. As it exits back into the air, it moves from a denser medium to a rarer medium, bending away from the normal. The total change in direction caused by these two refractions is what we measure as the deviation.
At the specific angle of minimum deviation, the ray traveling inside the glass prism is perfectly parallel to its base (BC).
How to measure the angle of deviation?
Once your four pins are set perfectly, remove the prism and the pins. You now have two points defining your incident ray (P₁, P₂) and two defining your emergent ray (P₃, P₄).
To find the angle of deviation (δ):
Extend the incident ray: Use a ruler to draw a straight, dashed line extending the incident ray forward, completely past the right face of the prism.
Extend the emergent ray backwards: Draw a dashed line extending the emergent ray backwards into the prism until it crosses the extended incident ray.
Mark the angle: The angle where these two dashed lines intersect is the angle of deviation (δ). Measure this interior angle with a protractor.
This geometric process is highly sensitive. If you are comparing your experimental data to the theoretical curve, you can check your expected values using the Fermi Problem Library. By inputting the prism's refractive index and your angle of incidence, Fermi's step-by-step solver will calculate the exact deviation you should have measured, helping you spot where your drawing went wrong.
Where do students lose marks?
Examiners frequently deduct marks for the same avoidable drawing errors. Use this checklist before handing in your sheet:
Arrowheads are missing: A line without an arrowhead is just a line, not a ray of light. Always draw arrows indicating the direction of travel on the incident, refracted, and emergent rays.
Thick pencil lines: Use a hard, extremely sharp pencil (like an H or 2H). Thick, blunt lines create uncertainty when aligning your protractor, introducing an angular error.
Incorrect normal measurement: Students often mistakenly measure the angle of incidence from the flat surface of the prism rather than the dashed normal line.
Pins too close: As noted by NCERT guidelines, placing pins closer than 5 cm makes it impossible to draw a mathematically accurate line, especially when plotting a sensitive deviation vs incidence graph.
Mastering this drawing is largely about patience and physical precision. Much like tracing a ray through a glass slab, taking the extra time to align your pins perfectly will yield a flawless angle of deviation every single time.


