

On this page
The excitement of a solar eclipse often leads to a dangerous temptation: looking straight at it. However, directly viewing the sun without protection can cause severe and permanent eye damage. Whether you are helping your children experience this astronomical event safely or reviewing optics for your own exams, understanding the science behind safe viewing is essential.
What is solar retinopathy and why is it painless?
Looking at the sun exposes your eyes to intense visible light, particularly blue light, which triggers a photochemical reaction in the retina. The retina is the light-sensitive tissue lining the back of your eye, and its central area, the macula, is responsible for sharp, detailed vision. When you stare at the sun, the lens of your eye acts like a magnifying glass, focusing that intense energy directly onto the fovea, the very centre of the macula.
A 2018 study published in *JAMA Ophthalmology* by Wu et al. used advanced imaging to show that acute solar retinopathy physically disrupts the photoreceptor layers of the eye (DOI: 10.1001/jamaophthalmol.2017.5517). Unlike a thermal burn on your skin, this photochemical damage is often entirely painless because the retina lacks pain receptors. Symptoms such as blurred vision, a central blind spot (scotoma), and distorted shapes typically appear 4 to 12 hours after the exposure, by which time the damage is already done. There is currently no medical or surgical treatment to reverse solar retinopathy, making strict prevention the only effective strategy.
How to check if your eclipse glasses are ISO 12312-2 certified?
To observe the sun directly, you must use purpose-built solar filters. According to the American Astronomical Society (AAS), standard sunglasses, no matter how dark they appear, are completely useless against the intense ultraviolet (UV) and infrared (IR) rays emitted by the sun.
Safe eclipse glasses must comply with the international ISO 12312-2 standard, which requires the material to transmit only a safely tiny percentage of sunlight and block harmful invisible radiation. When a manufacturer claims their glasses are certified, it means the filters have been tested in an accredited laboratory to ensure they reduce sunlight to a safe, comfortable level. Before you use a pair of eclipse glasses, perform a simple indoor check:
The indoor test: Put the glasses on inside your house. You should not be able to see anything except perhaps the faint glow of an extremely bright bare lightbulb. If you can see ordinary furniture or household lights, the glasses are not safe.
The physical check: Discard any glasses that have scratched, torn, or punctured lenses.
The optical rule: Never look at the sun through an unfiltered camera lens, telescope, or binoculars while wearing eclipse glasses. The concentrated solar energy will instantly melt the filter and cause catastrophic eye injury.
How does a pinhole projector work?
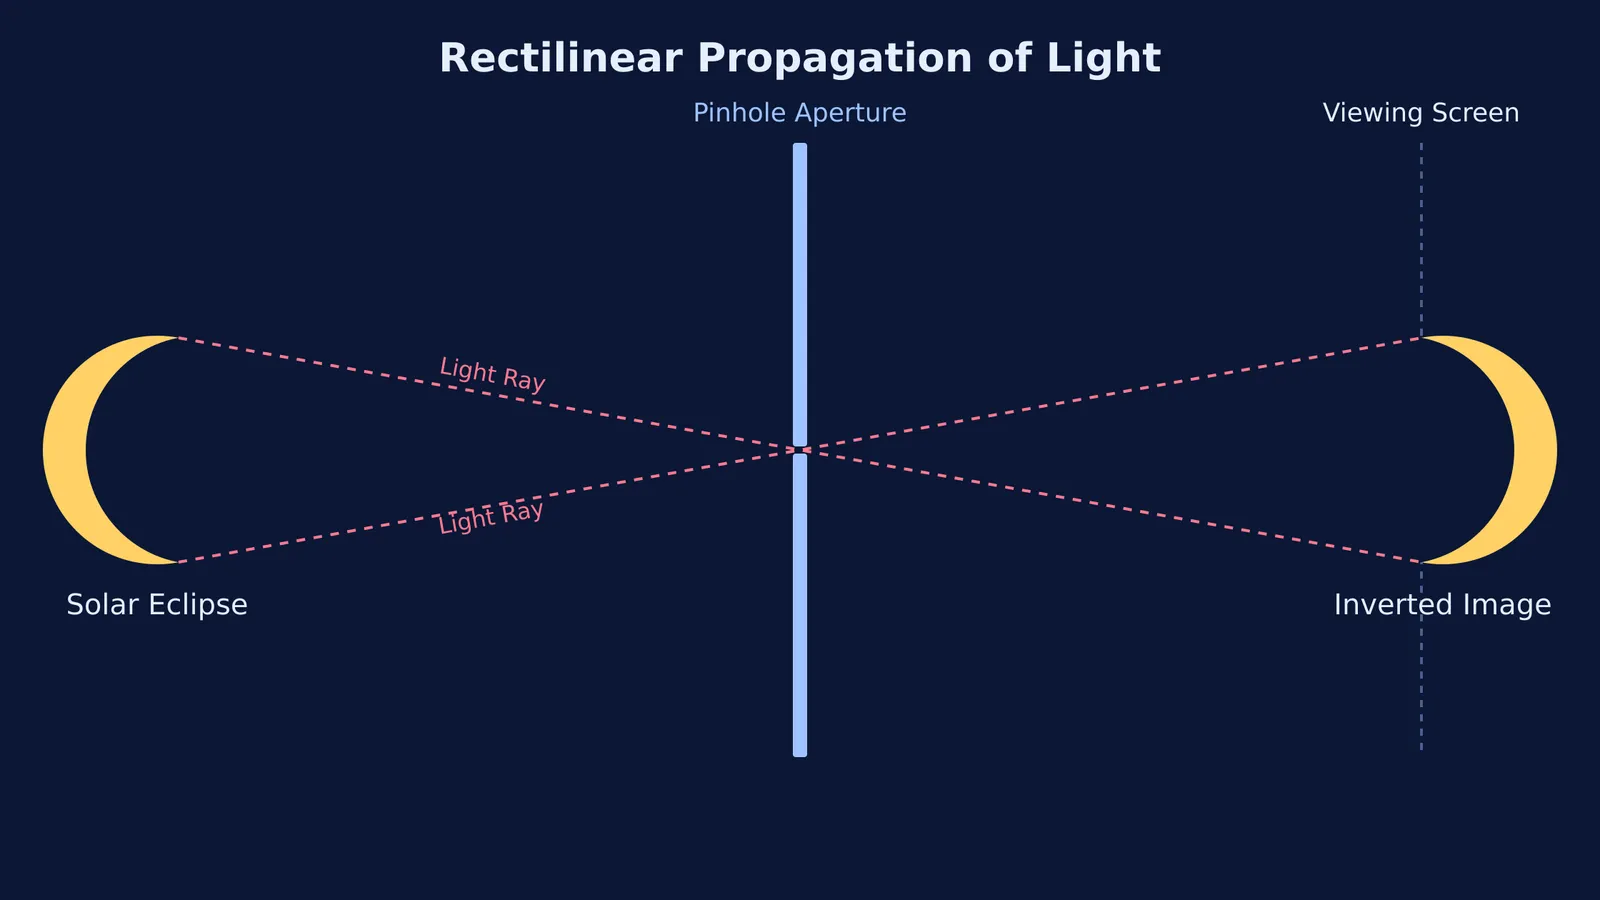
If you do not have access to certified eclipse glasses, indirect viewing is the safest method. A pinhole projector relies on a fundamental principle of physics taught in schools: the rectilinear propagation of light.
Because light travels in straight lines, rays from the top of the sun pass through a small hole and strike the bottom of a screen, while rays from the bottom of the sun strike the top of the screen. This geometric crossing creates a perfect, inverted image of the eclipse on the viewing surface. You can explore Shadows, mirrors and pinhole cameras in Class 7 science to see how early optics rely on this simple geometry. If your child struggles to visualise how these intersecting light rays flip an image upside down, they can explore interactive simulations for ideas that are easier to see than to read in the Fermi Simulation Lab.
How to build a simple pinhole projector:
Take two pieces of stiff white cardboard.
Pierce a smooth, round hole in the centre of one piece using a pin or a needle.
Stand with your back to the sun.
Hold the pierced card up so sunlight falls onto it, and position the second, intact card a few feet away to act as your screen.
Adjust the distance between the two cards until a crisp, inverted image of the eclipsed sun appears.
The sharpness of the projected image depends on the size of the pinhole. A smaller hole produces a crisper image because it restricts the light rays to a narrower path, preventing them from overlapping and blurring on the screen. However, a smaller hole also makes the image dimmer. Moving the screen further away from the pinhole will increase the size of the projected sun, giving you a better view of the moon's progress across the solar disc.
This safe, hands-on experiment perfectly demonstrates Light in Class 10: reflection, refraction and the lens formula without risking your eyesight. To dig deeper into why these astronomical events occur in the first place, review Why seasons and eclipses happen: Class 7 Earth, Moon and Sun.


