

On this page
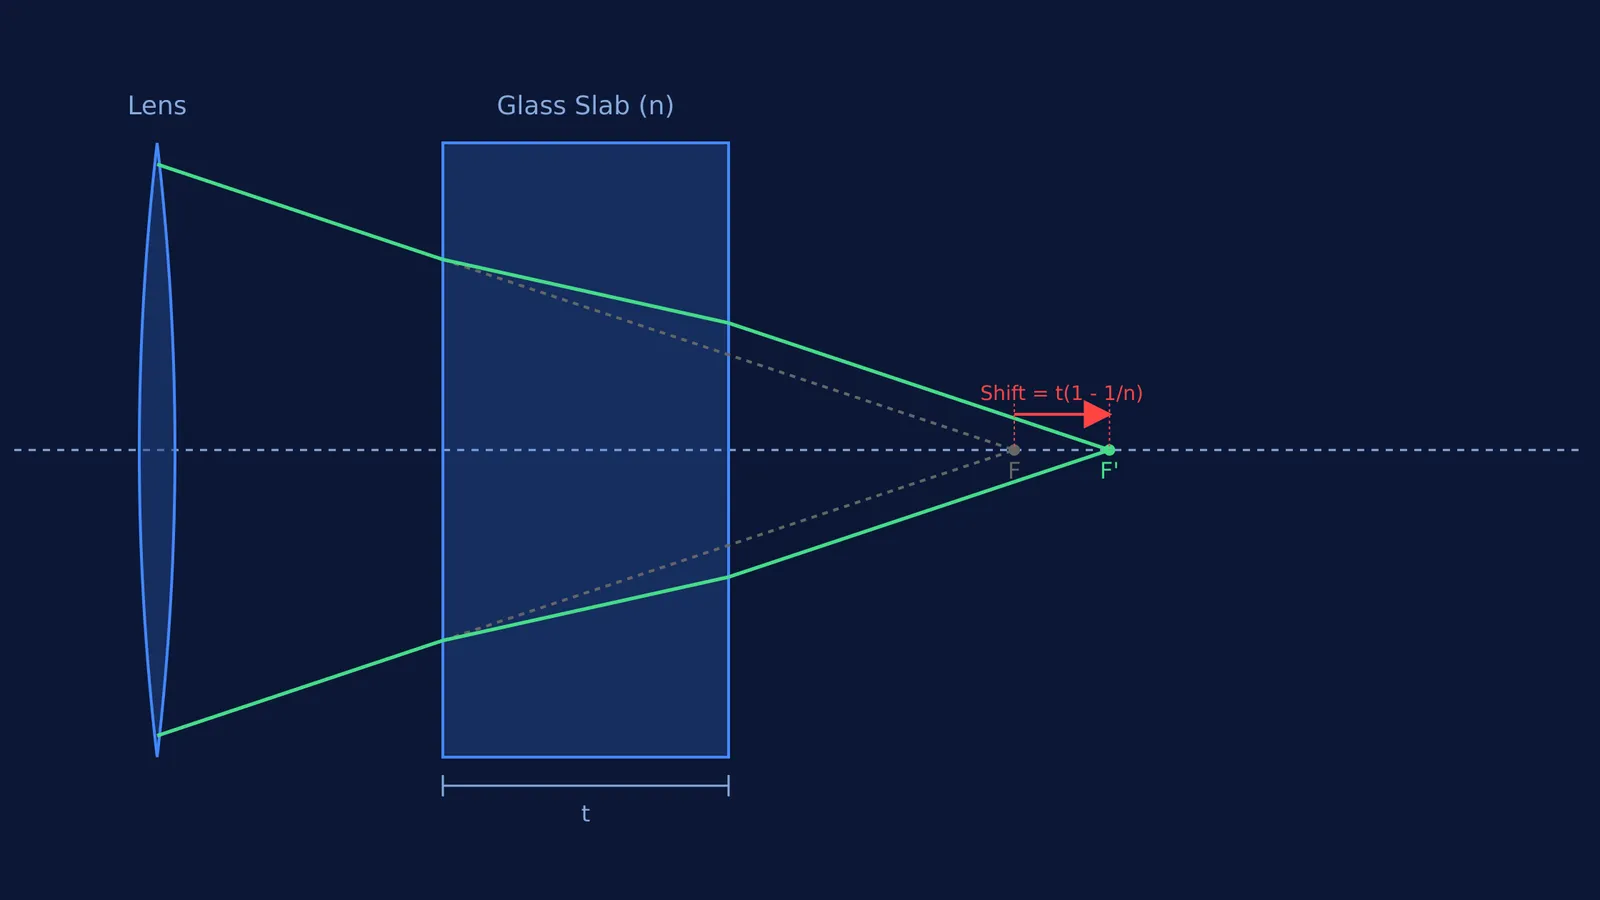
You have set up an optics experiment. A convex lens forms a sharp, real image of an object on a screen. But what happens if you place a rectangular glass slab in the path of the converging rays, between the lens and the screen? The image on the screen becomes blurred. The glass slab has shifted the point where the light rays meet, forcing you to move the screen to catch the image again.
Why does the image shift when a glass slab is placed?
When light rays travel from air into a denser glass slab, they slow down and bend towards the normal, and when they exit, they bend away from the normal to resume their original angle.
If you trace a single ray of light passing through the glass slab, you will notice that it does not change its final direction. The ray emerging from the slab is perfectly parallel to the ray that entered it. However, it has suffered a lateral displacement, meaning it has been stepped sideways.
Because the lens produces a cone of converging rays, every ray in that cone gets stepped slightly outward, away from the principal axis. The upper rays are stepped upwards, and the lower rays are stepped downwards. Since the entire cone of light has been widened by the glass slab, the rays now require more distance to converge to a single point. As a result, they need to travel further along the principal axis before they finally meet. The point of convergence, and therefore the sharp image, moves away from the lens.
How much does a glass slab shift the image?
The displacement of the image along the principal axis is known as the normal shift. When a glass slab of thickness *t* and refractive index *n* is placed in the path of light, it produces a normal shift given by the formula *t*(1 − 1/*n*).
This formula tells us two things. First, a thicker slab (larger *t*) produces a larger shift. Second, a denser glass (larger *n*) also increases the shift. To get a sharp image again, you must move the screen away from the lens by this exact distance.
What happens with multiple glass slabs?
In advanced optics problems, you might encounter a setup where two or more glass slabs are placed next to each other in the path of the converging rays. When multiple slabs are present, they act independently as long as their faces are parallel, obeying Snell's law at every boundary.
To find the new image position in a multi-slab system, you simply calculate the shift for each slab and add them together. For example, if you place a slab producing a 1 cm shift next to a slab producing a 2 cm shift, the total normal shift is 3 cm. The overall shift formula becomes the sum of the individual shifts.
This additive property makes complex optical arrangements much easier to handle. Instead of recalculating the angles at every single boundary, you can follow these steps:
Find the position of the original image formed by the lens as if no slabs were present.
Calculate the normal shift for each glass slab individually.
Sum the individual shifts to find the total normal shift.
Move the final image position away from the lens by this total distance.
A worked example
Suppose a convex lens forms a real image of a point object on a screen at a distance of 50 cm. You place a glass slab of thickness 3 cm and refractive index 1.5 between the lens and the screen. Where should you move the screen to refocus the image, as predicted by the laws of refraction?
The shift produced by the slab is: Shift = 3 × (1 − 1/1.5) Shift = 3 × (1 − 2/3) Shift = 3 × 1/3 = 1 cm
Because the slab pushes the focal point further away, the new image forms 1 cm behind the original position. You must move the screen to 51 cm from the lens. This principle is a step up from tracing a ray through a glass slab in Class 10, and it helps when tackling harder JEE problems like tracing the image through both a lens and a mirror.
How Fermi helps you see it
Ray optics problems can be hard to visualise when you only have a static textbook diagram. If you need to review the rules of refraction before starting, the Fermi Concept Library explains them from the ground up. Then, the Fermi Simulation Lab lets you drag and drop lenses and glass slabs to see the light paths bend in real time.
When you are ready to apply these concepts to multiple optical elements, the Fermi Problem Library breaks them down step by step. And if you get stuck on why a formula works, Fermi's AI tutor will walk you through the geometry behind the shift, checking your understanding as it goes.


