

On this page
In school biology examinations, from CBSE Class 10 practicals to senior entrance tests, examiners consistently ask students to sketch, label, and explain a germinating dicot seed such as a red kidney bean (*Phaseolus vulgaris*) or Bengal gram (*Cicer arietinum*). Scoring full marks requires understanding why embryonic organs emerge in a strict sequence, how nutrients support growth, and how gravitropism directs the young seedling.
What are the key parts of a germinating bean seed?
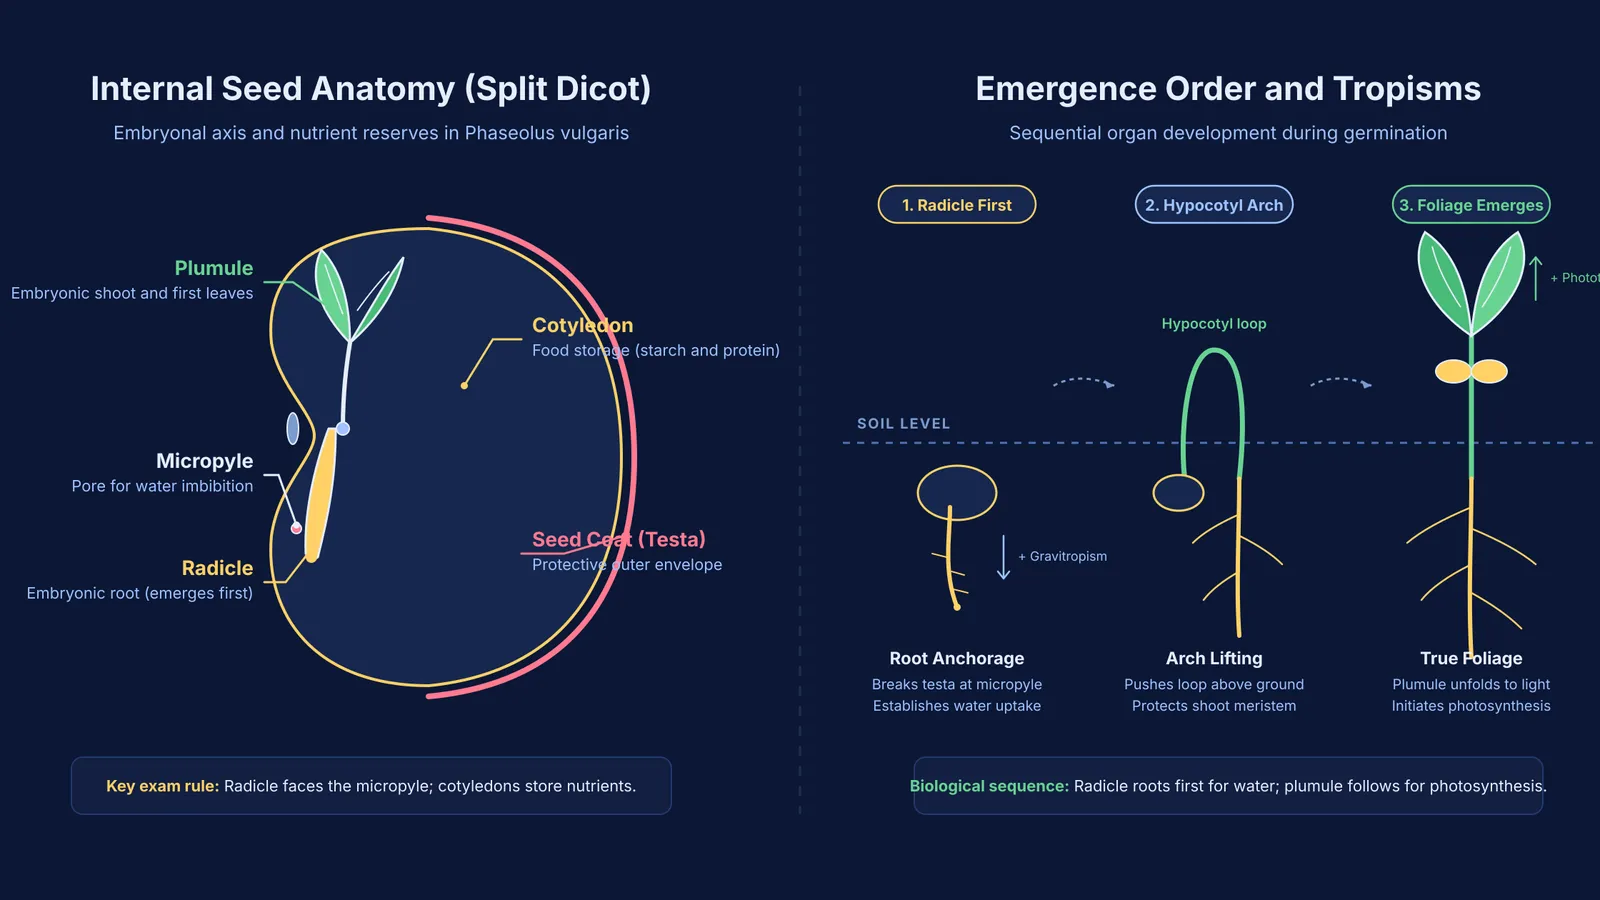
A mature bean seed is non-endospermic (exalbuminous). Rather than retaining a separate endosperm like maize, the embryo stores its nutrients directly in two fleshy cotyledons during seed development, as outlined in the NCERT Class 10 Science textbook (Chapter 7).
Splitting a soaked bean seed reveals four core structures:
Seed coat (testa and tegmen): The protective covering developed from ovule integuments. The thick outer layer is the testa; the delicate inner membrane is the tegmen. On the concave edge lie the hilum (attachment scar) and the micropyle, a pore admitting water and oxygen.
Cotyledons: Two fleshy, kidney-shaped halves storing starch and protein reserves that sustain growth until the seedling develops true leaves.
Radicle (embryonic root): The conical lower terminus of the embryonal axis pointing toward the micropyle, which develops into the primary taproot.
Plumule (embryonic shoot): The delicate apical terminus above the cotyledonary node, bearing folded embryonic leaves that form the shoot and photosynthetic foliage.
Mastering these four labels is essential when practising CBSE Class 10 science diagrams to practise and label. To review how plant anatomy fits into the wider curriculum, the Fermi Concept Library maps every concept across school biology, showing where embryo development connects to plant reproduction and hormonal signalling.
Why does the radicle emerge before the plumule?
In every viable seed, the radicle emerges through the seed coat before the plumule shows upward growth. In a foundational review in *The Plant Cell*, J. Derek Bewley (doi:10.1105/tpc.9.7.1055) defined germination *sensu stricto* as the physiological window beginning with imbibition and ending with radicle protrusion.
Three physiological mechanisms explain why the root emerges first:
Hydraulic security: Cotyledons lack free water, and shoot expansion requires turgor pressure. The radicle enters soil first to absorb moisture before leaves face desiccation.
Mechanical anchorage: Pushing a shoot upward through soil requires a downward anchor. The radicle secures the seedling so the elongating hypocotyl can lift the shoot.
Directional growth: The radicle displays positive gravitropism downward, while the shoot shows negative gravitropism and phototropism, as covered in tropic movements in plants for Class 10.
Biomechanical research by Tina Steinbrecher and Gerhard Leubner-Metzger in the *Journal of Experimental Botany* (doi:10.1093/jxb/erw428) shows that radicle emergence requires the embryo's growth potential to overcome the puncture resistance of enclosing seed tissues. Studies by William E. Finch-Savage and Gerhard Leubner-Metzger in *New Phytologist* (doi:10.1111/j.1469-8137.2006.01787.x) confirm that declining abscisic acid releases dormancy, allowing gibberellins to trigger cell wall-loosening enzymes that weaken the micropylar coat.
How can you dissect and observe seed embryo parts at home or in the lab?
Observing seed embryo parts is a standard laboratory practical in the CBSE Academic curriculum. You can perform this dissection with kitchen legumes:
Hydration: Soak dry seeds of Bengal gram (*chana*) or kidney bean (*rajma*) in water overnight. Water enters through the micropyle, initiating imbibition.
Incubation: Drain the water, wrap seeds in a moist cloth, and keep them in a warm spot for a day to initiate respiration.
Peeling the testa: Using forceps or fingernails, gently peel away the softened outer seed coat starting near the hilum.
Splitting cotyledons: Pry the two fleshy cotyledon halves open along their natural seam.
Observing the axis: Use a hand lens to find the embryonal axis attached to one cotyledon. Note the downward-pointing radicle and upward-folded plumule.
What mistakes do students make in board exam seed diagrams?
In board examinations, seed diagrams frequently appear as evaluation questions in the chapter on how organisms reproduce in Class 10. Examiners note several common errors:
Inverting radicle and plumule labels: Point the plumule arrow to the leafy shoot apex, and the radicle arrow to the smooth conical root tip.
Misidentifying cotyledon function: Marking cotyledons as photosynthetic inside a dormant seed loses marks; before sprouting, they serve strictly for food storage.
Detached axis drawing: Drawing the plumule and radicle as detached floating structures rather than continuous poles of a single embryonal axis loses marks.
Confusing monocot and dicot features: Drawing a single shield-shaped scutellum for a bean seed confuses monocot grass anatomy with dicot anatomy, as contrasted in NCERT Class 11 Biology (Chapter 5).
If you want step-by-step guidance on questions testing directional plant growth, the Fermi Problem Library has worked problems with a step-by-step solver that explains the reasoning rather than just printing an answer. Practising with clear diagrams ensures full marks on both practicals and theory papers.


