

On this page
Most students memorise the convex lens table as six unrelated rows. You don't have to: once you see that the image moves away from the lens as the object moves towards it, the table follows from two landmark points.
What image does a convex lens form for each object position?
Everything below follows Table 9.4 of NCERT Class 10 Science, Chapter 9: Light, Reflection and Refraction. F1 and 2F1 are on the object's side of the lens, F2 and 2F2 on the other side, and O is the optical centre.
Object at infinity: image at F2, highly diminished (point-sized), real and inverted.
Object beyond 2F1: image between F2 and 2F2, diminished, real and inverted.
Object at 2F1: image at 2F2, same size, real and inverted.
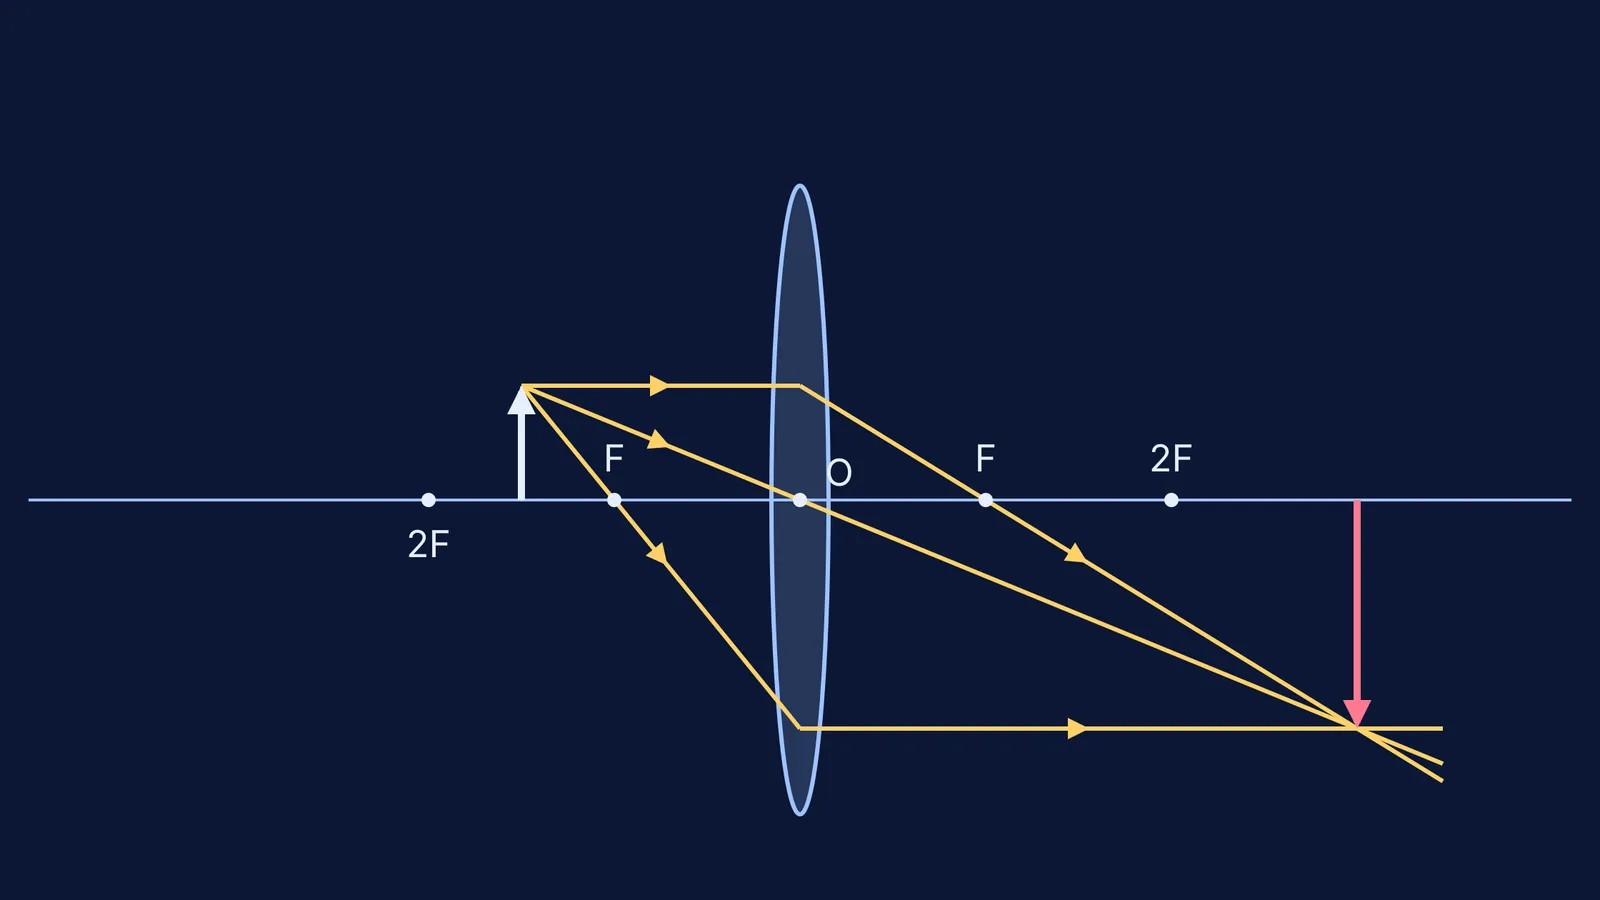
Object between F1 and 2F1: image beyond 2F2, enlarged, real and inverted.
Object at F1: image at infinity; NCERT's table says an image would not be formed.
Object between F1 and O: image on the same side as the object, enlarged, virtual and erect. This is the magnifying glass case.
If you have already learnt the six positions for a concave mirror, the rows match almost line for line, except that a lens forms real images on the far side.
How do you draw the ray diagram for each position?
NCERT says you need any two of three rays (Chapter 9, section 9.3.5):
A ray parallel to the principal axis passes through F2 after refraction.
A ray through F1 comes out parallel to the principal axis.
A ray through the optical centre O goes straight on without deviation.
For positions 2 to 4, draw the parallel ray and the ray through O from the top of the object; where they cross on the far side is the top of the image. For position 1, the incoming rays are already parallel to the axis, so they converge to a point at F2. For position 5, the rays leave parallel and never meet. For position 6, they spread apart, so extend them backwards with dotted lines until they meet on the object's side: that is the top of the virtual image.
If you find it hard to picture how the image slides as the object moves, the Fermi Simulation Lab has interactive simulations for ideas that are easier to see than to read.
Is there a pattern that makes the table easy to remember?
Yes. Remember two landmarks and one rule.
2F is the balance point. Object at 2F1 gives an image at 2F2 of the same size. Farther than 2F1 means a smaller image; nearer means a bigger one.
F is the switch. Beyond F1 every image is real and inverted. At F1 the image runs off to infinity. Inside F1 it flips to virtual and erect.
The rule: as the object walks in, the image walks out and grows. Move the object from infinity towards F1 and the image moves from F2 out towards infinity, getting bigger all the way.
Worked example: one lens, five object distances
Here is the pattern checked with numbers. We use NCERT's lens formula, 1/v − 1/u = 1/f, and magnification m = v/u, with distances measured from O and object distances negative (NCERT Chapter 9, section 9.3.7). Take a convex lens with f = +10 cm, so F is at 10 cm and 2F at 20 cm.
u = −30 cm (beyond 2F1): 1/v = 1/10 − 1/30 = 1/15, so v = +15 cm and m = −0.5. Real, inverted, half size, between F2 and 2F2.
u = −20 cm (at 2F1): v = +20 cm, m = −1. Real, inverted, same size, at 2F2.
u = −15 cm (between F1 and 2F1): v = +30 cm, m = −2. Real, inverted, twice the size, beyond 2F2.
u = −10 cm (at F1): 1/v = 0, so the image is at infinity.
u = −5 cm (inside F1): 1/v = 1/10 − 1/5 = −1/10, so v = −10 cm and m = +2. Virtual, erect, twice the size, on the object's side.
Read v top to bottom: 15, 20, 30, infinity, then negative. The object moved in and the image ran out to infinity, then jumped sides. Negative m means inverted, positive m means erect.
To practise the same steps on fresh numbers, the Fermi Problem Library has worked problems with a step-by-step solver that explains the reasoning rather than printing an answer.
What mistakes cost marks in convex lens ray diagrams?
No arrows on rays. Every ray needs a direction arrow, pointing away from the object.
Solid lines for virtual rays. The backward extensions in position 6 must be dotted.
Unlabelled points. Mark O, F1, F2, 2F1 and 2F2, and label the object and image (AB and A′B′).
Wrong side for real images. A lens forms real images on the far side, not in front like a mirror.
For the rest of the chapter, see our guide to light, reflection and refraction for Class 10, and for the practical, how to find the focal length of a convex lens.


