

On this page
Drawing the transverse section (T.S.) of a young anther is a staple of board exams and a foundation for NEET biology. A clear, correctly labelled diagram shows the examiner that you understand how a plant prepares to produce pollen.
Here is a step-by-step guide to drawing the T.S. of an anther accurately, avoiding the common mistakes that cost marks.
What is the shape of a young anther?
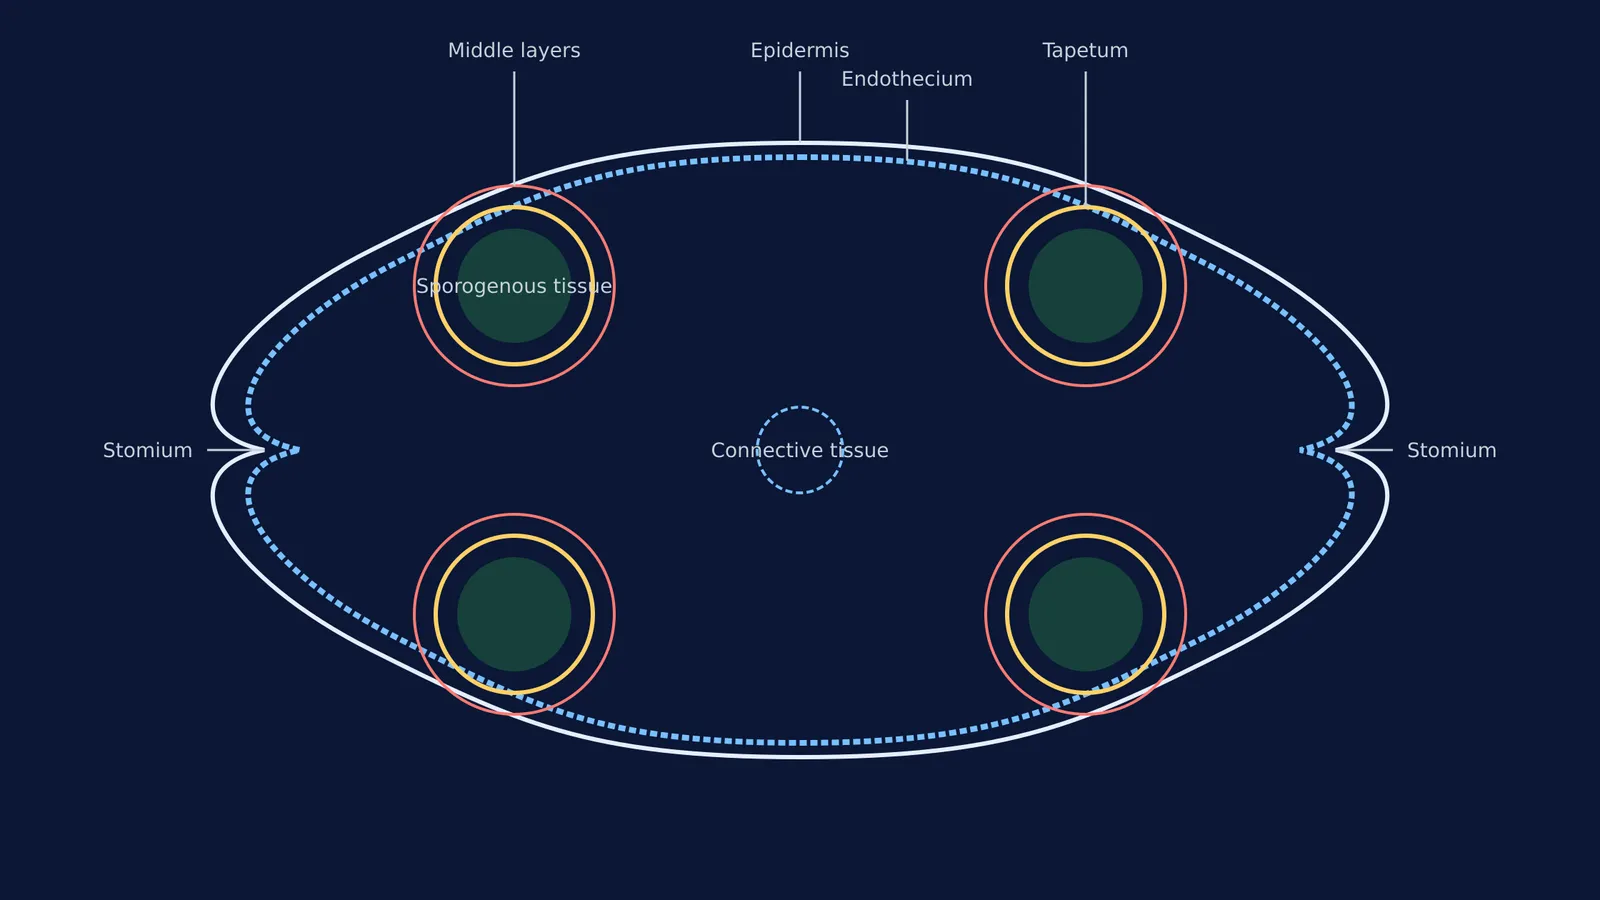
According to botanical structural descriptions of the microsporangium, a typical angiosperm anther is bilobed (has two lobes) and dithecous (each lobe has two thecae or chambers). This means the transverse section is a four-sided (tetragonal) structure consisting of four microsporangia located at the corners.
A common mistake is drawing a circle or an uneven number of lobes. Start your diagram by lightly sketching a "butterfly" outline with a shallow groove on the top and bottom, and a deeper groove on the left and right sides. Place four circular regions in the corners to represent the microsporangia. The precision of your initial outline sets the standard for the rest of the diagram.
What are the 4 wall layers of the anther?
The wall layers protect the developing pollen and help the anther split open (dehisce) at maturity. A frequent error is mixing up their order or drawing them with identical cell structures. Draw and label them in this exact sequence from the outside in:
Epidermis: This is the single outermost protective layer. Draw this as a continuous, thin outline around the entire anther. It serves as the primary barrier against environmental stress.
Endothecium: The layer just below the epidermis. In your diagram, show this as a distinct layer inside the epidermis. Its cells develop alpha-cellulose fibrous thickenings, which absorb water and create tension, helping the mature anther to rupture.
Middle Layers: One to three layers of cells located directly beneath the endothecium. These layers are ephemeral and often break down as the anther matures, providing early structural support. Draw them relatively thin.
Tapetum: The innermost wall layer enclosing the microsporangium. Its sole purpose is to nourish the developing pollen grains. When drawing tapetal cells, remember that they possess dense cytoplasm and generally have more than one nucleus (they are multinucleate). Represent this layer distinctly from the outer three, often with prominent nuclei in your sketch.
Examiners and NTA NEET questions frequently test this division of labour: the outer three layers (epidermis, endothecium, and middle layers) perform the function of protection and facilitate dehiscence, while the tapetum alone provides the vital nutrition for pollen development.
What goes in the centre of the anther?
Inside the tapetum of a young anther, you must draw a group of compactly arranged homogenous cells called the sporogenous tissue. As the anther develops, these cells will undergo meiosis to form microspore tetrads in a process called microsporogenesis, which shapes the pollen grain. It is a major conceptual error to label this central mass as "pollen grains" in a *young* anther diagram. Pollen grains only appear after meiosis is complete and the anther has matured.
In the very centre of the anther, between the two lobes, draw a small circular region and label it the connective tissue. This area houses the vascular bundle containing the xylem and phloem that supply essential water and nutrients to the growing anther.
Finally, you must clearly indicate the stomium (the line of dehiscence). This is located at the deep lateral grooves where the two microsporangia of a single lobe meet. This region lacks the thick fibrous endothecium, making it the weakest point where the anther will eventually split to release pollen to the wind or to pollinators.
How should you practise drawing biological diagrams?
An active recall approach works much better than simply copying a diagram while looking directly at it. Read the description in the Fermi Concept Library to fix the geometry and anatomical relationships in your mind. Next, close the book and draw the entire structure from memory.
Use the checklist above to mark your own work. Did you draw all four layers in the correct order? Did you put the nutritive tapetum on the inside? Does your stomium sit at the correct lateral indentation? Correct your mistakes in a different colour and try again. This method builds the robust neural pathways needed to reproduce the complex diagram swiftly and flawlessly under the pressure of exam conditions. Once you have mastered the male reproductive structures of the anther, you can apply the exact same memory technique to female reproductive structures, such as megasporogenesis and how the embryo sac forms.


