

On this page
Why does a parallel line reveal the triangle angle sum?
Every middle-school student learns that the interior angles of any triangle add up to 180°, but memorising the rule does not explain why it holds true. If you stare at a bare triangle, the three corners sit isolated from one another. You cannot immediately compare their sizes or combine them because they point in different directions across the plane.
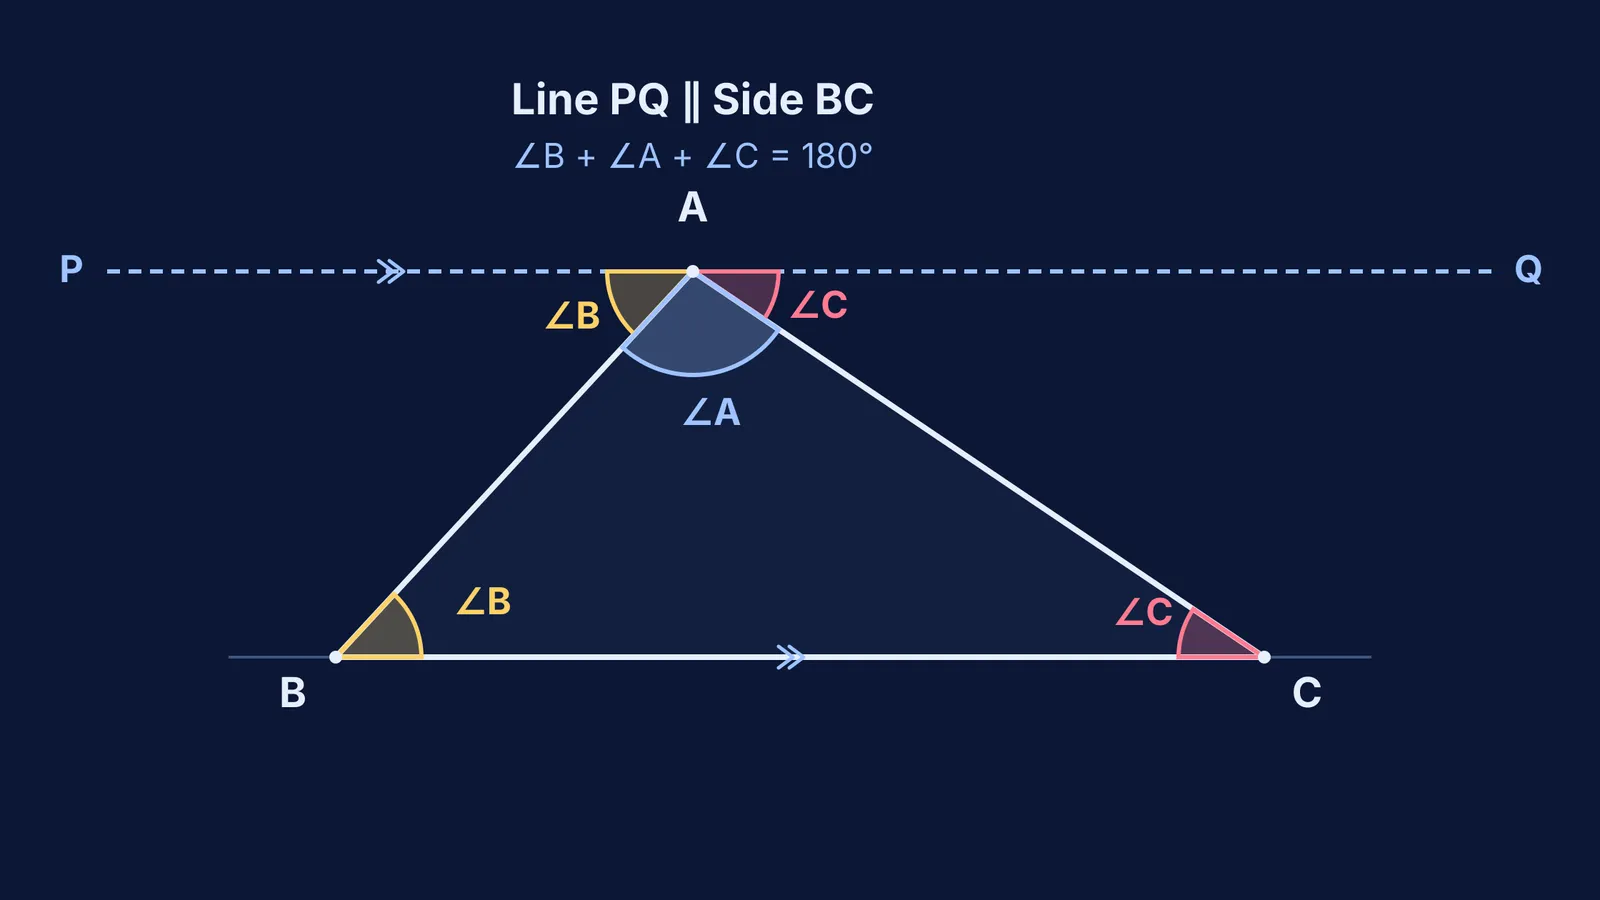
The breakthrough happens when you add an auxiliary line: a straight line drawn through the top vertex parallel to the opposite base. In mathematics education research published in *Educational Studies in Mathematics*, Lianghuo Fan and colleagues (DOI: 10.1007/s10649-017-9772-5) observe that constructing an auxiliary line is a pivotal cognitive step because it creates a bridge that transfers geometric properties into new positions where hidden relationships become visible. Yet students routinely find this step intimidating. In an empirical study of 1,520 secondary school geometry students published in *The Mathematics Teacher*, Sharon L. Senk (DOI: 10.5951/mt.78.6.0448) found that only about 30% reached a 75% mastery level on proof-writing assessments, with 29% unable to write a single proof correctly. Student performance dropped sharply on problems requiring auxiliary constructions because adding an unseen line requires active mathematical reasoning rather than simple pattern recognition.
In the NCERT Class 9 Mathematics curriculum, this construction forms the core of Theorem 6.7 in the chapter on lines and angles. By introducing a parallel line, you pull the triangle's two base angles up to the top vertex, aligning all three angles along a single straight edge.
How do you prove the triangle angle sum step by step?
A geometric proof requires clear notation, an explicit construction, and rigorous justification for every assertion. Here is the formal proof using triangle ABC:
Given: Triangle ABC with interior angles ∠A (or ∠BAC), ∠B (or ∠ABC), and ∠C (or ∠ACB).
To prove: ∠A + ∠B + ∠C = 180°.
Construction: Through vertex A, draw a straight line PQ parallel to side BC.
Step 1 (First alternate interior angle): Line PQ is parallel to line segment BC, and line segment AB acts as a transversal line cutting both parallels. Therefore, the alternate interior angles are equal: ∠PAB = ∠ABC = ∠B.
Step 2 (Second alternate interior angle): Similarly, line PQ is parallel to BC, and line segment AC acts as a transversal. The alternate interior angles must again be equal: ∠QAC = ∠ACB = ∠C.
Step 3 (Angles on a straight line): The rays AP, AB, AC, and AQ meet at vertex A along the straight line PQ. Because the angles forming a linear straight angle sum to two right angles (180°), we have: ∠PAB + ∠BAC + ∠QAC = 180°.
Step 4 (Substitution): Substitute ∠B in place of ∠PAB and ∠C in place of ∠QAC into the straight-line equation: ∠B + ∠BAC + ∠C = 180°, which rearranges to ∠A + ∠B + ∠C = 180°.
This completes the proof. What appeared to be three separate angles scattered around a triangle are proved to be the exact components of a single straight angle.
What are the most common mistakes in geometry proofs?
Students lose marks on this proof not because the algebra is complicated, but because they omit foundational geometric justifications. Three recurring errors appear in exam answers:
Skipping the construction statement: You cannot cite angle ∠PAB without first stating that you have constructed line PQ through vertex A parallel to side BC.
Circular reasoning: Citing the exterior angle theorem without proving it first introduces circular logic, because the standard exterior angle theorem relies on the angle sum property itself.
Confusing transversals: When equating alternate interior angles, always name the transversal. Writing "alternate angles" without specifying that AB connects parallel lines PQ and BC leaves the reasoning incomplete.
How can students practice geometric proofs effectively?
Mastering geometry requires moving from passive reading to constructing arguments independently. When preparing for school examinations or building spatial reasoning for competitive tests, use this practical four-step checklist:
Draw and label the given figure clearly: Mark known angles, parallel segments, and vertices with distinct symbols before writing equations.
State your auxiliary construction early: If the given lines do not connect your angles, ask which vertex can host a parallel line or perpendicular segment to create shared transversals.
Pair every mathematical statement with an axiom: Never write an equality without its geometric justification, such as alternate interior angles, vertically opposite angles, or angles on a straight line.
Verify by testing special cases: Check your completed algebraic identity against an equilateral triangle (60° + 60° + 60° = 180°) or a right-angled isosceles triangle (90° + 45° + 45° = 180°) to confirm consistency.
Building confidence in geometry comes from understanding how each proof links back to first principles. If you encounter unfamiliar theorems or need to review how parallel lines interact with transversals, the Fermi Concept Library covers every concept in physics, chemistry, biology, mathematics and computing, each with its own lesson and its place in the map. When you want to practice proof steps on exam questions, the Fermi Problem Library provides worked problems with a step-by-step solver that explains the underlying reasoning rather than just printing an answer.


